Outseta was specifically designed to help SaaS founders launch products more efficiently by delivering the table stakes functionality that all SaaS products require. This includes things like:
- Registration and payments
- Authentication
- User profiles
- Customer billing portal (self-service subscription management)
- Transactional emails
- Activity notifications
- User engagement tracking
This feature set helps developers dramatically improve speed to market. Post launch, you'll benefit from managing your business with a pre-integrated billing system, CRM, email marketing, and help desk tools. This article will cover how to integrate Outseta with your SaaS product from a technical perspective.
Meet Outseta's sign-up, login, and profile embeds
There are three integration points between Outseta and your SaaS product—the sign up, login, and profile embeds. Here's an overview of the functionality covered by each.
Sign up embed—Outseta's sign up embed allows users to sign up for a subscription and create an account (registration).
Login embed—After sign up, Outseta will send your new subscriber a confirmation email prompting them to establish a password. Once they've established login credentials, they'll login into your product using Outseta's login embed (authentication).
Profile embed—Outseta's profile embed serves both as a user profile and a self-service customer billing portal. The profile embed allows users to:
- Maintain a user profile (information about themselves)
- Maintain account information (information about their company)
- Invite team members to share their subscription
- Upgrade, downgrade, or cancel their subscription
- Update their payment information and view past invoices
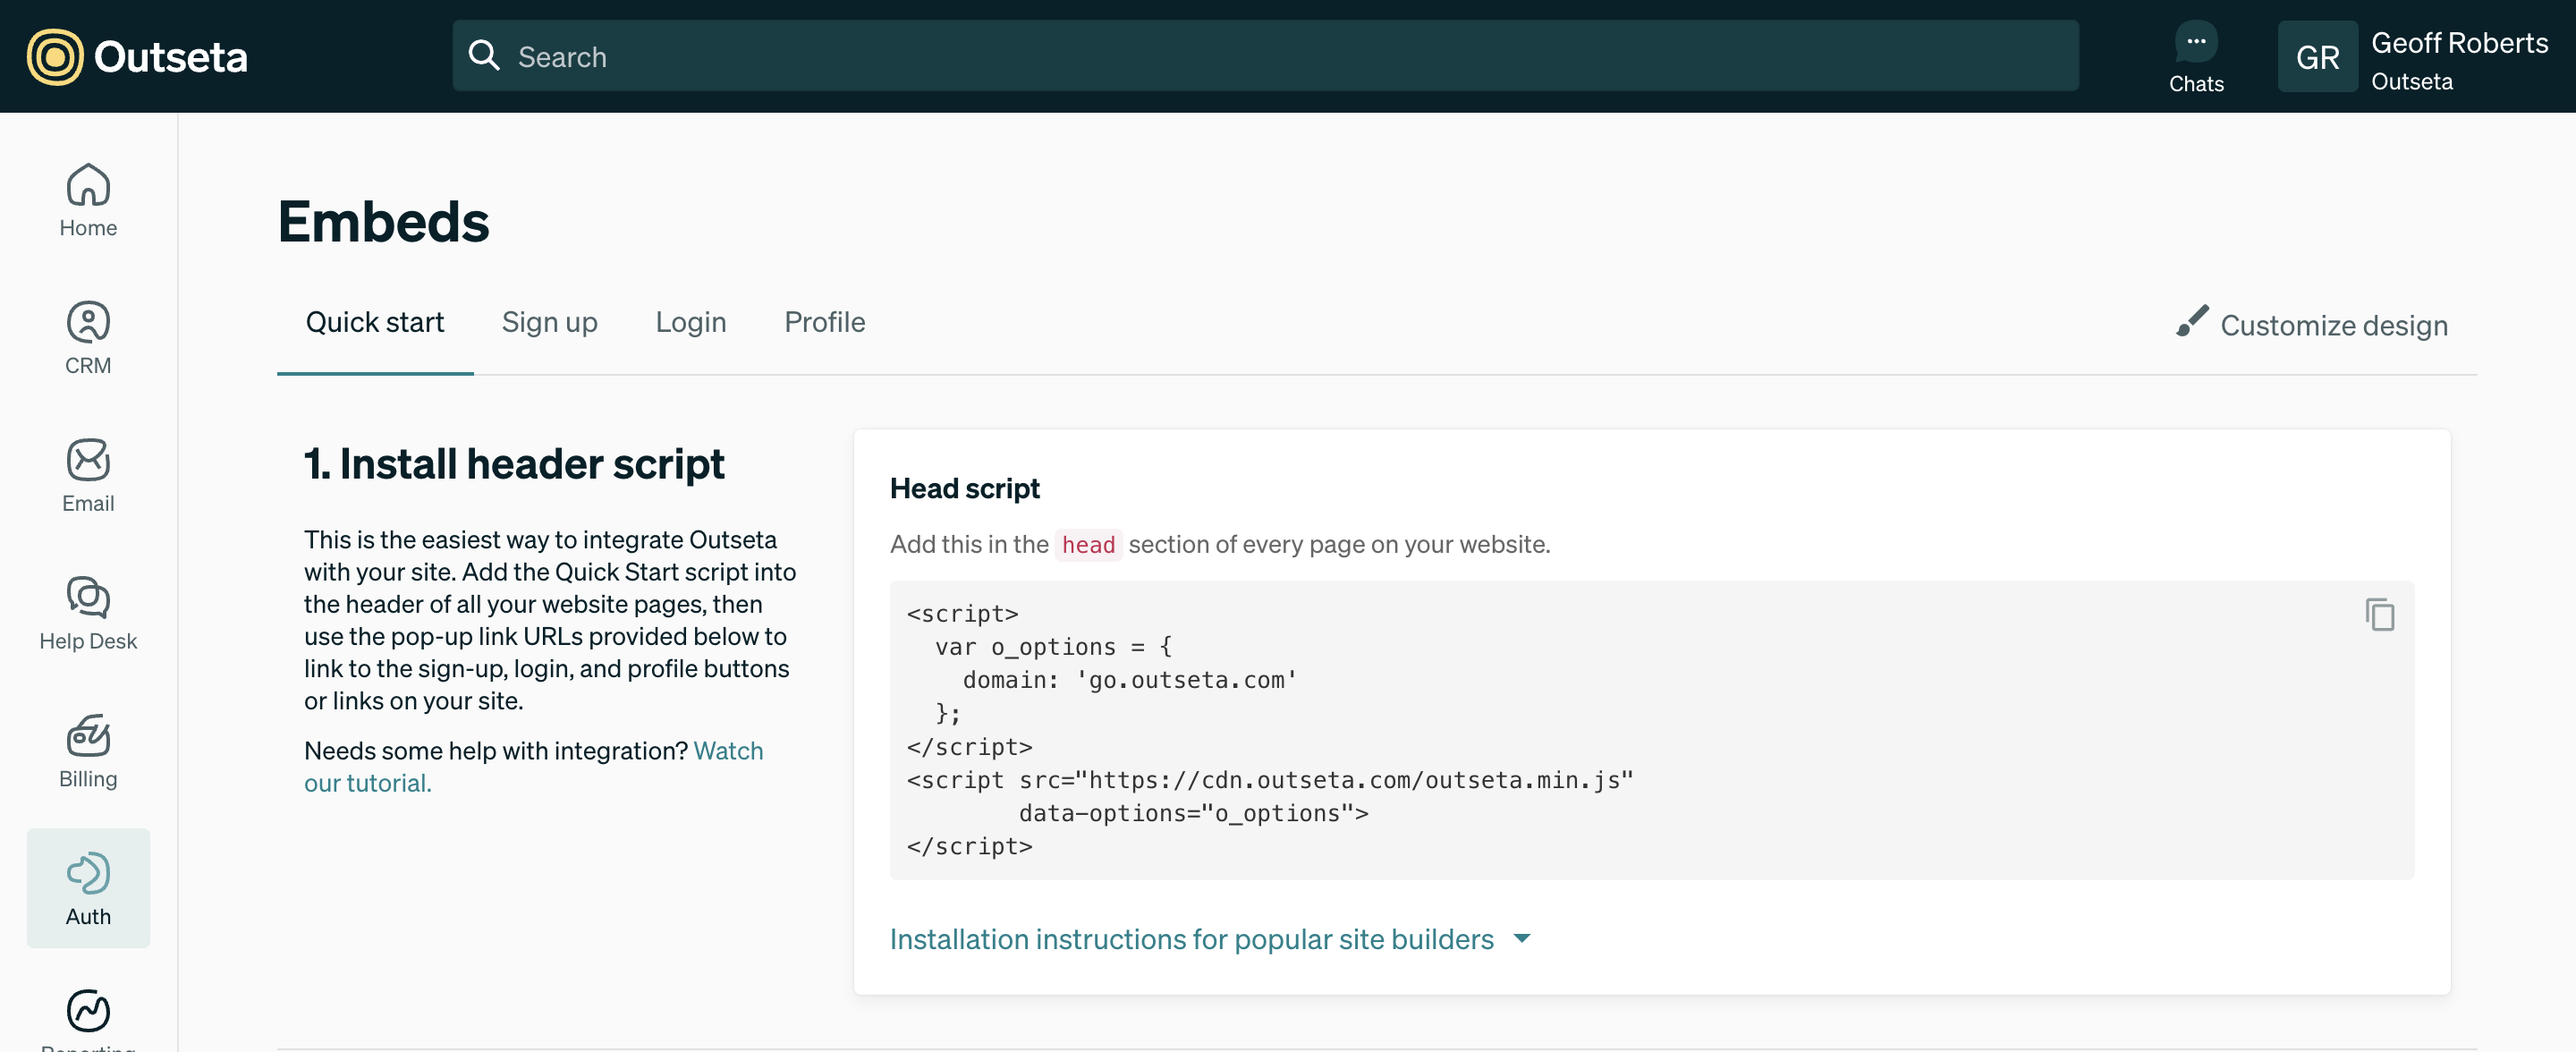
The outseta.min.js script
The outseta.min.js script is the entry point to integrating Outseta's sign up, login, and profile embeds with your product. It gets dropped into the header of your website and SaaS application—anywhere that you'll need to trigger the sign up, login, or profile embeds.
<script>
  var o_options = {
    domain: '[your-subdomain].outseta.com'
  };
</script>
<script src="https://cdn.outseta.com/outseta.min.js"
        data-options="o_options">
</script>
- The script can be found within your Outseta account on the AUTH > EMBEDS page. The embeds can be triggered either as a pop-up or can be embedded directly within a page.
- You can choose to embed this script in the header of your SaaS product or you can add it so it only loads at runtime on any page where embed functionality is needed.
Next we'll cover how to implement each of the embeds specifically.
Sign up embed implementation
Outseta's sign up embed allows users to sign up for a subscription and also creates an Account for the customer in Outseta.
- Go to BILLING > PLANS and set up at least one plan.
- Go to AUTH > SIGN UP AND LOGIN. On this screen you'll enter several configuration options that dictate how you'll sign up and login new users—here's an overview of the settings you'll find on this page. The Sign up form fields are particularly important—these specify the information you'd like to capture from new customers when they sign up. If you want to capture information that's not already available in the drop down menu, you must first add new custom properties to your account records. Once you've done this, these new fields will appear in the Sign up form fields drop down menu.
- Once you've completed the settings on this page, you can go to AUTH > EMBEDS to grab the embed script for Outseta's sign up embed.
Login embed implementation
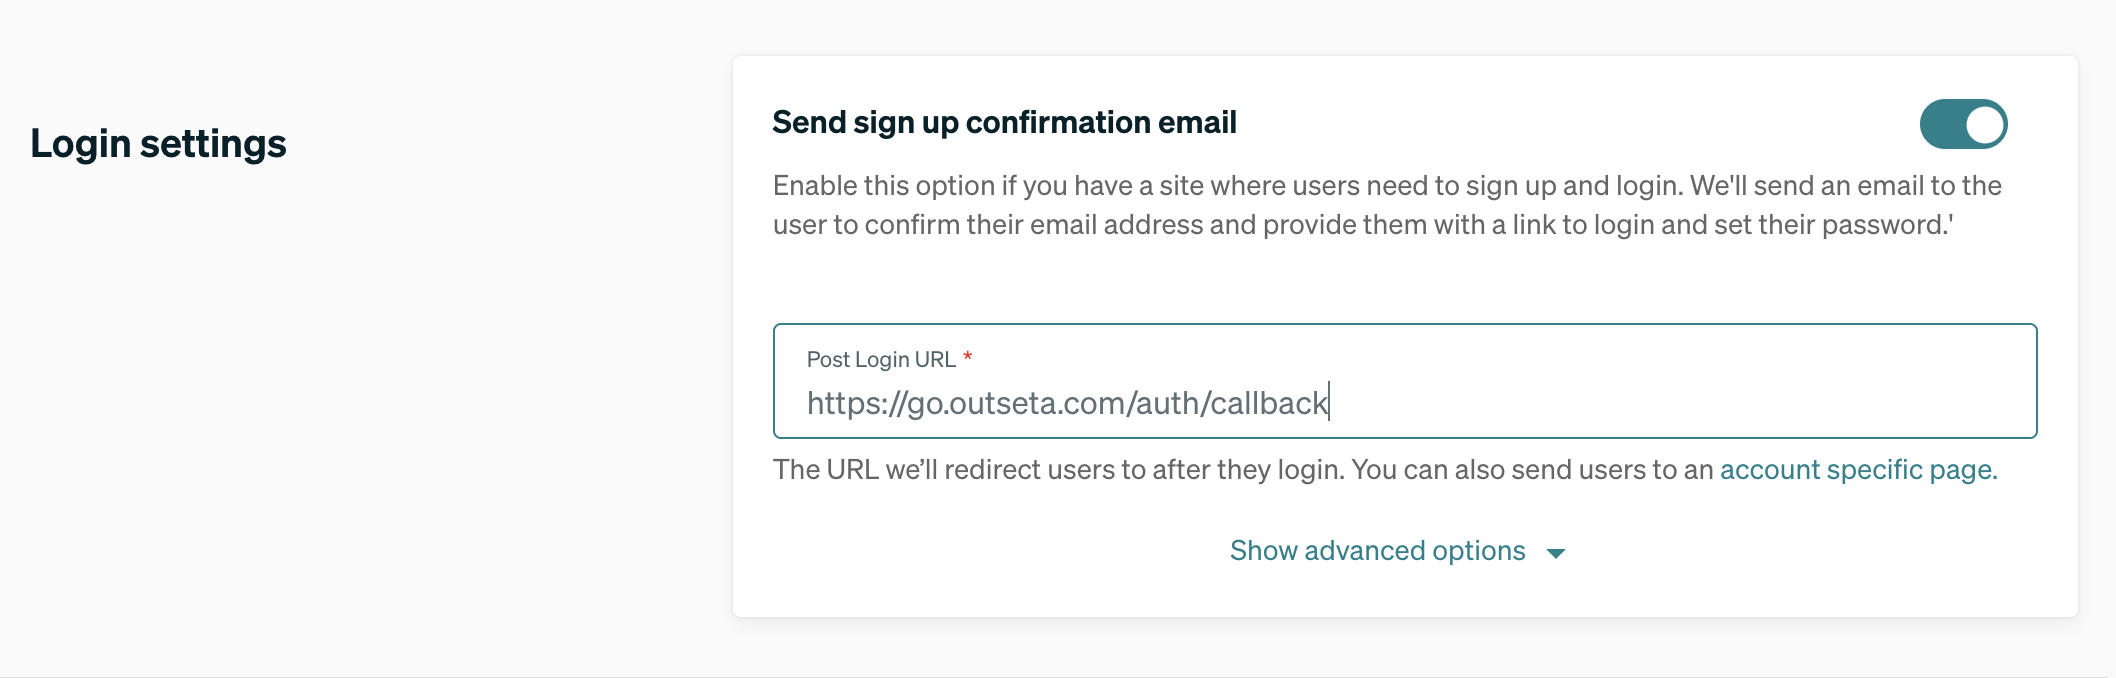
- Go to AUTH > SIGN UP AND LOGIN.
- Make sure the Send sign up confirmation email toggle is on. When a new user signs up, this setting will send a confirmation email to the user that both verifies their email address and prompts them to set a password so they can login.
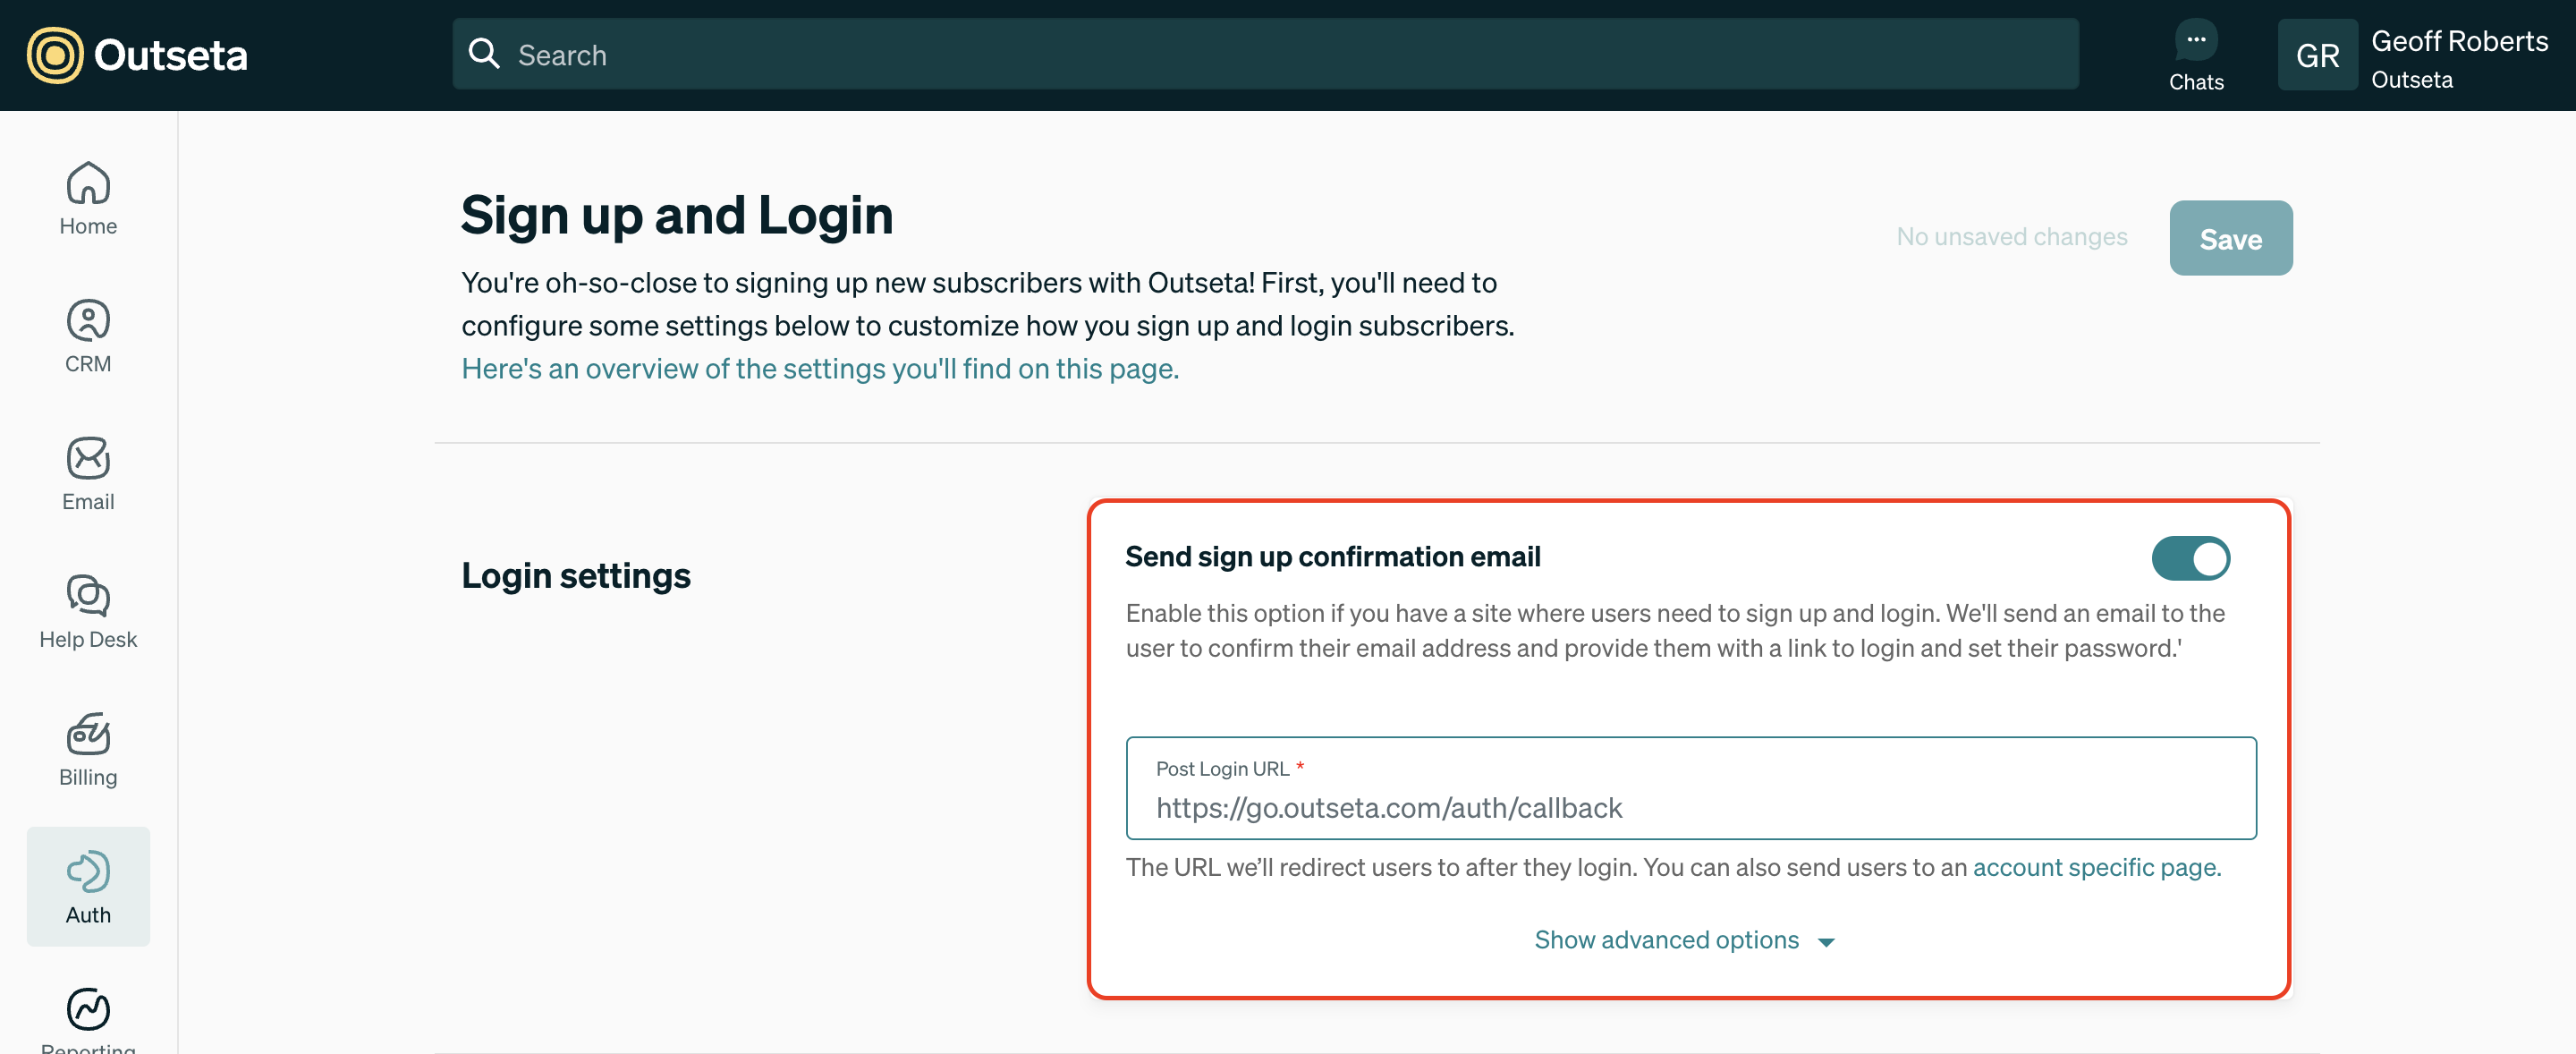
- Specify a Post Login URL. This is the URL you'd like Outseta to redirect users to after they've logged in successfully. This is often a dashboard or initial screen within your software product.
- Click AUTH > EMBEDS to grab the login widget embed script.
Note: A person needs to be associated with an account that has an active subscription in order for authentication to work. The account and subscription get created automatically when a person registers via the sign up embed, but you can also manually add and subscribe accounts under CRM > ACCOUNTS.
After a user signs up they'll receive a confirmation email prompting them to set their password before they are able to login. The page that the confirmation email redirects the user to must have the login embed present—Outseta will redirect users to a hosted page where the login embed is present by default.
You can specify the URL of this page (rather than using the hosted page we provide) by clicking Show Advanced Options under Sign up Settings. The Sign Up Confirmation URL is the link that's included in the confirmation email.
Authentication Workflow
When a user successfully enters their login credentials in Outseta's login embed:
- Outseta will redirect the user to the specified
Post Login URL. - A JWT access token is passed to your SaaS application in an
access_tokenquery string parameter. This token contains information like who the user is and what subscription plan they are on.- This JWT token can be verified with a public key that Outseta provides to you. The public key can be found at AUTH > SIGN UP AND LOGIN. Open the Show Advanced Options menu under the Login Settings.
- After verifying the JWT token your website can consider the user as being authenticated.
- A great resource to use for JWT tokens is JWT.IO. On that site you can find a utility that allows you to see the contents of the token as well as libraries in different languages that allow you to verify the token.
- The contents of this token contains information—like the user's subscription plan and any add-on products they've purchased—that can also be used for authorization. How you use the contents of the token to setup feature restrictions will vary depending on the development framework you're using.
For example, when a user authenticates into Outseta we send them to a callback URL.
This is an invisible page that we use to store the access_token in the browser—we then route the user to their own dashboard page within our product.

Profile embed implementation
- Click AUTH > EMBEDS > PROFILE. Configure the embed to your liking then click INSTALL YOUR EMBED to generate your embed script or pop-up trigger.
- Copy and embed the profile embed
<script>tag. We recommend adding this at the bottom of the<body>HTML tag. - Pass the
access_tokenreceived by the Post Login URL to the profile embed'ssetAccessToken()method. You can also use the profile embed without the login embed by calling directly the Log a user in method to retrieve the access token for a given account/user.

With the sign up, login, and profile embeds integrated with your SaaS product you're off and running with Outseta. Below you'll find some additional technical resources and guidance on debugging that may prove useful.
Additional Resources
- Outseta's REST API—Outseta's REST API allows you to add, edit, or delete any data stored in our database.
- Outseta's Embed API—Outseta's embed API allows you to programmatically control the sign up, login, and profile embeds.
- Javascript configuration guide—Outseta's sign up, login, and profile embeds each have default behaviors that dictate how they operate. Our javascript configuration guide allows you to further configure how the embeds operate. Want to keep a user logged in across tabs? Want to override the Post Login URL? You've come to the right place.
- Webhooks—By going to SETTINGS > NOTIFICATIONS Outseta allows you to setup webhooks so you can keep data in sync across multiple systems. Rather than continually pulling data from Outseta into your own application, updates can be sent to Callback URLs that you specify to notify you of any changes made to user data.
Debugging
To test the callbacks that Outseta initiates and be able to inspect the content of the callback request please use tools like RequestBin or PostBin. The schema of the object sent via a POST request when setting up the Registration Callback URL looks like this:
{
   "Name":"Test Company",
   "IsDemo":false,
   "AccountStage":2,
   "PersonAccount":[
      {
         "Person":{
            "Email":"[email protected]",
            "FirstName":"Test First Name",
            "LastName":"Test Last Name",
            "PhoneMobile":"",
            "PhoneWork":"",
            "IPAddress":"::1",
            "Referer":"http://localhost/auth",
            "UserAgent":"Mozilla/5.0 (Windows NT 10.0; Win64; x64) AppleWebKit/537.36 (KHTML, like Gecko) Chrome/74.0.3729.131 Safari/537.36",
            "FullName":"Test First Name Test Last Name",
            "OAuthIntegrationStatus":0,
            "UserAgentPlatformBrowser":"WinNT (Chrome)",
            "Uid":"dQGpld94",
            "Created":"2019-05-24T14:30:21",
            "Updated":"2019-05-24T14:33:25"
         },
         "IsPrimary":true,
         "Uid":"Kj9baMQn",
         "Created":"2019-05-24T14:34:22.3279439Z",
         "Updated":"2019-05-24T14:34:22.3279439Z"
      }
   ],
   "Subscriptions":[
      {
         "BillingRenewalTerm":1,
         "Quantity":1,
         "StartDate":"2019-05-24T14:34:22.0649555Z",
         "RenewalDate":"2019-06-24T14:34:22.0649555Z",
         "IsPlanUpgradeRequired":false,
         "Uid":"ZBWzp2QE",
         "Created":"2019-05-24T14:34:22.3279439Z",
         "Updated":"2019-05-24T14:34:22.3279439Z"
      }
   ],
   "Deals":[

   ],
   "AccountStageLabel":"Trialing",
   "LatestSubscription":{
      "BillingRenewalTerm":1,
      "Quantity":1,
      "StartDate":"2019-05-24T14:34:22.0649555Z",
      "RenewalDate":"2019-06-24T14:34:22.0649555Z",
      "IsPlanUpgradeRequired":false,
      "Uid":"ZBWzp2QE",
      "Created":"2019-05-24T14:34:22.3279439Z",
      "Updated":"2019-05-24T14:34:22.3279439Z"
   },
   "Uid":"By9qp3QA",
   "Created":"2019-05-24T14:34:22.3279439Z",
   "Updated":"2019-05-24T14:34:22.3279439Z"
}
If you have technical questions about integrating Outseta with your SaaS product, please email support(at)outseta.com. This goes directly to our engineering team who is best suited to answer your questions.