An Outseta JWT Access Token identifies an authenticated user of your app. It can be decoded to access the payload (aka, information about the user). However, you must always verify an access token before you trust the payload.
👉 New to server-side verification? Start with Protecting your data with Outseta authentication to understand when and why you need this.
Other relevant articles:
👉 The JWT Access Token — Full payload reference
👉 Generate JWT Access Tokens (aka. log in users) using the Outseta API
👉 Supabase + Outseta Auth with Row Level Security (RLS)
Prerequisites
To follow the examples in this guide, you'll need:
- A server-side environment (Node.js, Python, etc.)
- The Jose library for Node.js examples — install with
npm install jose - Your Outseta domain (e.g.,
your-company.outseta.com)
Two ways to verify
There are two ways to verify an Outseta JWT Access Token:
- JWK verification — Use your Outseta Public JWT Key to verify the access token using an auth library.
- Profile endpoint verification — Use the access token in a request to the profile endpoint; the request will only succeed if the access token is valid.
Which method should you use?
| Method | Best for | Trade-offs |
|---|---|---|
| JWK verification | High-traffic apps, performance-critical endpoints, offline verification after initial fetch | Slightly more complex setup; payload data only |
| Profile endpoint | Simpler setup, when you need custom properties or fresh profile data | Network request per verification; depends on Outseta availability |
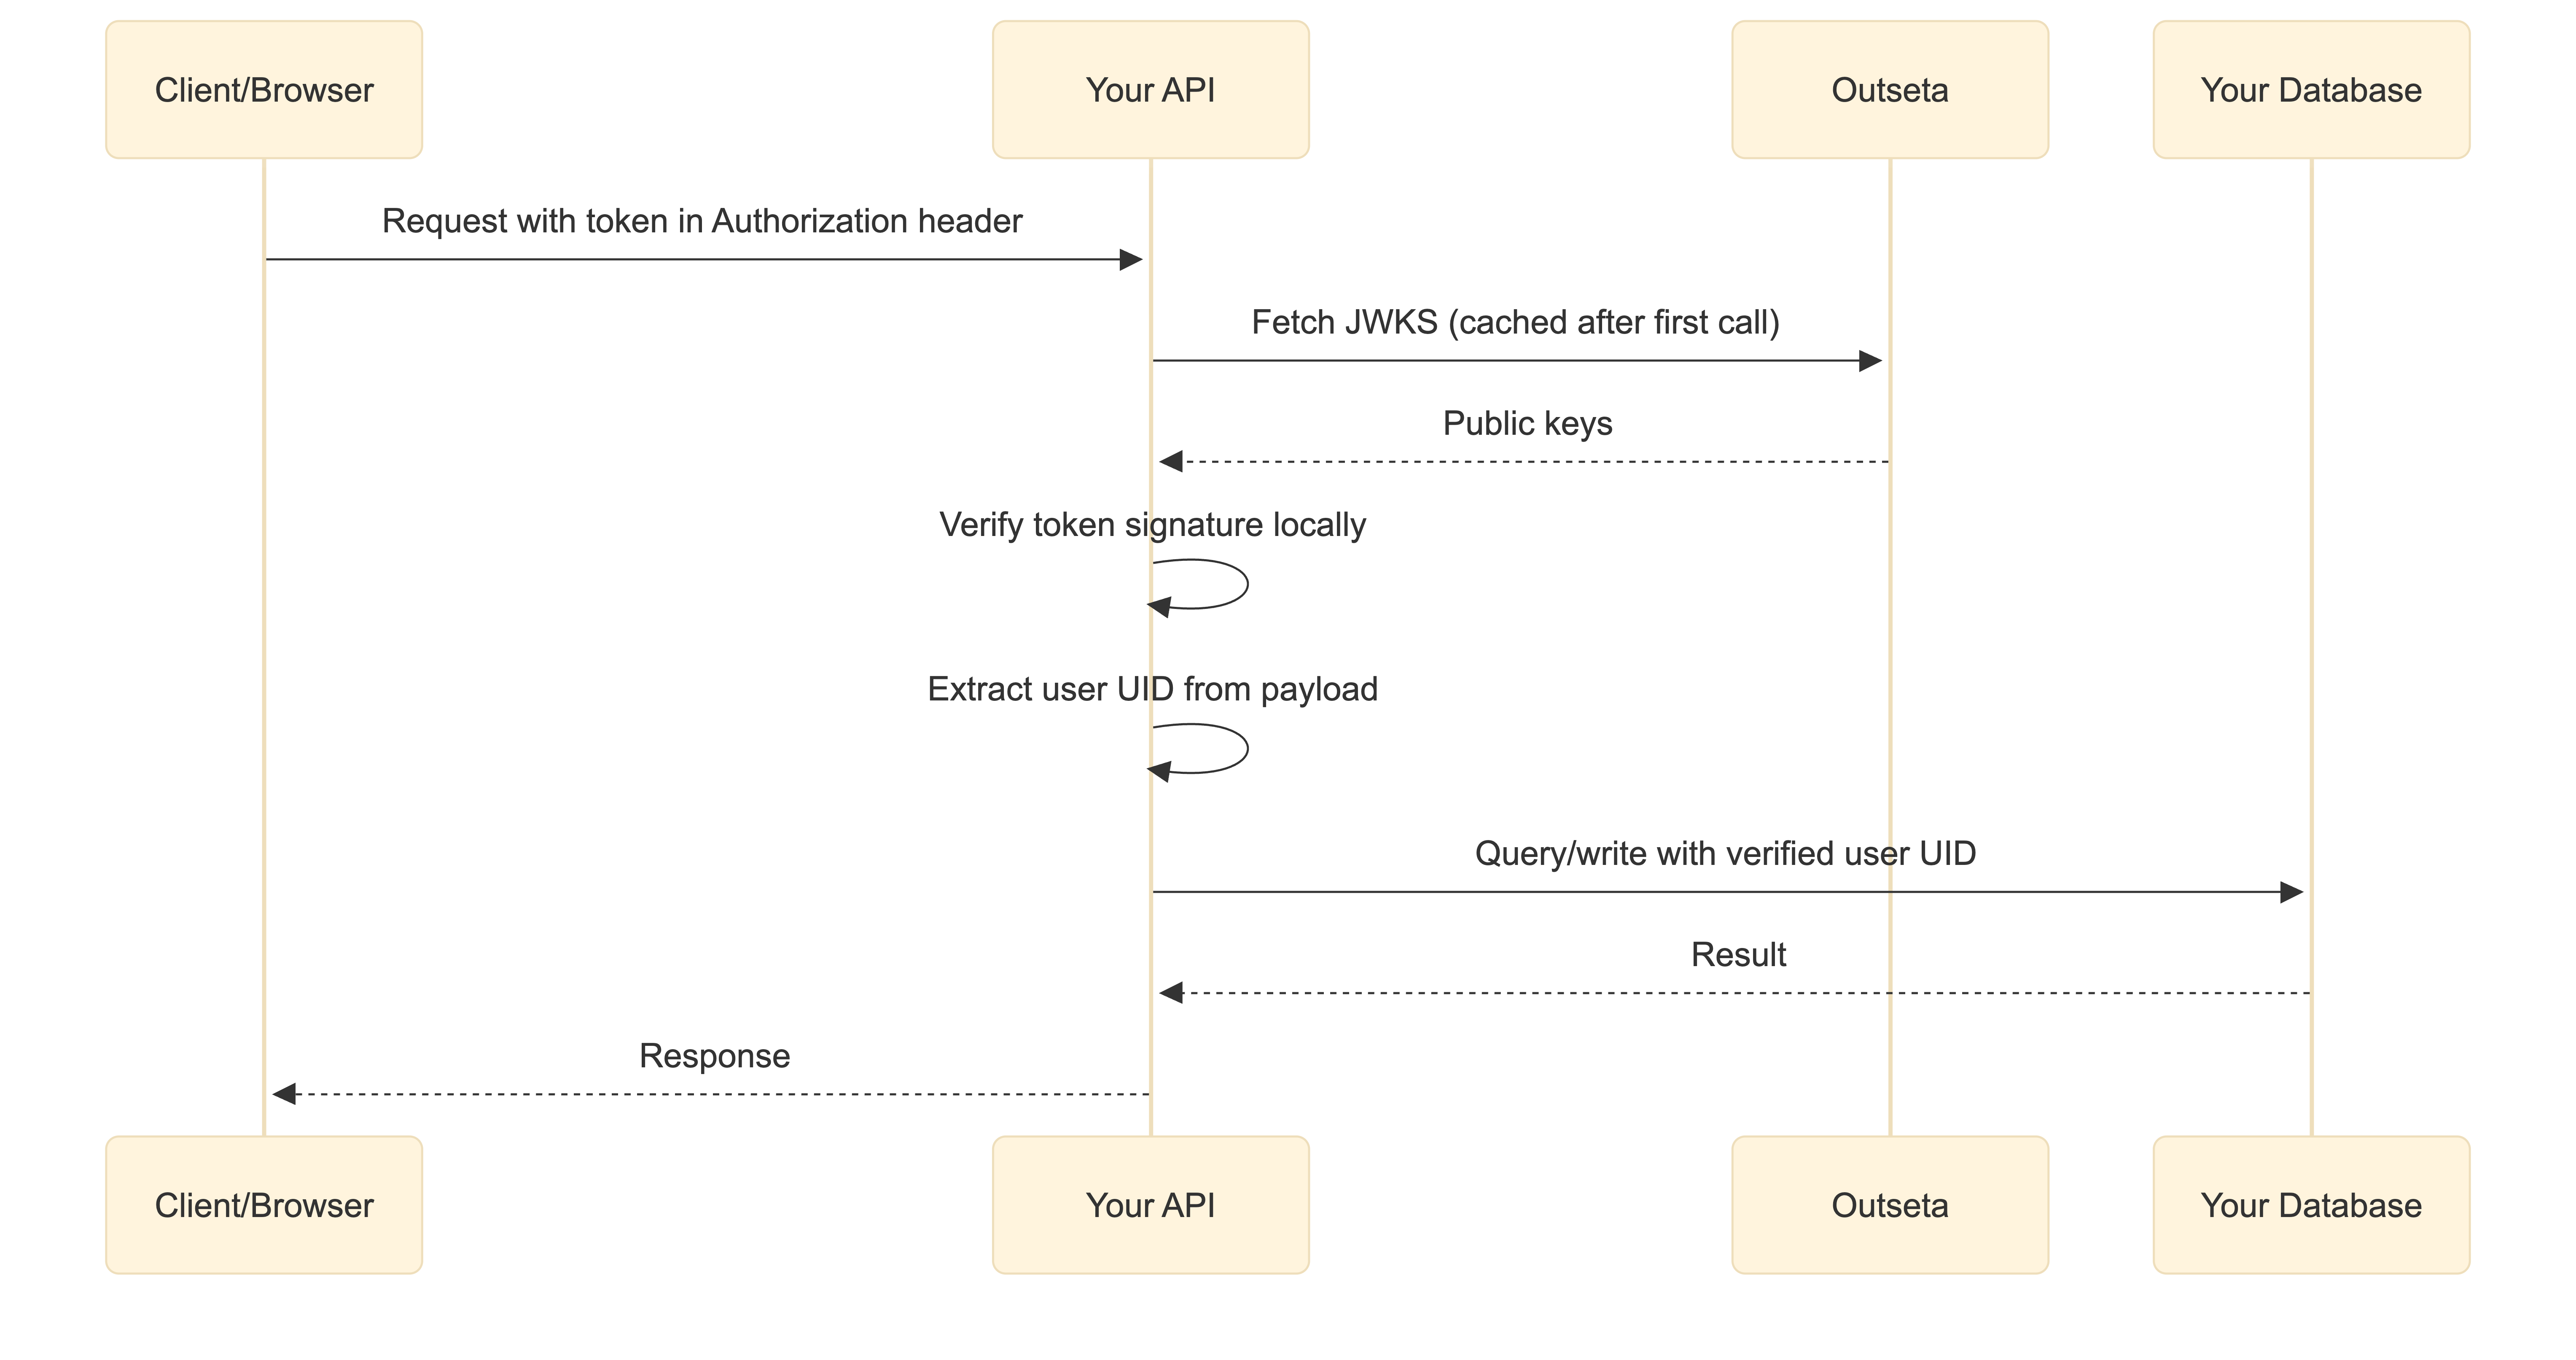
Option 1: Verify with your Outseta Public JWT Key (JWK)
This method verifies tokens locally using cryptographic keys, making it faster for high-traffic applications. After the initial fetch, the JWK set can be cached, allowing verification without additional network requests.
- Get the access token from the request
- Fetch the JSON Web Key (JWK) set from your well-known URL:
https://<your-domain>.outseta.com/.well-known/jwks - Use the JWK Set to verify the access token with an auth library suitable for your tech stack.
👉 For more details on Outseta's well-known endpoints, see Outseta's Well-Known Endpoints (JWK / OIDC)
Example: Node.js with Jose library
This example assumes the access token is sent as part of an authorization header in the format Bearer <token>:
import { createRemoteJWKSet, jwtVerify } from "jose";

// Grab the auth header
const authHeader = request.headers["authorization"];

// Grab the token from the auth header by splitting
// on space and taking the second value.
const token = authHeader?.split(" ")[1]?.trim();

// Fetch the JSON Web Key (JWK) set
const JWKS = createRemoteJWKSet(
  new URL("https://<your_domain>.outseta.com/.well-known/jwks")
);

// Use the JSON Web Key (JWK) to verify the token
const { payload } = await jwtVerify(token, JWKS);

console.log("VERIFIED");

// The token is verified and you may use the information
// in its payload to identify the person behind the request.
const userId = payload.sub;
const email = payload.email;
const accountId = payload["outseta:accountUid"];

// Commonly used in a request to your database:
// Examples:
// - Save a comment
// - Fetch the user's comments
// - Or other user related data
You may see how this looks as an Express endpoint (/verify-with-remote-jwk-set) in this CodeSandbox example.
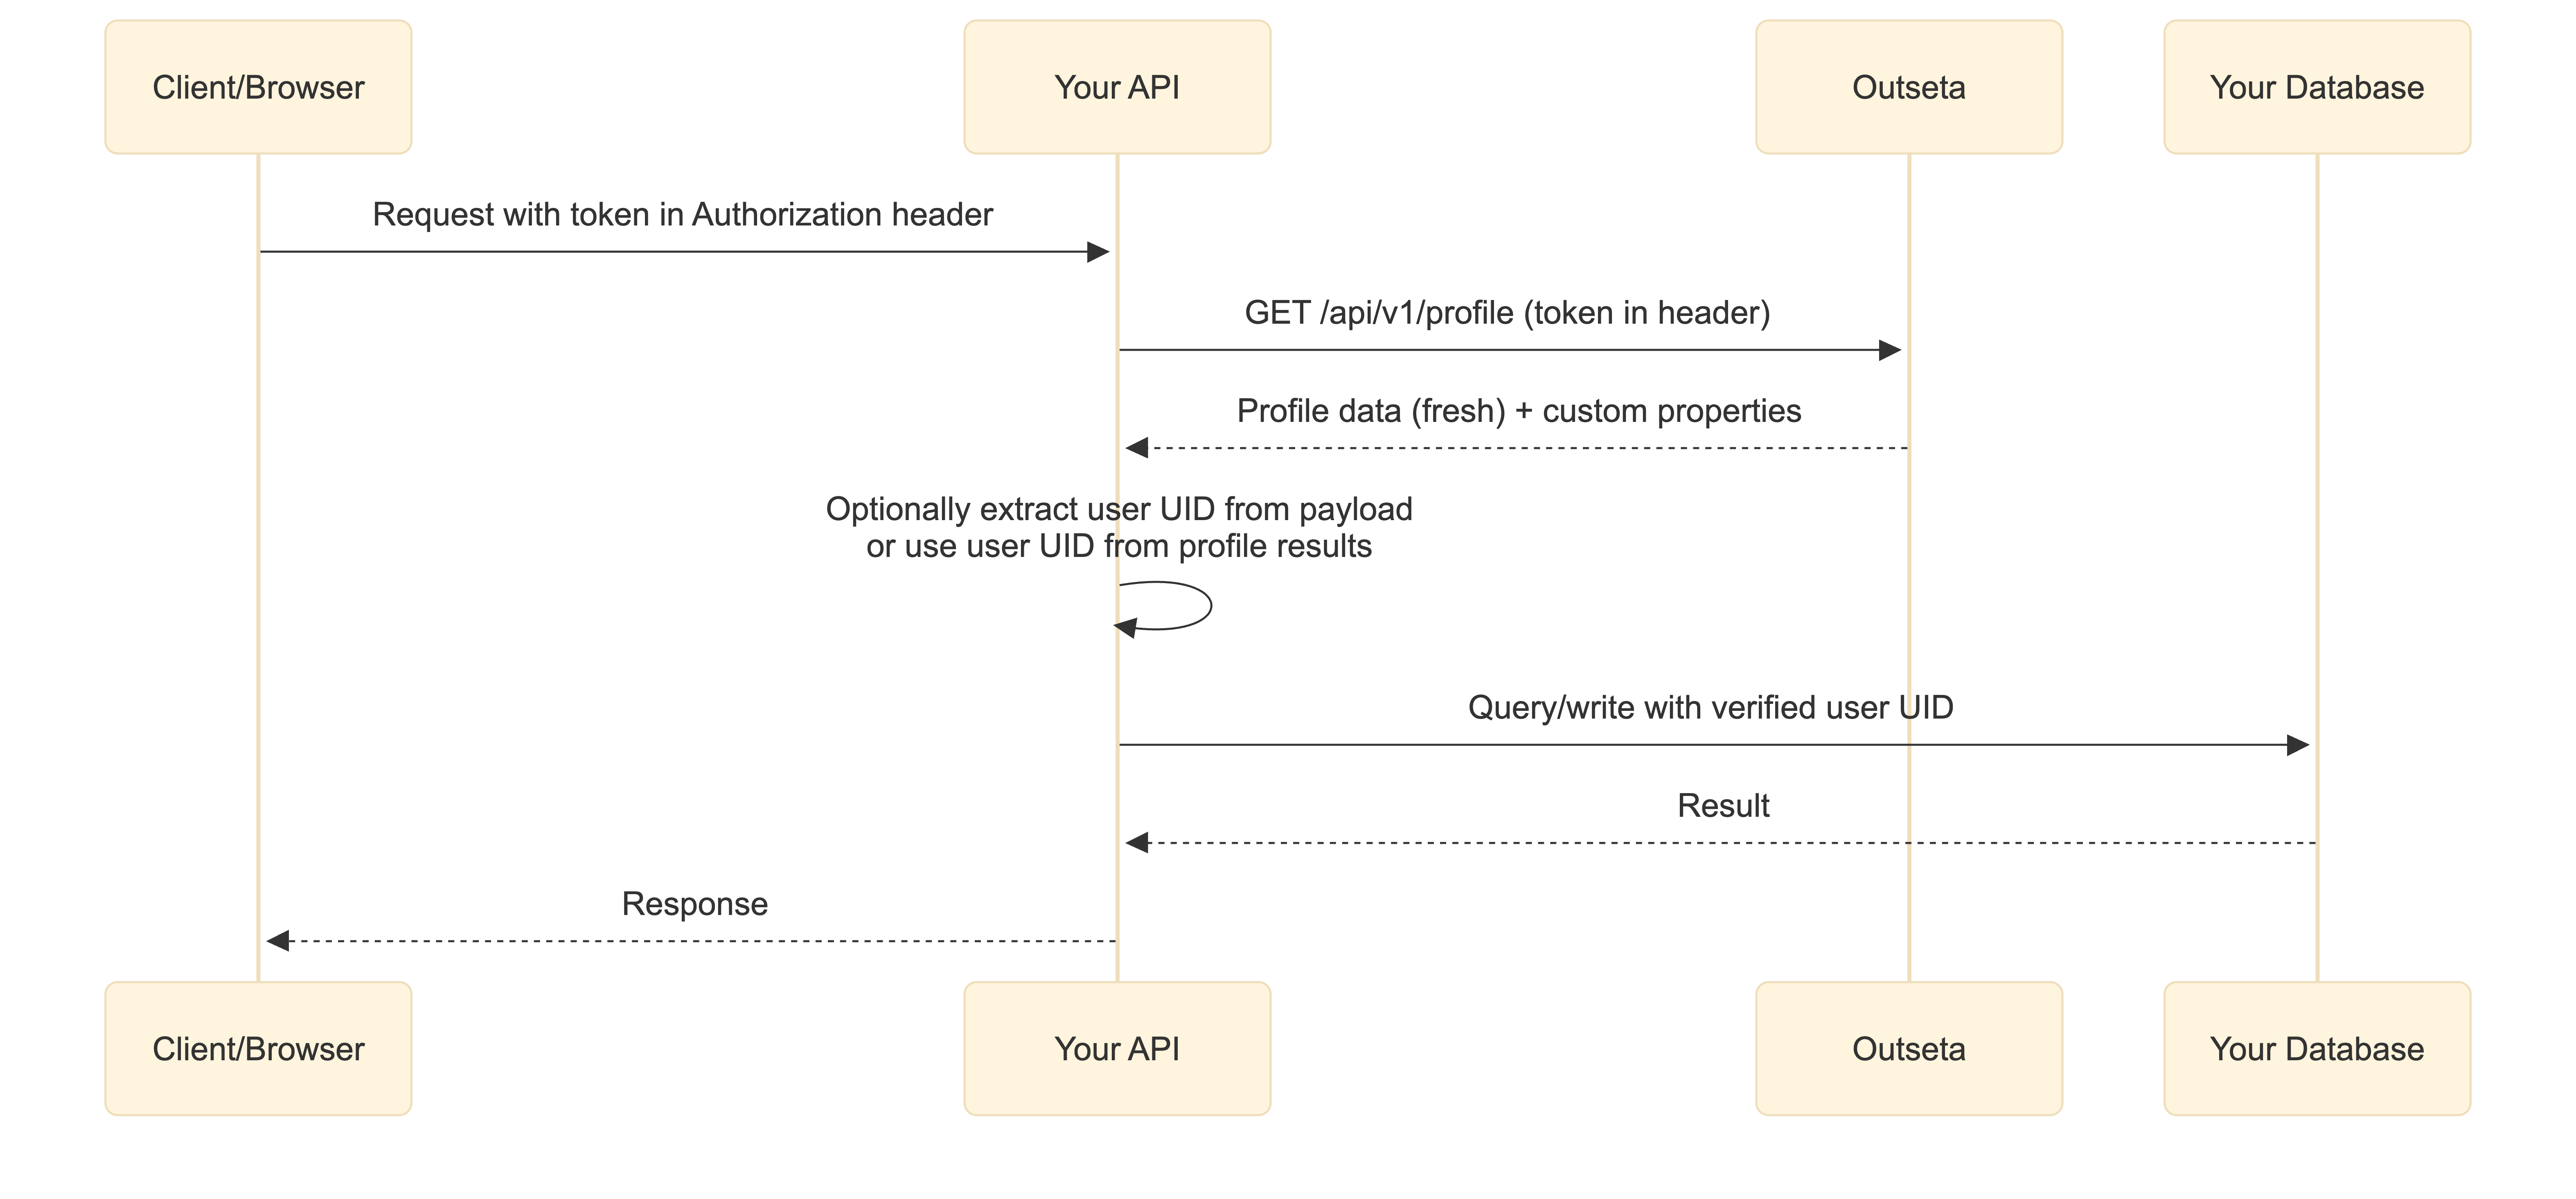
Option 2: Verify with the profile endpoint
This method verifies tokens by making a request to Outseta's profile endpoint. It's simpler to implement and gives you access to additional profile data not included in the token payload, such as custom properties and avatar URLs.
- Get the access token from the request
- Use the access token in a request to Outseta's profile endpoint
- Use the profile response to identify the user, or optionally decode token for account data
You can also decode the token to access account-level data like outseta:accountUid and outseta:planUid. However, the profile endpoint returns fresher data — if a user's name or email changed after the token was issued, the profile response reflects the current values while the token payload may be stale.
Example: Node.js with Jose library
This example assumes the access token is sent as part of an authorization header in the format Bearer <token>:
import { decodeJwt } from "jose";

// Grab the auth header
const authHeader = request.headers["authorization"];

// Grab the token from the auth header by splitting
// on space and taking the second value.
const token = authHeader?.split(" ")[1]?.trim();

// Do a request to the profile endpoint with the token
const fetchResponse = await fetch(
  // Adding fields=* gives you custom properties as well
  "https://<your_domain>.outseta.com/api/v1/profile?fields=*",
  {
    headers: {
      Authorization: `Bearer ${token}`,
    },
  }
);

if (!fetchResponse.ok) throw new Error("Profile response not ok");

const profile = await fetchResponse.json();

console.log("VERIFIED");

// Use the profile response for fresh user data
const userId = profile.Uid;
const email = profile.Email;
const name = `${profile.FirstName} ${profile.LastName}`;
const avatar = profile.ProfileImageS3Url;
const myCustomProperty = profile.MyCustomProperty;

// Optionally decode the token for account-level data
// Note: token payload may be stale compared to profile response
const payload = decodeJwt(token);
const accountId = payload["outseta:accountUid"];
const planId = payload["outseta:planUid"];

// Commonly used in a request to your database:
// Examples:
// - Save a comment
// - Fetch the user's comments
// - Or other user related data
You may see how this looks as an Express endpoint (/verify-with-profile-request) in this CodeSandbox example.
Troubleshooting
"JWTExpired" error
The token has expired. Outseta tokens have a limited lifespan. The client should obtain a fresh token and retry the request.
"JWSSignatureVerificationFailed" error
The token signature is invalid. This could mean the token was tampered with, or you're using the wrong JWKS URL. Verify your domain is correct.
"Profile response not ok" error
When using the profile endpoint method, this usually means the token is invalid or expired. Check that you're passing the token correctly in the Authorization header.
CORS errors when fetching JWKS
The JWKS endpoint should only be called from your server, not from client-side JavaScript. If you're seeing CORS errors, you may be trying to verify tokens in the browser — this should happen on your server instead.