Outseta integrates with Webflow so that you can sign up new users, allow them to login to your website, and give them the ability to manage their membership—all without writing any code. Best yet, you can control access to your content based on a member's subscription plan.
Outseta integrates with your Webflow site via three "embeds."
- Sign up embed—Allows users to choose from your membership options and sign up.
- Login embed—Allows users to login to your site with an email address/password or their Gmail account.
- Profile embed—Allows users to manage their own user profile, upgrade or downgrade their membership, maintain their payment information, and invite new team members.
These embeds can be implemented to open as pop-ups when a link or button is clicked or they can be directly embedded into a website page.
Prerequisites
Before you begin integrating Outseta with Webflow you'll need to:
- Go to BILLING > SETTINGS and connect Outseta to Stripe.
- Go to BILLING > PLANS and add at least one pricing plan (can be a free plan).
- Go to AUTH > SIGN UP AND LOGIN and configure your sign up and login settings.
With these steps completed, you're ready to integrate Outseta's sign up, login, and profile embeds with your website. The video below demonstrates this process using our Webflow demo site: outseta-demo.webflow.io
NOTE: The video below covers how to integrate Outseta with Webflow using our standard integration process. This can also be accomplished using Outseta's Webflow App, which is covered at the bottom of this article.
Open the sign up, login, and profile embeds as pop-ups
The easiest way to integrate Outseta with your site is to open our sign up, login, and profile embeds as a pop-up when a button or link is clicked, but embedding them directly on the page is also an option (described in the next section).
1. Start by adding sign up, login, and profile buttons or links somewhere on your site—you should also add a logout link.
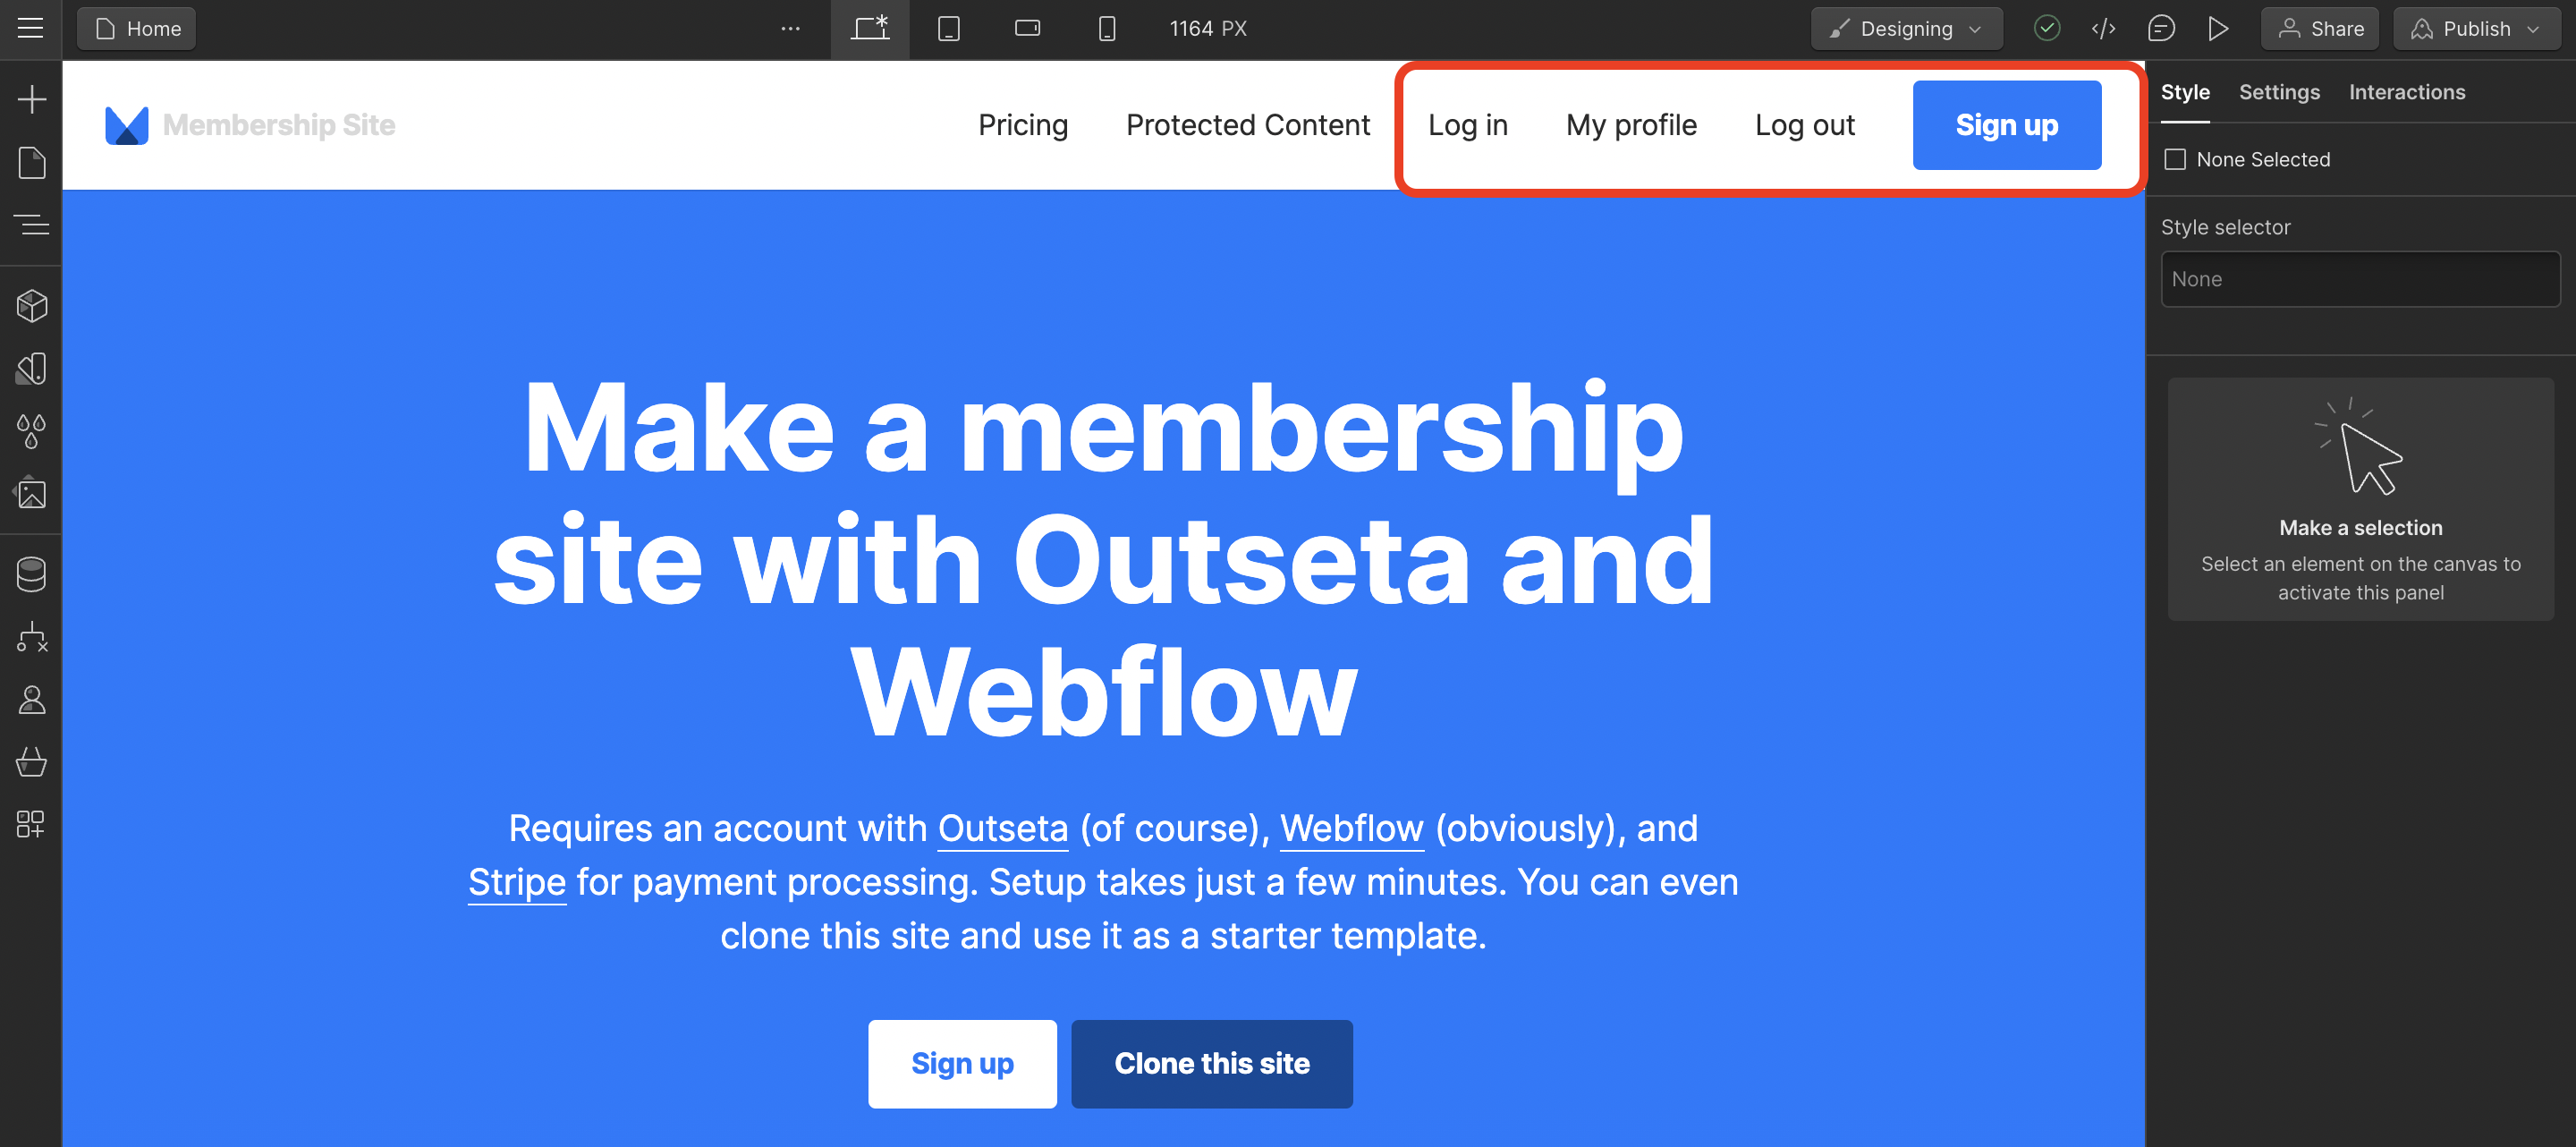
NOTE: Outseta will automatically show or hide these buttons or links based on when they are relevant. For example, your logout and profile links will only display for a logged in member.
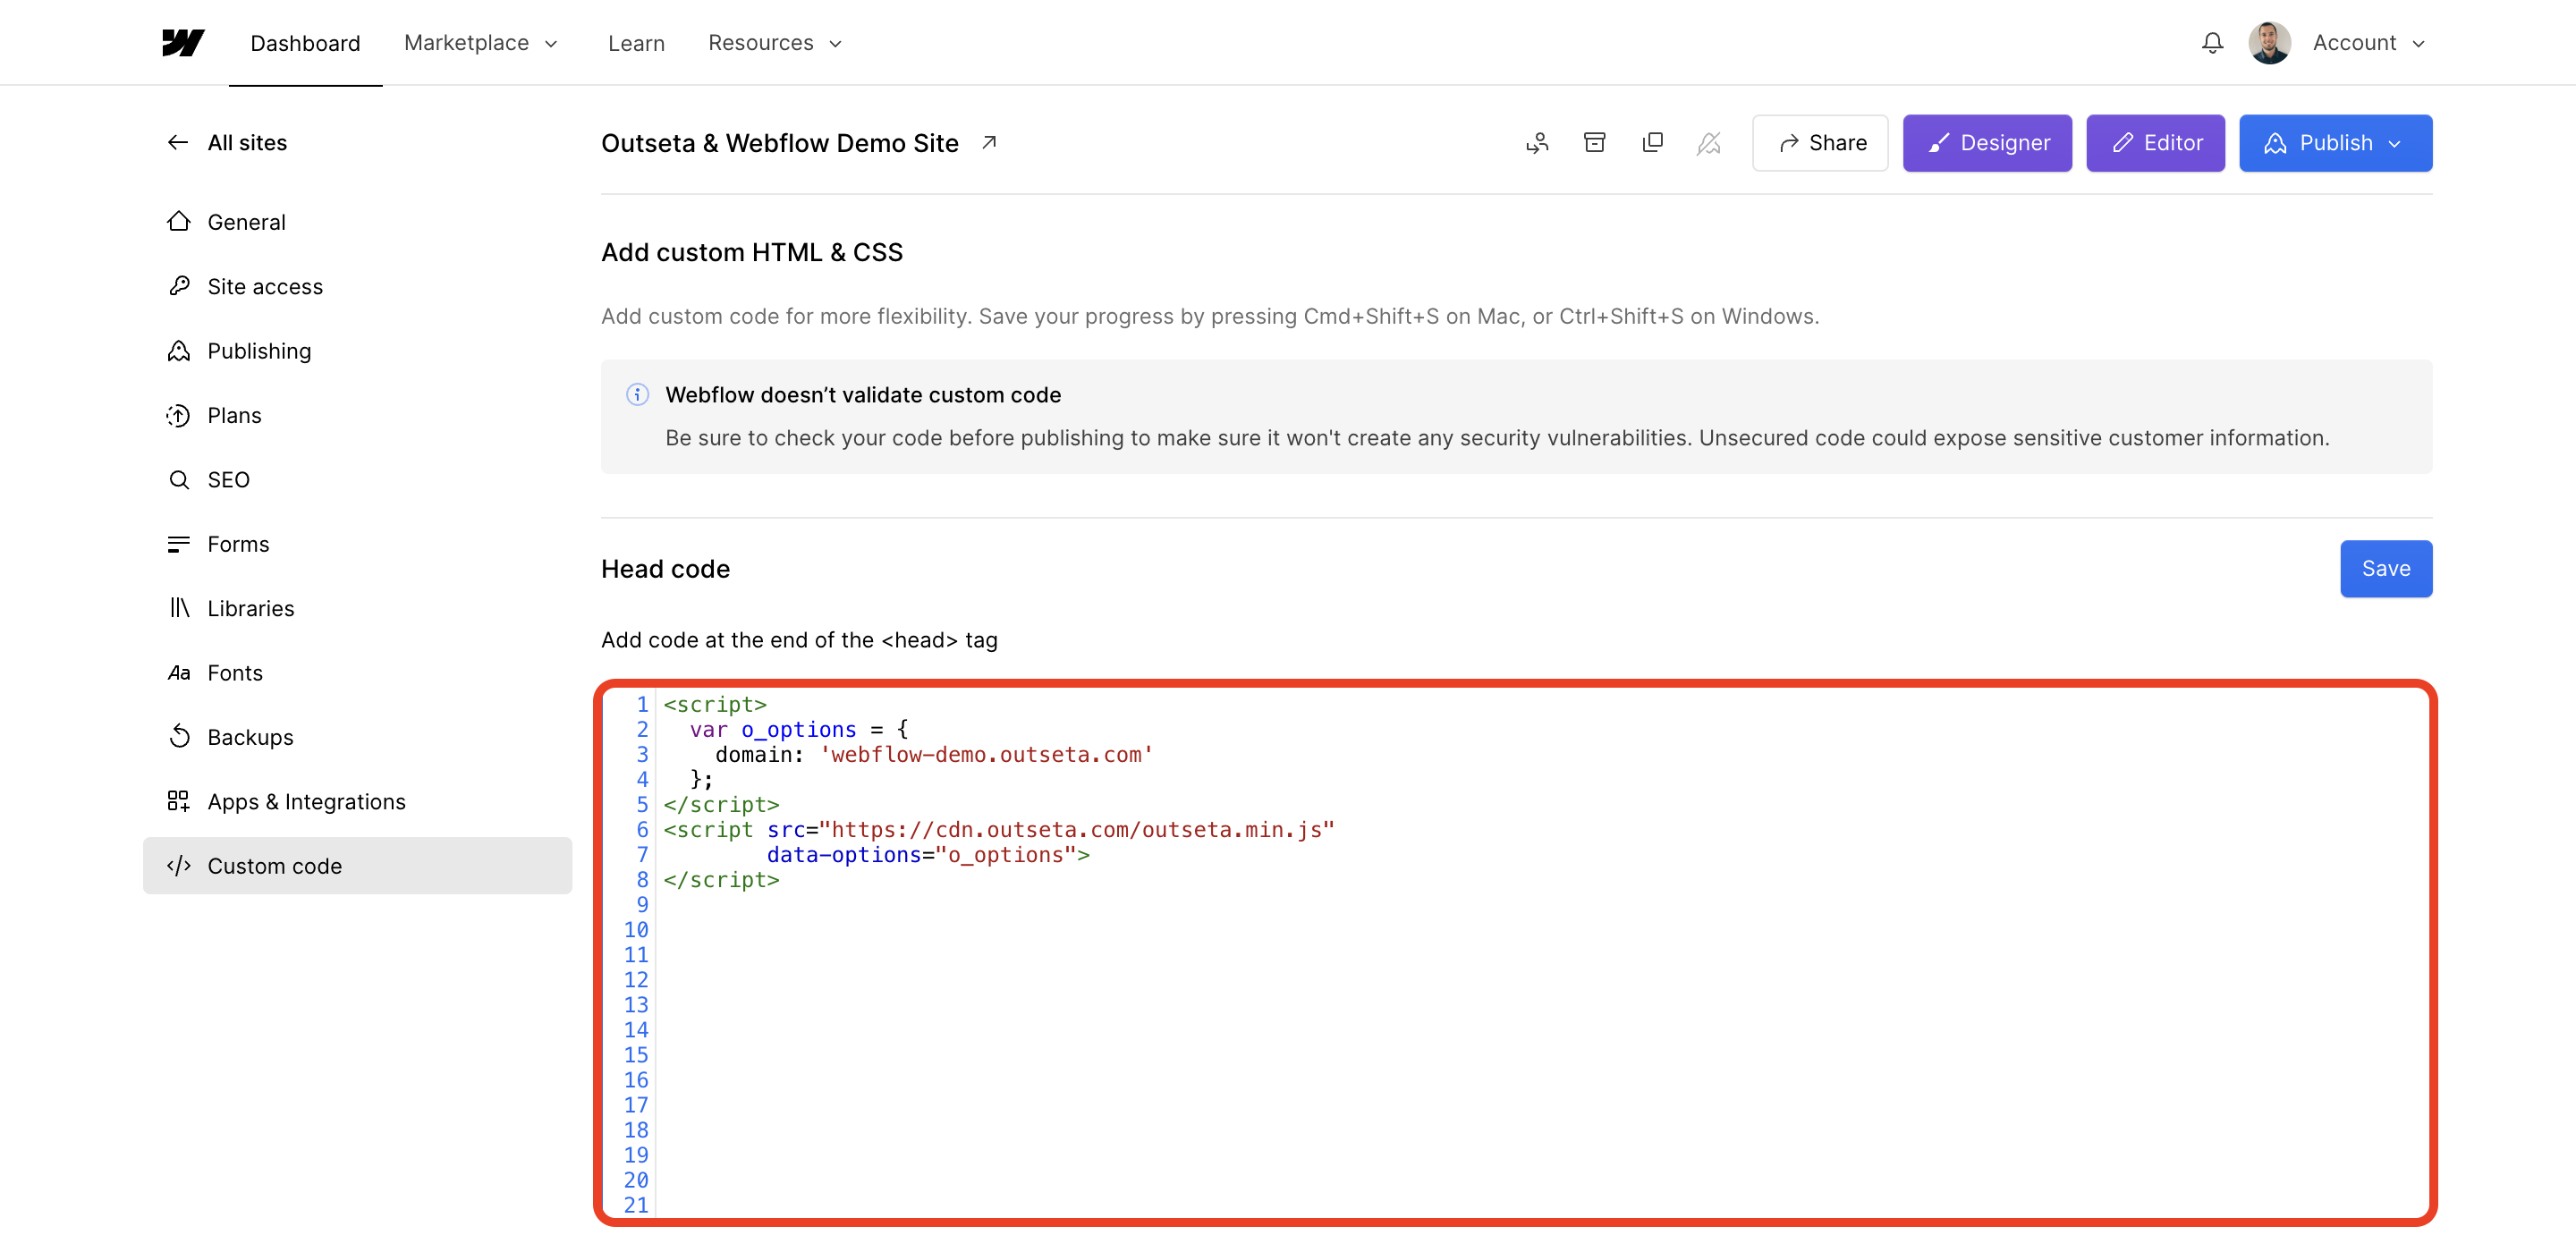
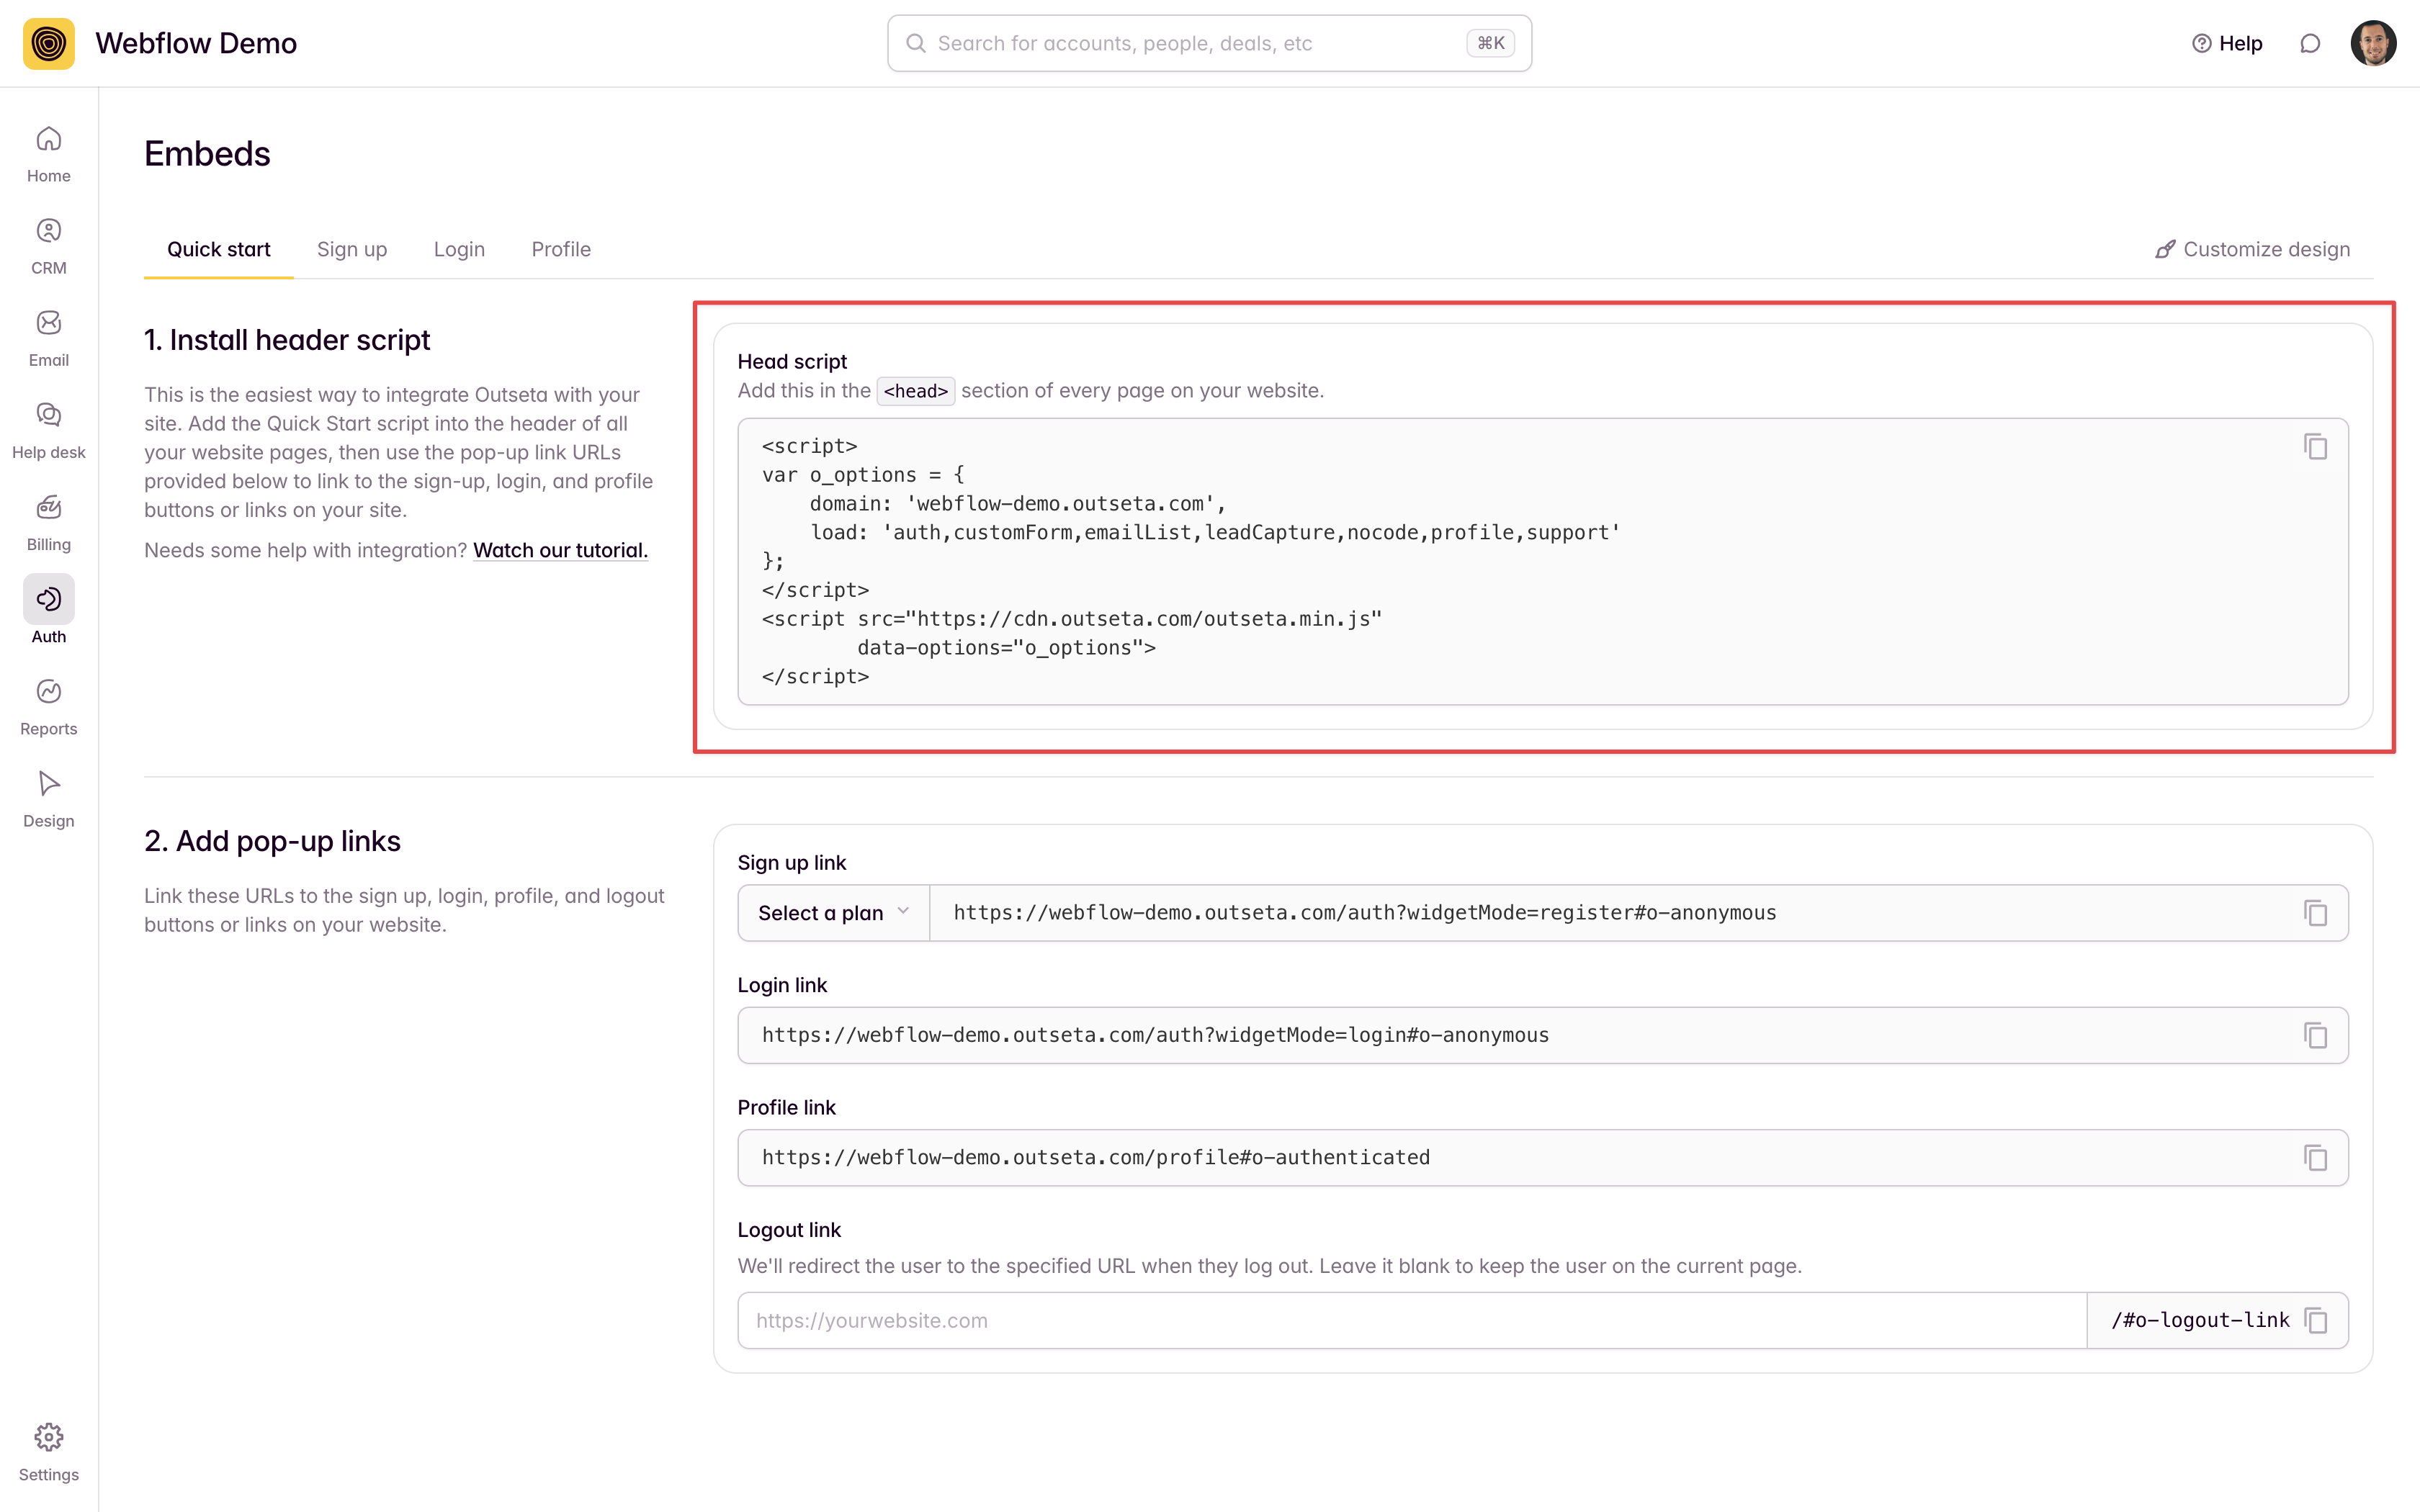
2. Go to AUTH > EMBEDS and copy the Quick start head script.

2. Within Webflow, go to PROJECT SETTINGS > CUSTOM CODE and paste the Quick start head script into the head code. Click SAVE.
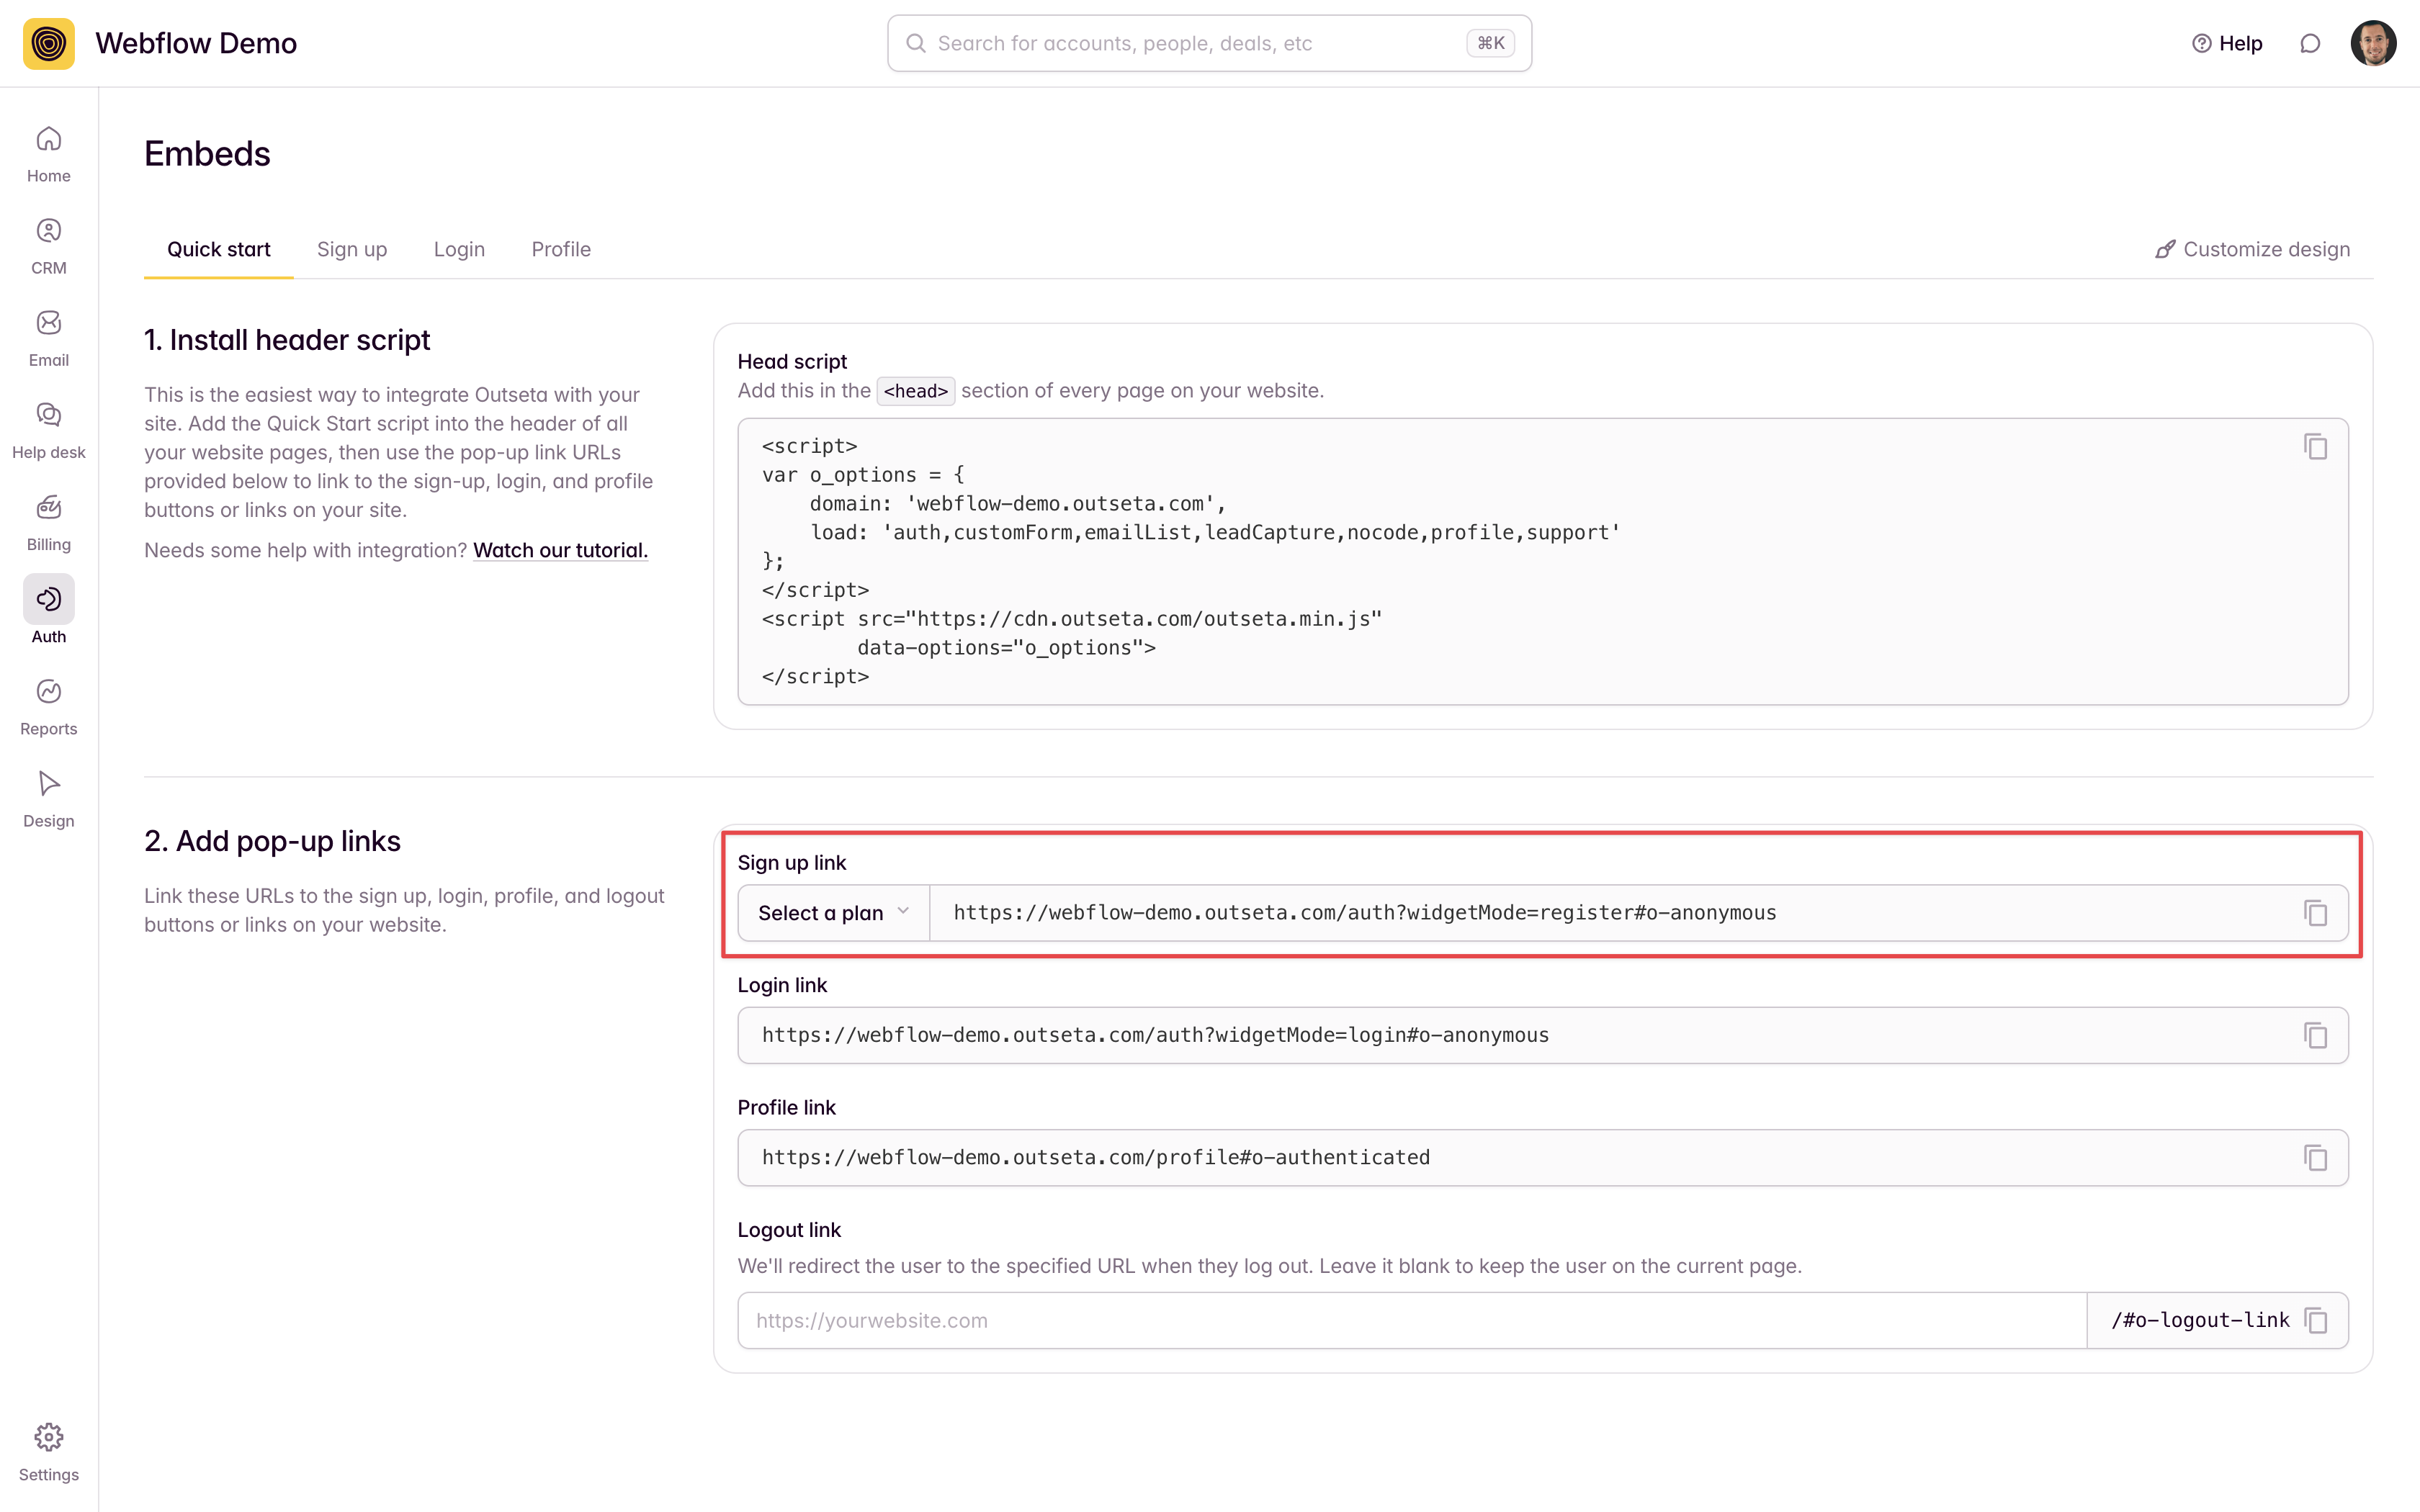
3. In your Outseta account, go to AUTH > EMBEDS and copy the sign up link you find under the Quick start head script.
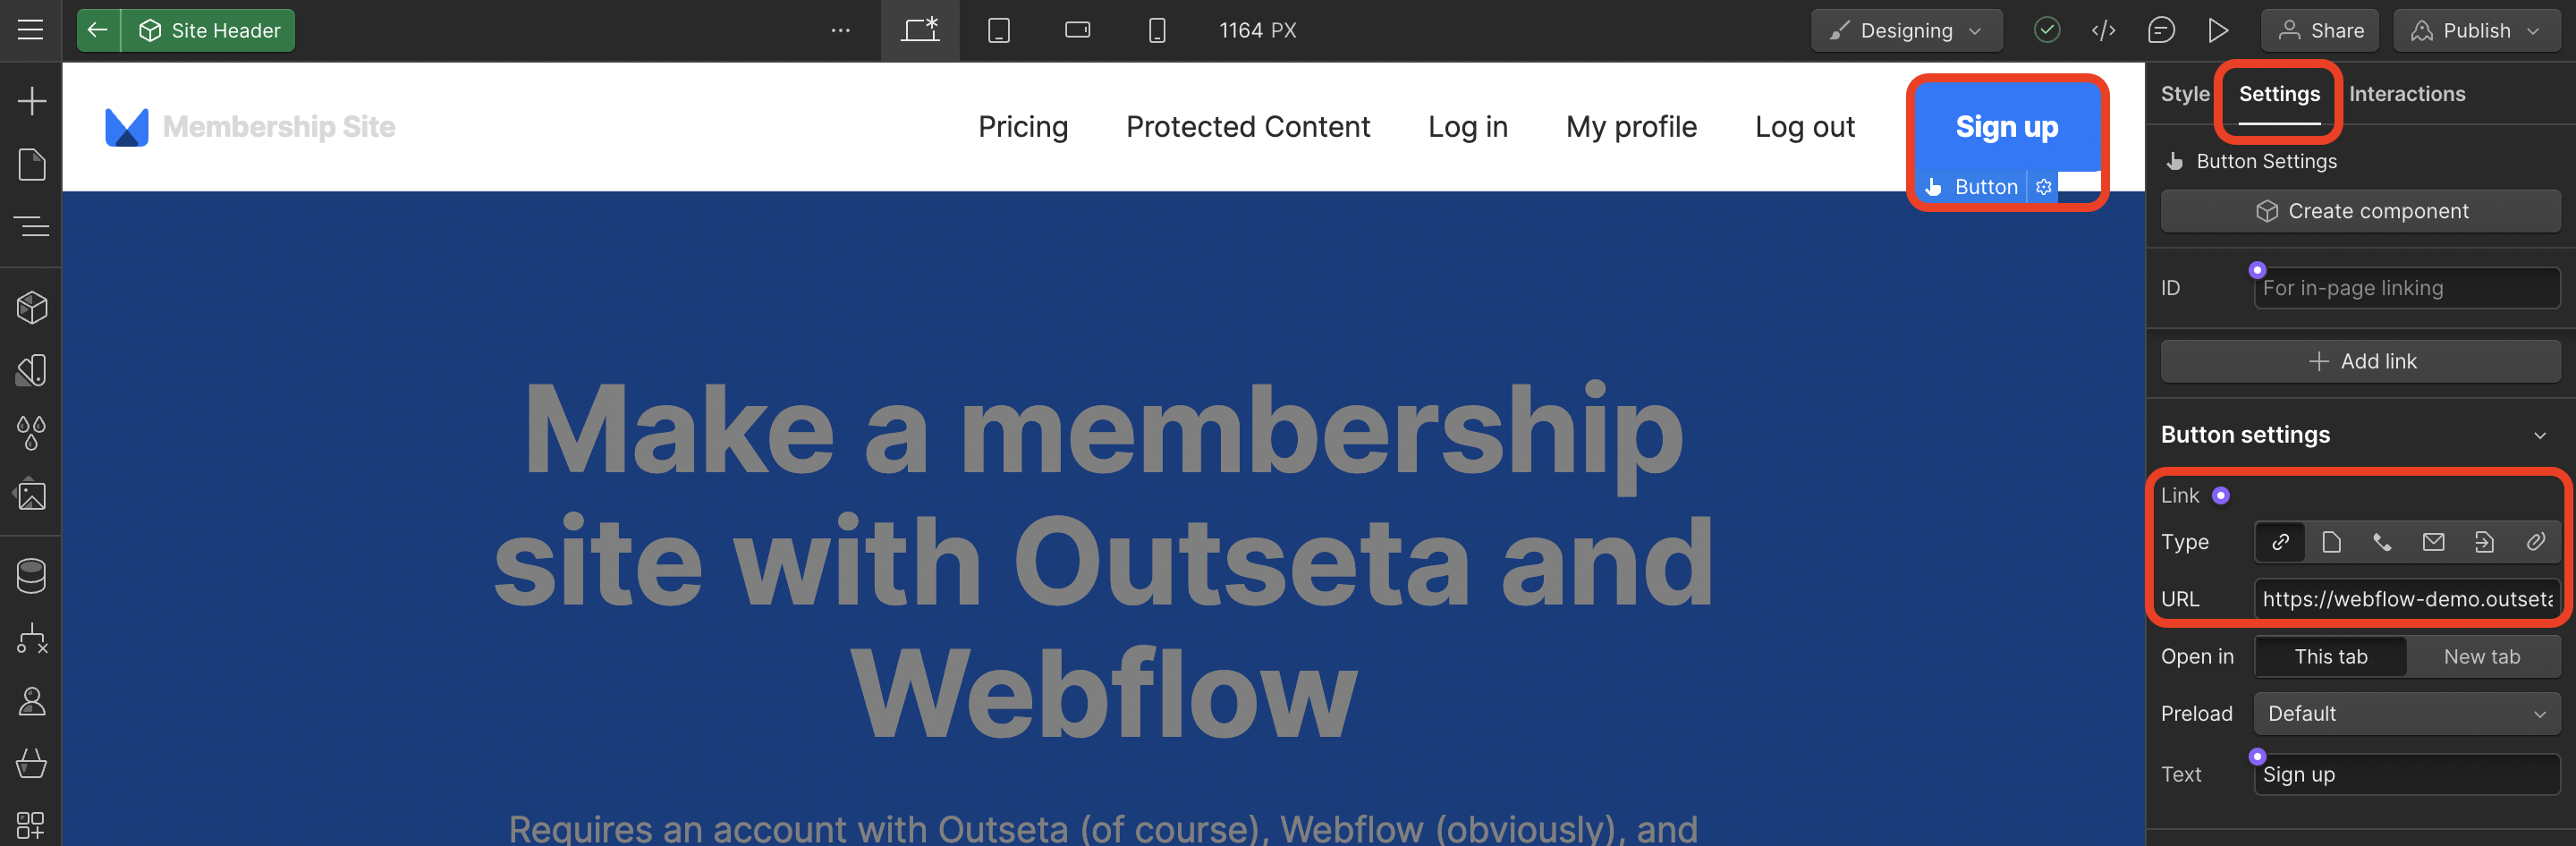
4. Back in the Webflow designer, click on your sign up link or button and open the element Settings. In the Link Settings section enter the URL of the sign up link that you copied from Outseta.
NOTE: You can also generate plan specific sign up links by using the sign up form configuration tool found at AUTH > EMBEDS > SIGN UP.
5. Repeat this same process for your login, profile, and logout buttons or links.
6. PUBLISH your site—Outseta is now fully integrated with your site!
Embed sign up, login, and profile forms on their own pages
Instead of opening Outseta's embeds as pop-ups, you can choose to embed them directly into your website pages. If you choose to go this route, consider adding dedicated /sign up, /login, and /profile pages to your website before you start this process. You can also add these embeds directly within any of your existing website pages.
Follow the steps outlined below to add the embeds directly to your website pages.
1. In Outseta go to AUTH > EMBEDS and copy the Quick start head script.
2. Within Webflow, go to PROJECT SETTINGS > CUSTOM CODE and paste the Quick start head script into the head code. Click SAVE.

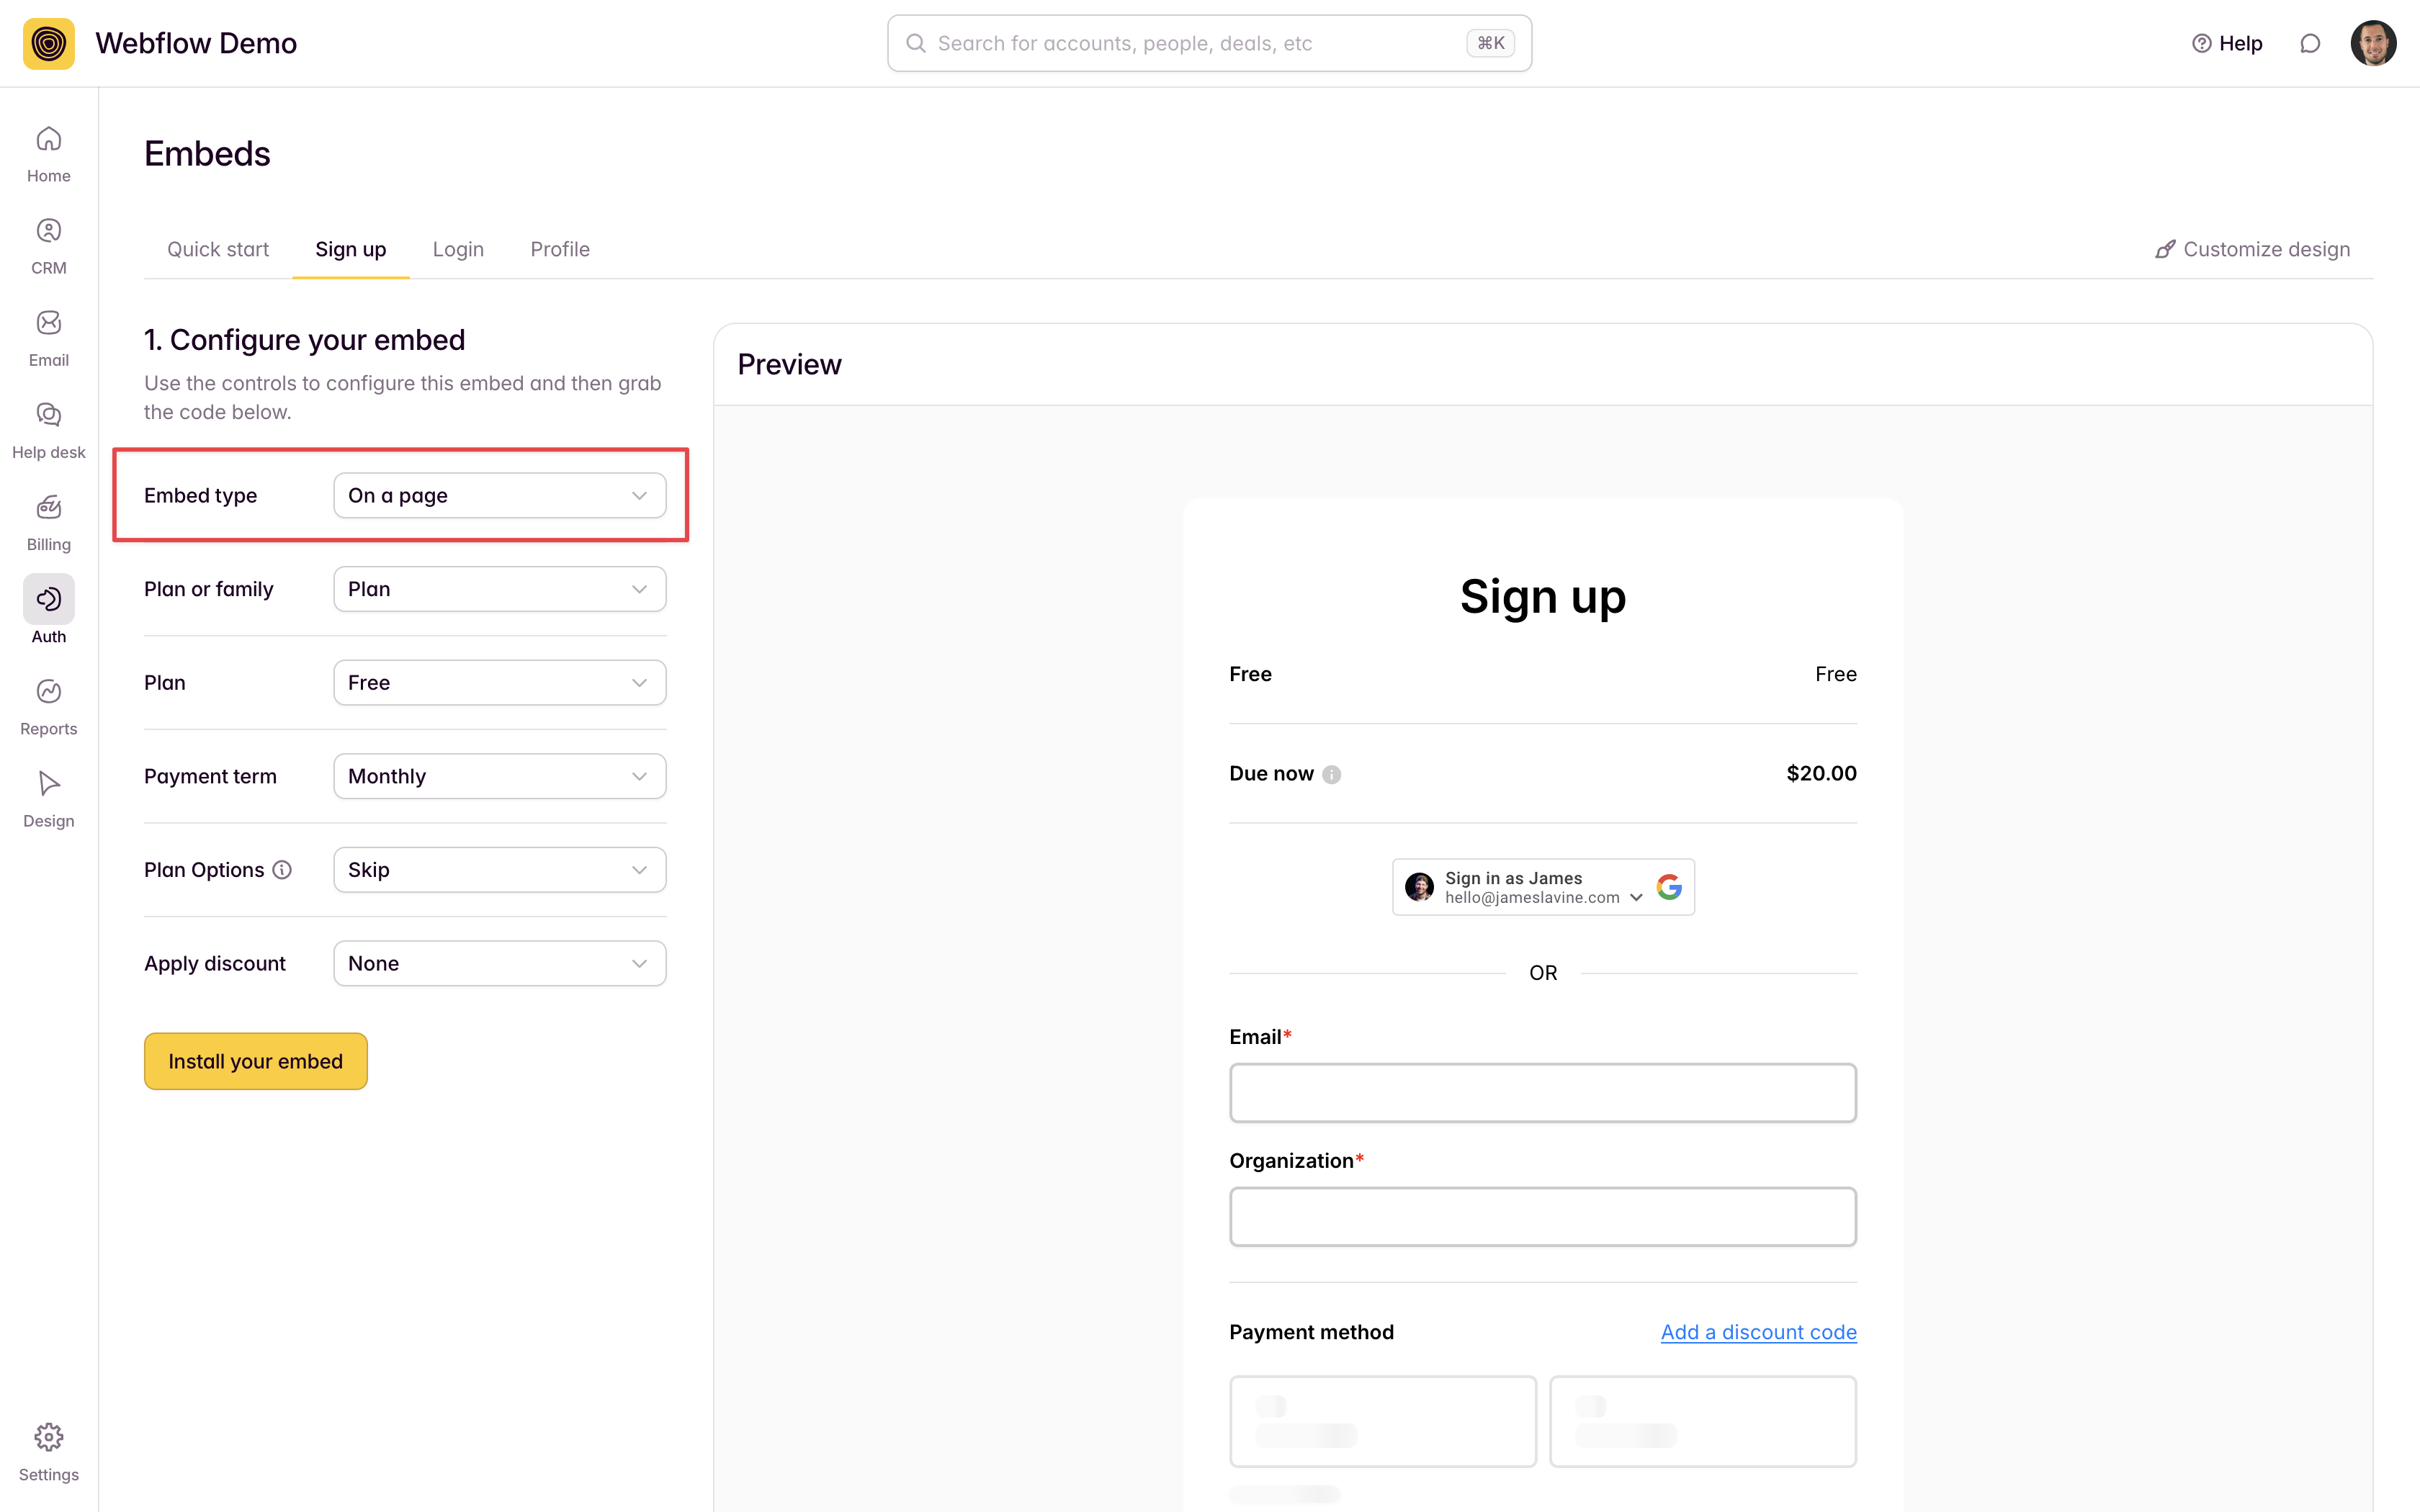
2. Within your Outseta account go to AUTH > EMBEDS. Via the tabs on this page you can select and work directly with the sign up, login, or profile embeds.
In the screenshot below I've selected the sign up embed. In the "Configure your embed" section you'll see I've selected the On a page option. You can also preselect the plan family or individual plans you'd like to display. Use these configuration options and you'll see the Live Preview on the right hand side of the screen update to reflect the changes you've made to the sign up embed.
Once you've configured your embed script to your liking, click INSTALL YOUR EMBED.
2. Scroll down and you can grab the page element that you'll need to drop into your website pages.
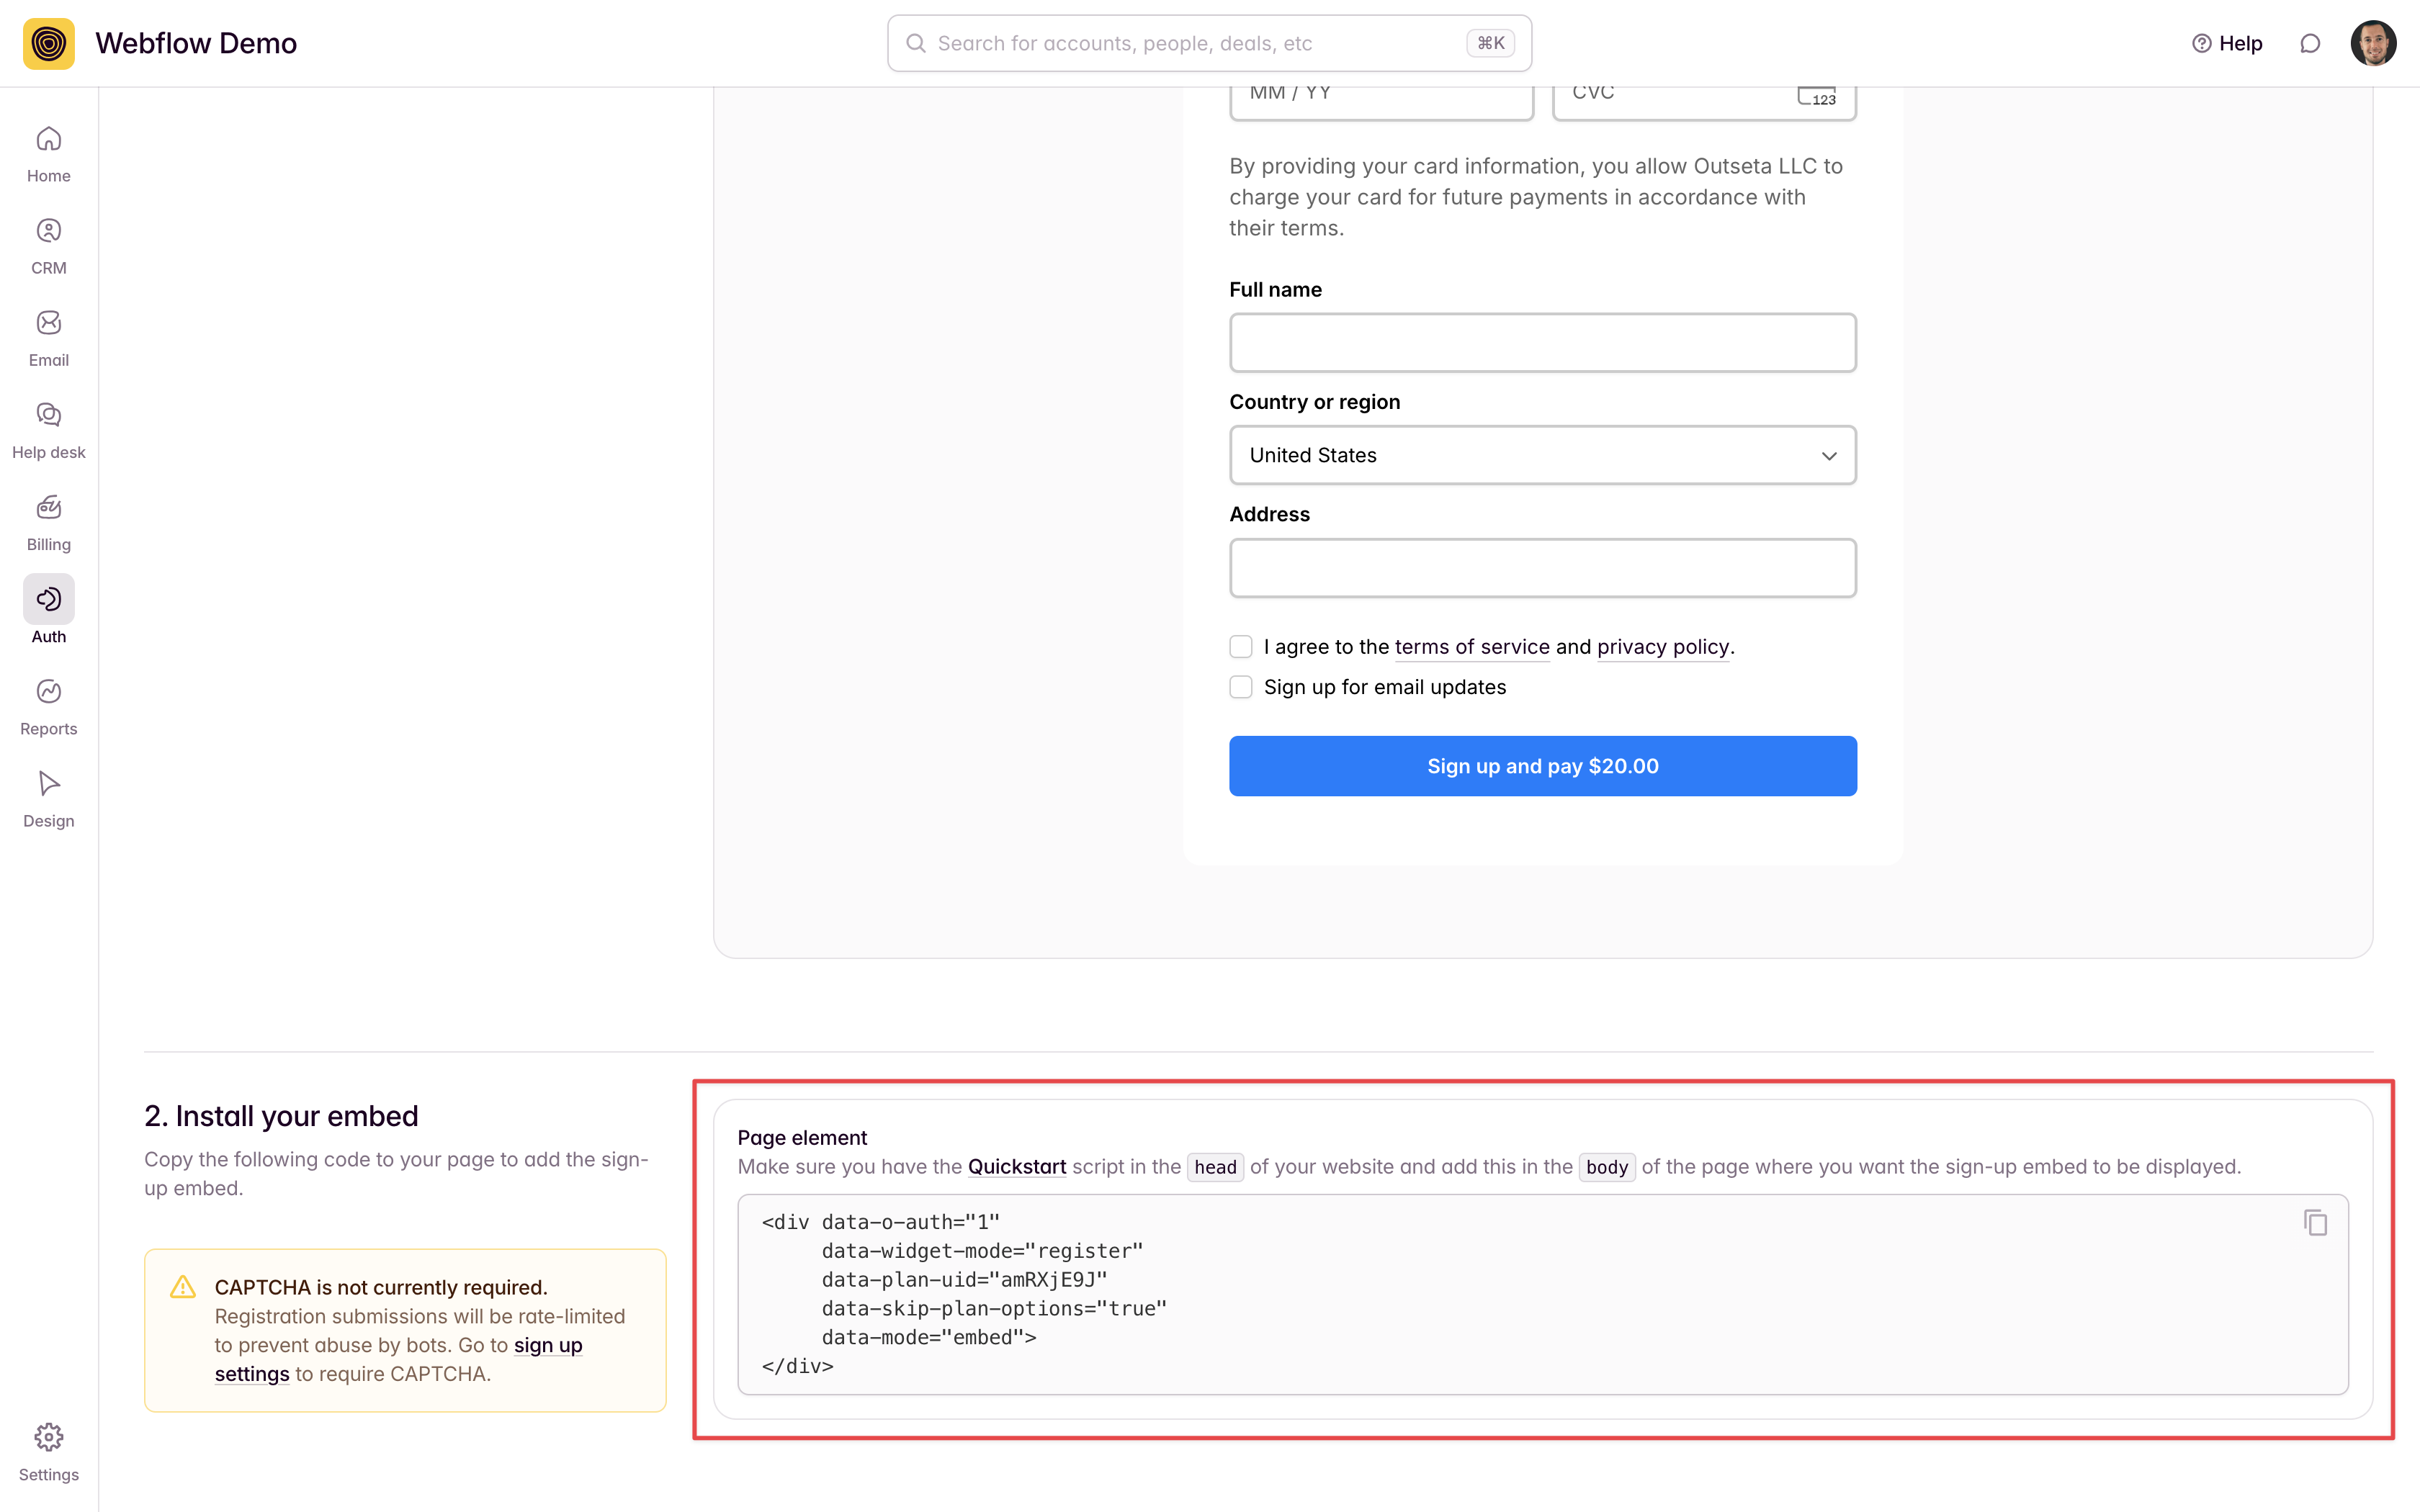
3. Repeat this same process to add the sign up, login, and profile embeds to your pages.
Embed sign up, login, or profile forms (Webflow App method)
You can also add Outseta's sign up, login, or profile embeds to your Webflow site by using our Webflow App.
In the example below I've selected a Sign Up button on the page and am using that button to trigger a sign up pop-up for the "Full Access Membership" plan.
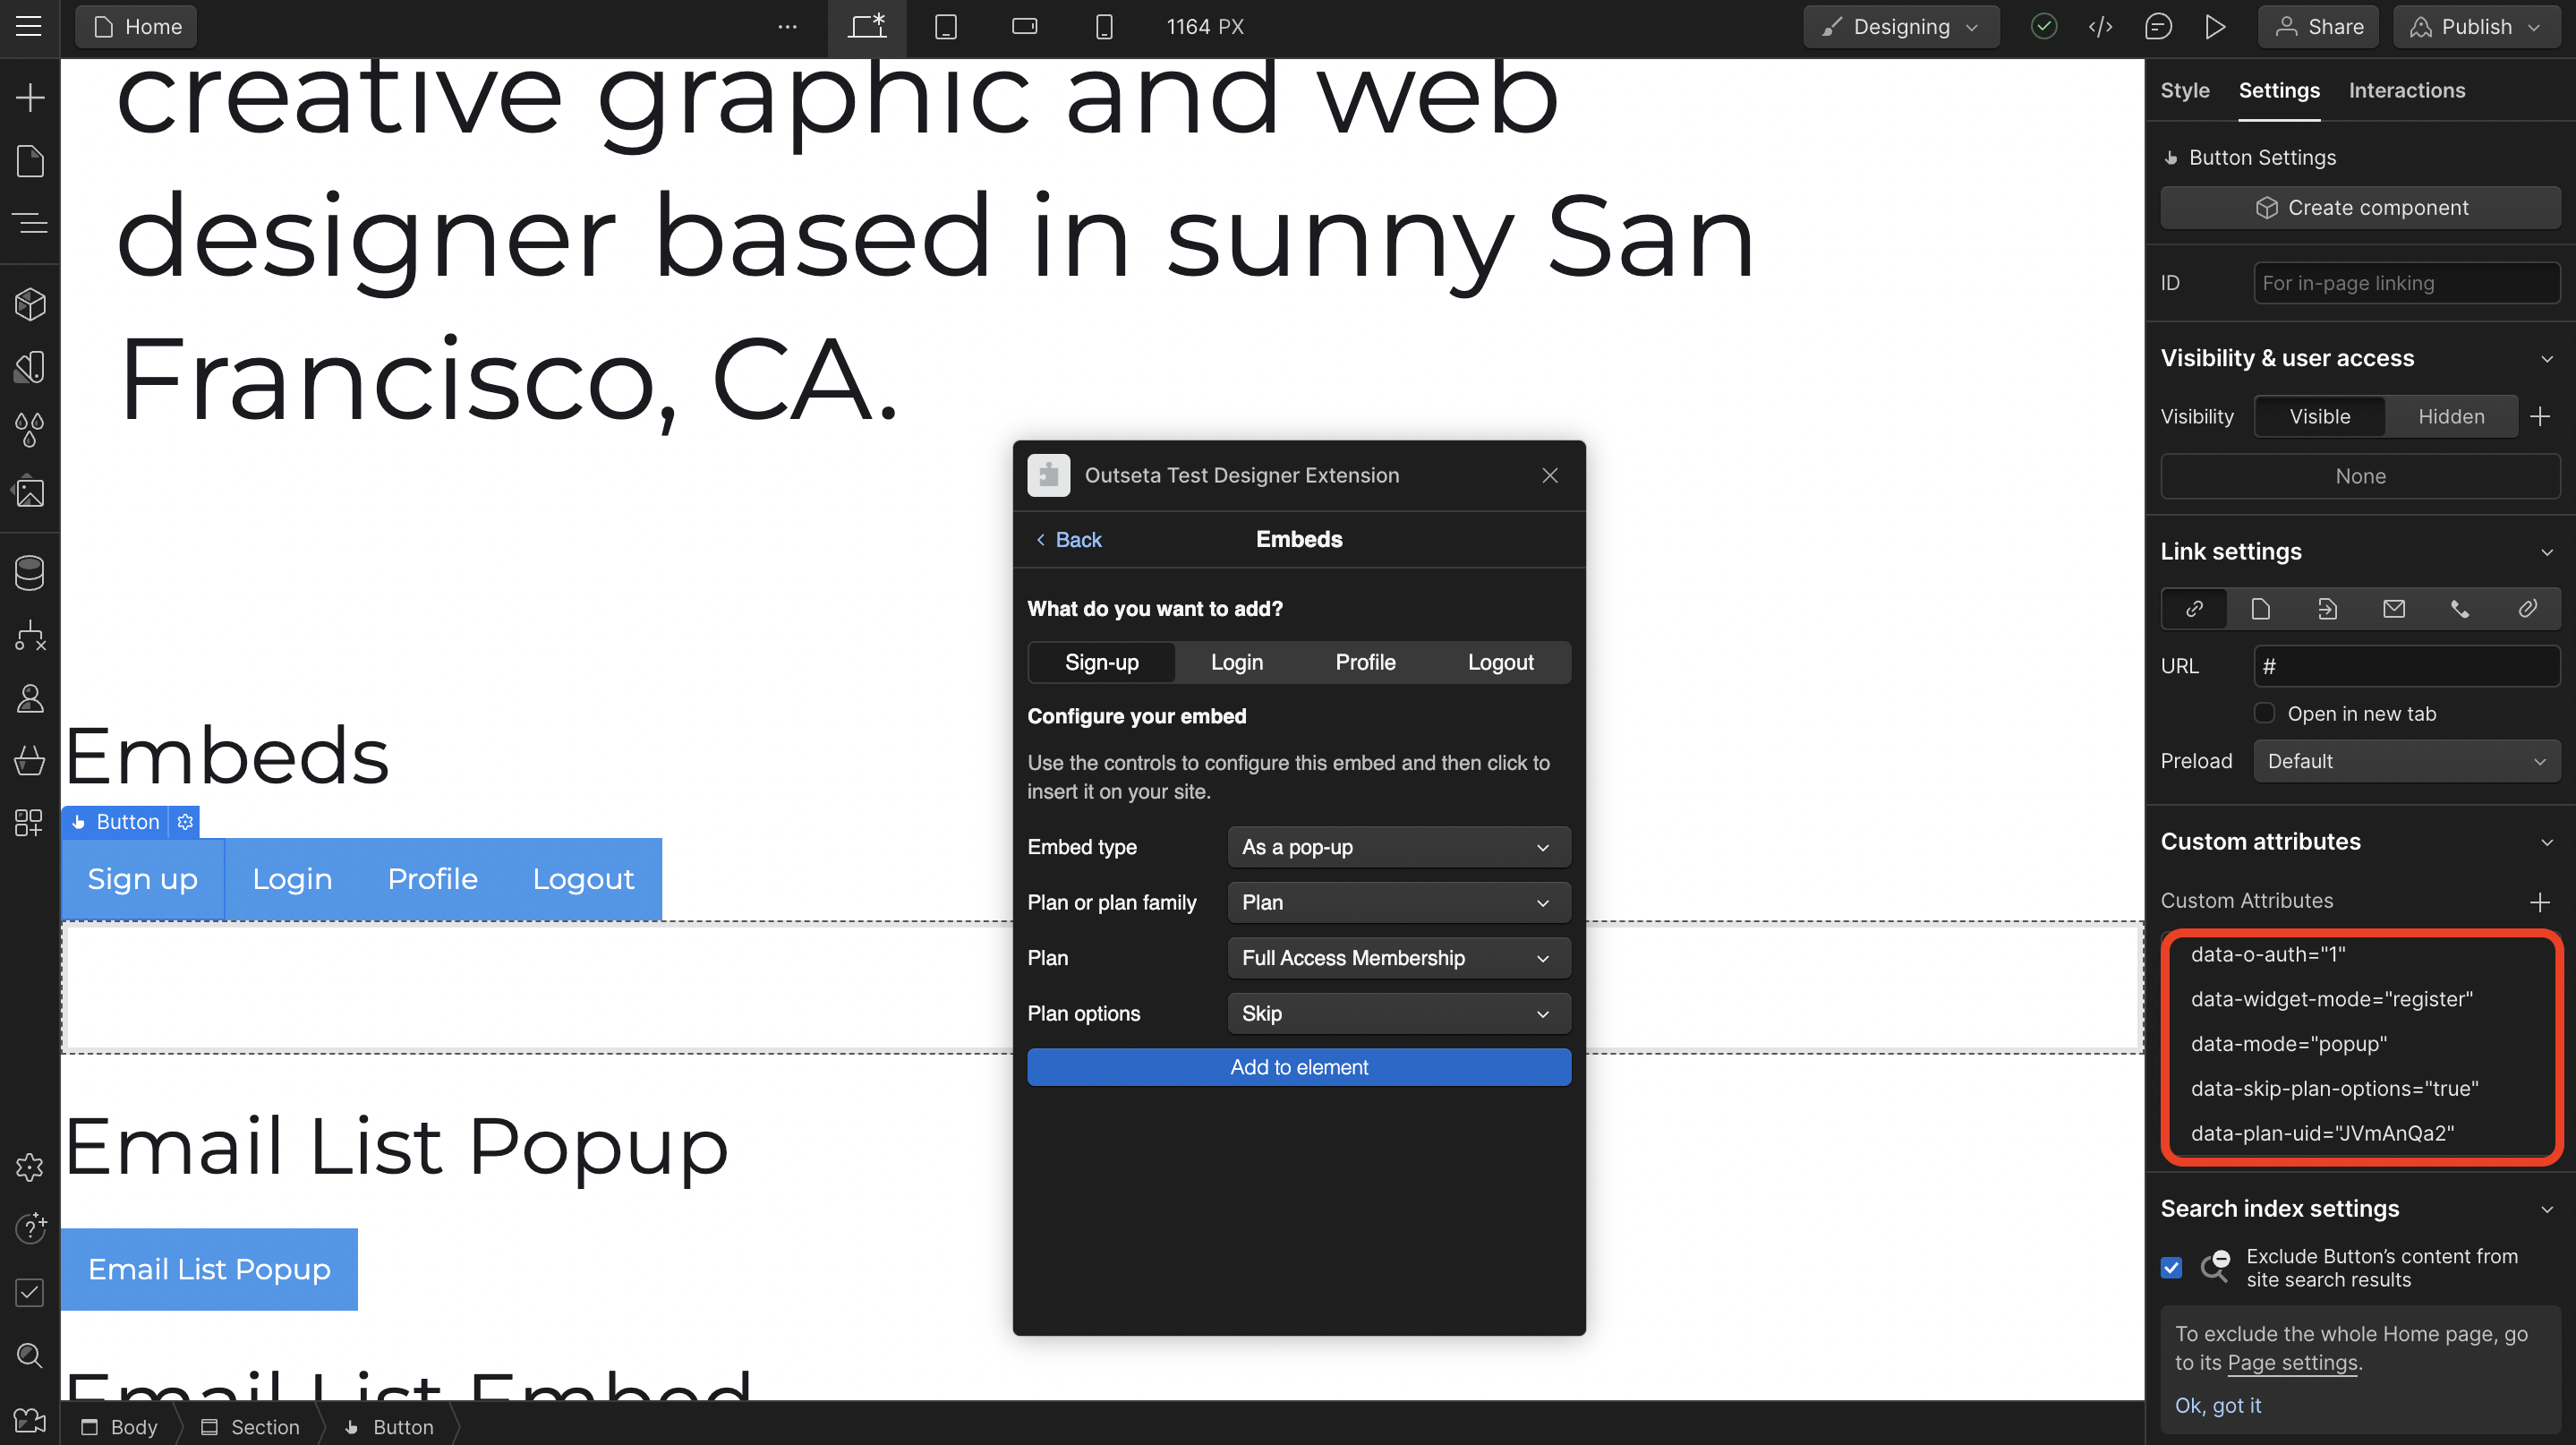
After selecting the button and the appropriate plan, click ADD TO ELEMENT.
When integrating sign up, login or profile embed forms with this method custom attributes are added to the Settings panel.
If you need any help with this process, we'd be happy to help! Please email us at support(at)outseta.com.