WeWeb is a powerful, no-code web app builder that integrates well with Outseta to provide authentication, billing, and user management capabilities without writing code.
When paired with WeWeb's Token-Based Auth Plugin, you get access to WeWeb’s native authentication features such as access control and conditional rendering.
In this guide, you’ll learn how to:
- Capture the Outseta access token
- and store it with the Token-Based Auth Plugin.
Looking to use Xano with WeWeb?
👉 Combine WeWeb's Xano Auth Plugin with Outseta
Prerequisites
Before proceeding, ensure you have completed the following steps from the general Get started with WeWeb and Outseta guide:
- Step 1: Add Outseta to Your WeWeb Project
- Step 2: Set Up Outseta Sign-Up, Login, Profile, and Logout
And have added the following plugin to your WeWeb project:
- Token-Based Auth Plugin
Step 1: Configure the WeWeb Token-Based Auth Plugin
To properly integrate WeWeb's Token-Based Auth Plugin with Outseta, configure the plugin as follows:
- Configuration
- Auth Type: Auth Bearer Token
- User Endpoint:
https://[your-subdomain].outseta.com/api/v1/profile - Refresh Token Endpoint: None
- Define Redirections
- Set up redirections based on your project’s needs.
- User Role Configuration (Optional)
- Outseta does not provide roles so leave this blank.
🔹 Note: Swap out [your-sudomain] with your subdomain found at Auth > Embeds > Quick Start.
Step 2: Create a Workflow to Process the Outseta Access Token
To sync Outseta authentication with WeWeb, create a WeWeb workflow that accepts the Outseta access token. If an access token exists, store it and fetch the user using the Token-Based Auth Plugin. If no access token, log out using the Token-Based Auth Plugin.
- Create a new workflow in the Actions panel to the left
- Name it "Outseta Auth to Token Based Auth"
- Add a parameter named
outsetaAccessToken - Add the actions outlined in the video below
✅ Test It: Use WeWeb's "Test Workflow" feature to test your workflow. To test the "true" path, use a valid Outseta access token. Grab it from the URL after logging in to your deployed site or write Outseta.getAccessToken() in the console (see video below).
Step 3: Create a Workflow to Capture the Outseta Access Token
To capture the Outseta Access Token, create a workflow in WeWeb that executes JavaScript to listen for Outseta authentication events and passes the access token to the "Outseta Auth to Token Based Auth" workflow from step 2.
- Create a new workflow using More > Trigger app workflows
- Name it "Capture Access Token"
- Select "On app load (before fetching collections)" as the trigger
- Add one Custom Javascript Action with the following code
const WORKFLOW_ID = "YOUR_WORKFLOW_ID";

function triggerWorkflow(outsetaAccessToken) {
  wwLib.wwWorkflow.executeGlobal(WORKFLOW_ID, {
    outsetaAccessToken: outsetaAccessToken,
  });
}

if (window.Outseta) {
  if (!Outseta.getAccessToken()) {
    // User is no longer logged in on app load
    triggerWorkflow();
  }

  Outseta.on("accessToken.set", () => {
    // Listen for changes in authentication
    triggerWorkflow(Outseta.getAccessToken());
  });
}
🔹 Note: Replace YOUR_WORKFLOW_ID with the workflow ID of your "Outseta Auth to Token Based Auth" workflow from step 2.

✅ Test It: We'll need to complete the next step to test this step.
Step 4: Utilize WeWeb's Private Access and Conditional Rendering
With the Outseta access token stored in WeWeb, you can now use WeWeb’s built-in private access and conditional rendering features.
Restricting Page Access
- Go to the Settings tab of a page in WeWeb.
- Choose Private Access and set "Who can access this page" to "Authenticated users."
Conditionally Showing Elements
- Select an element in WeWeb
- Under the Settings tab, open Conditional Rendering
- Configure the formula using the Token-Based Auth authentication state.
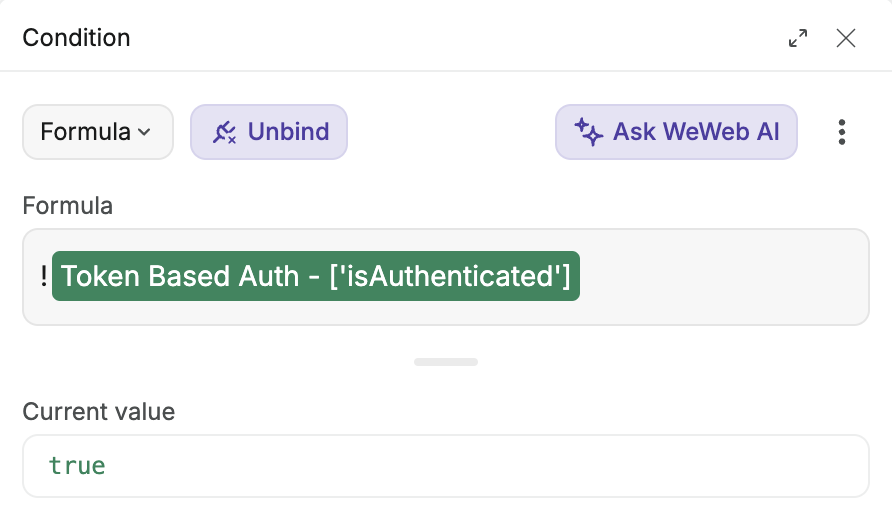
Only display the Sign-up and Login buttons to logged-out users using the following formula:
Only display the Profile and Logout buttons to logged-in users using the following formula:
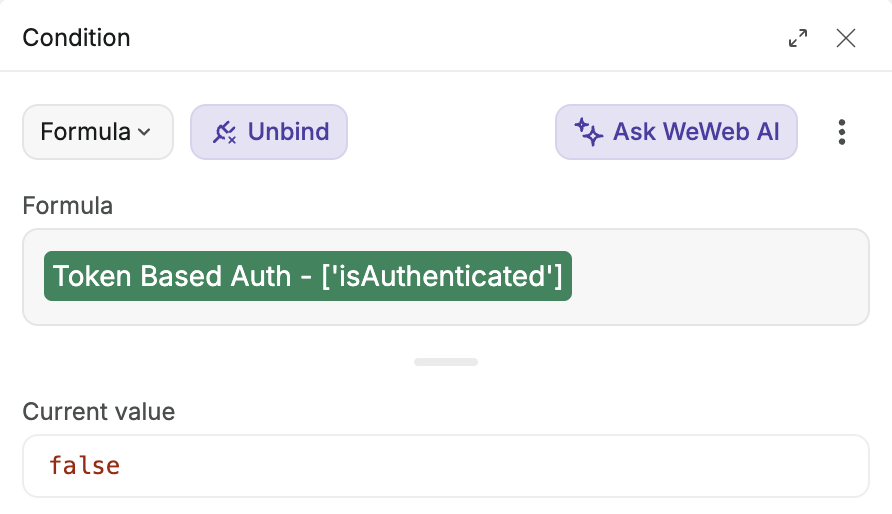
🔹 Note: The subtle difference between the two is the ! at the beginning of the first formula that negates what comes after it.
✅ Test It: Log in and out of the deployed site to confirm that the appropriate elements appear or disappear based on authentication status.
Celebrate 🎉
That’s it! You’ve successfully combined Outseta with WeWeb’s Token-Based Auth Plugin, enabling WeWeb’s native authentication features such as private access and conditional rendering.
Need help? Reach out to Outseta Support ([email protected]). We're happy to assist!