
This guide covers everything you need to know about subscription changes in Outseta. This includes:
- How you can change a customer's subscription
- How a customer can change their own subscription
- How upgrades, downgrades, and proration are handled
- How to make subscription changes via Outseta's API
The logic Outseta uses for subscription changes is handled by Stripe Billing—refer to Stripe's documentation for further information: Modify Subscriptions
Subscription changes as an admin user (how to change a customer's subscription)
1. Navigate to CRM > ACCOUNTS and open the ACCOUNT record for the customer who's subscription you'd like to change.
2. Click on the name of the PRODUCT that you want to change from the SUBSCRIPTIONS section on their account record.
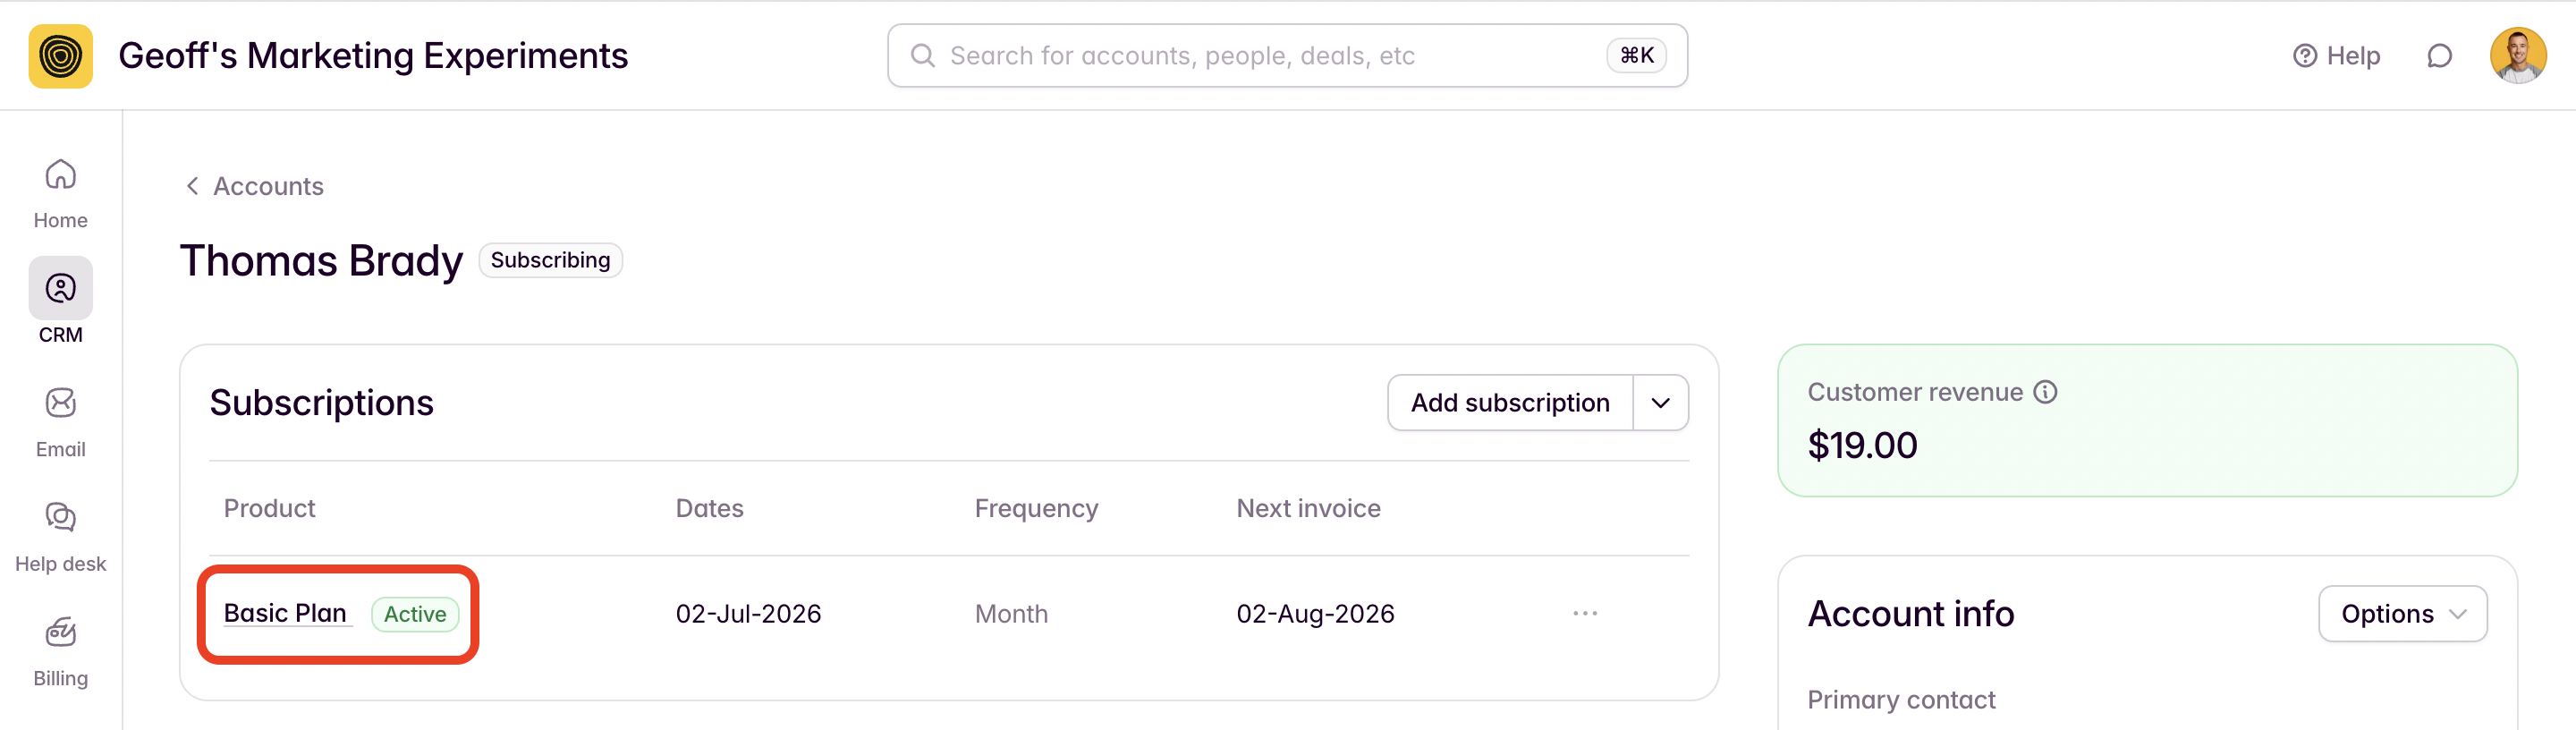
This will open Stripe.
3. Click UPDATE SUBSCRIPTION. You can then add and remove products from the subscription.
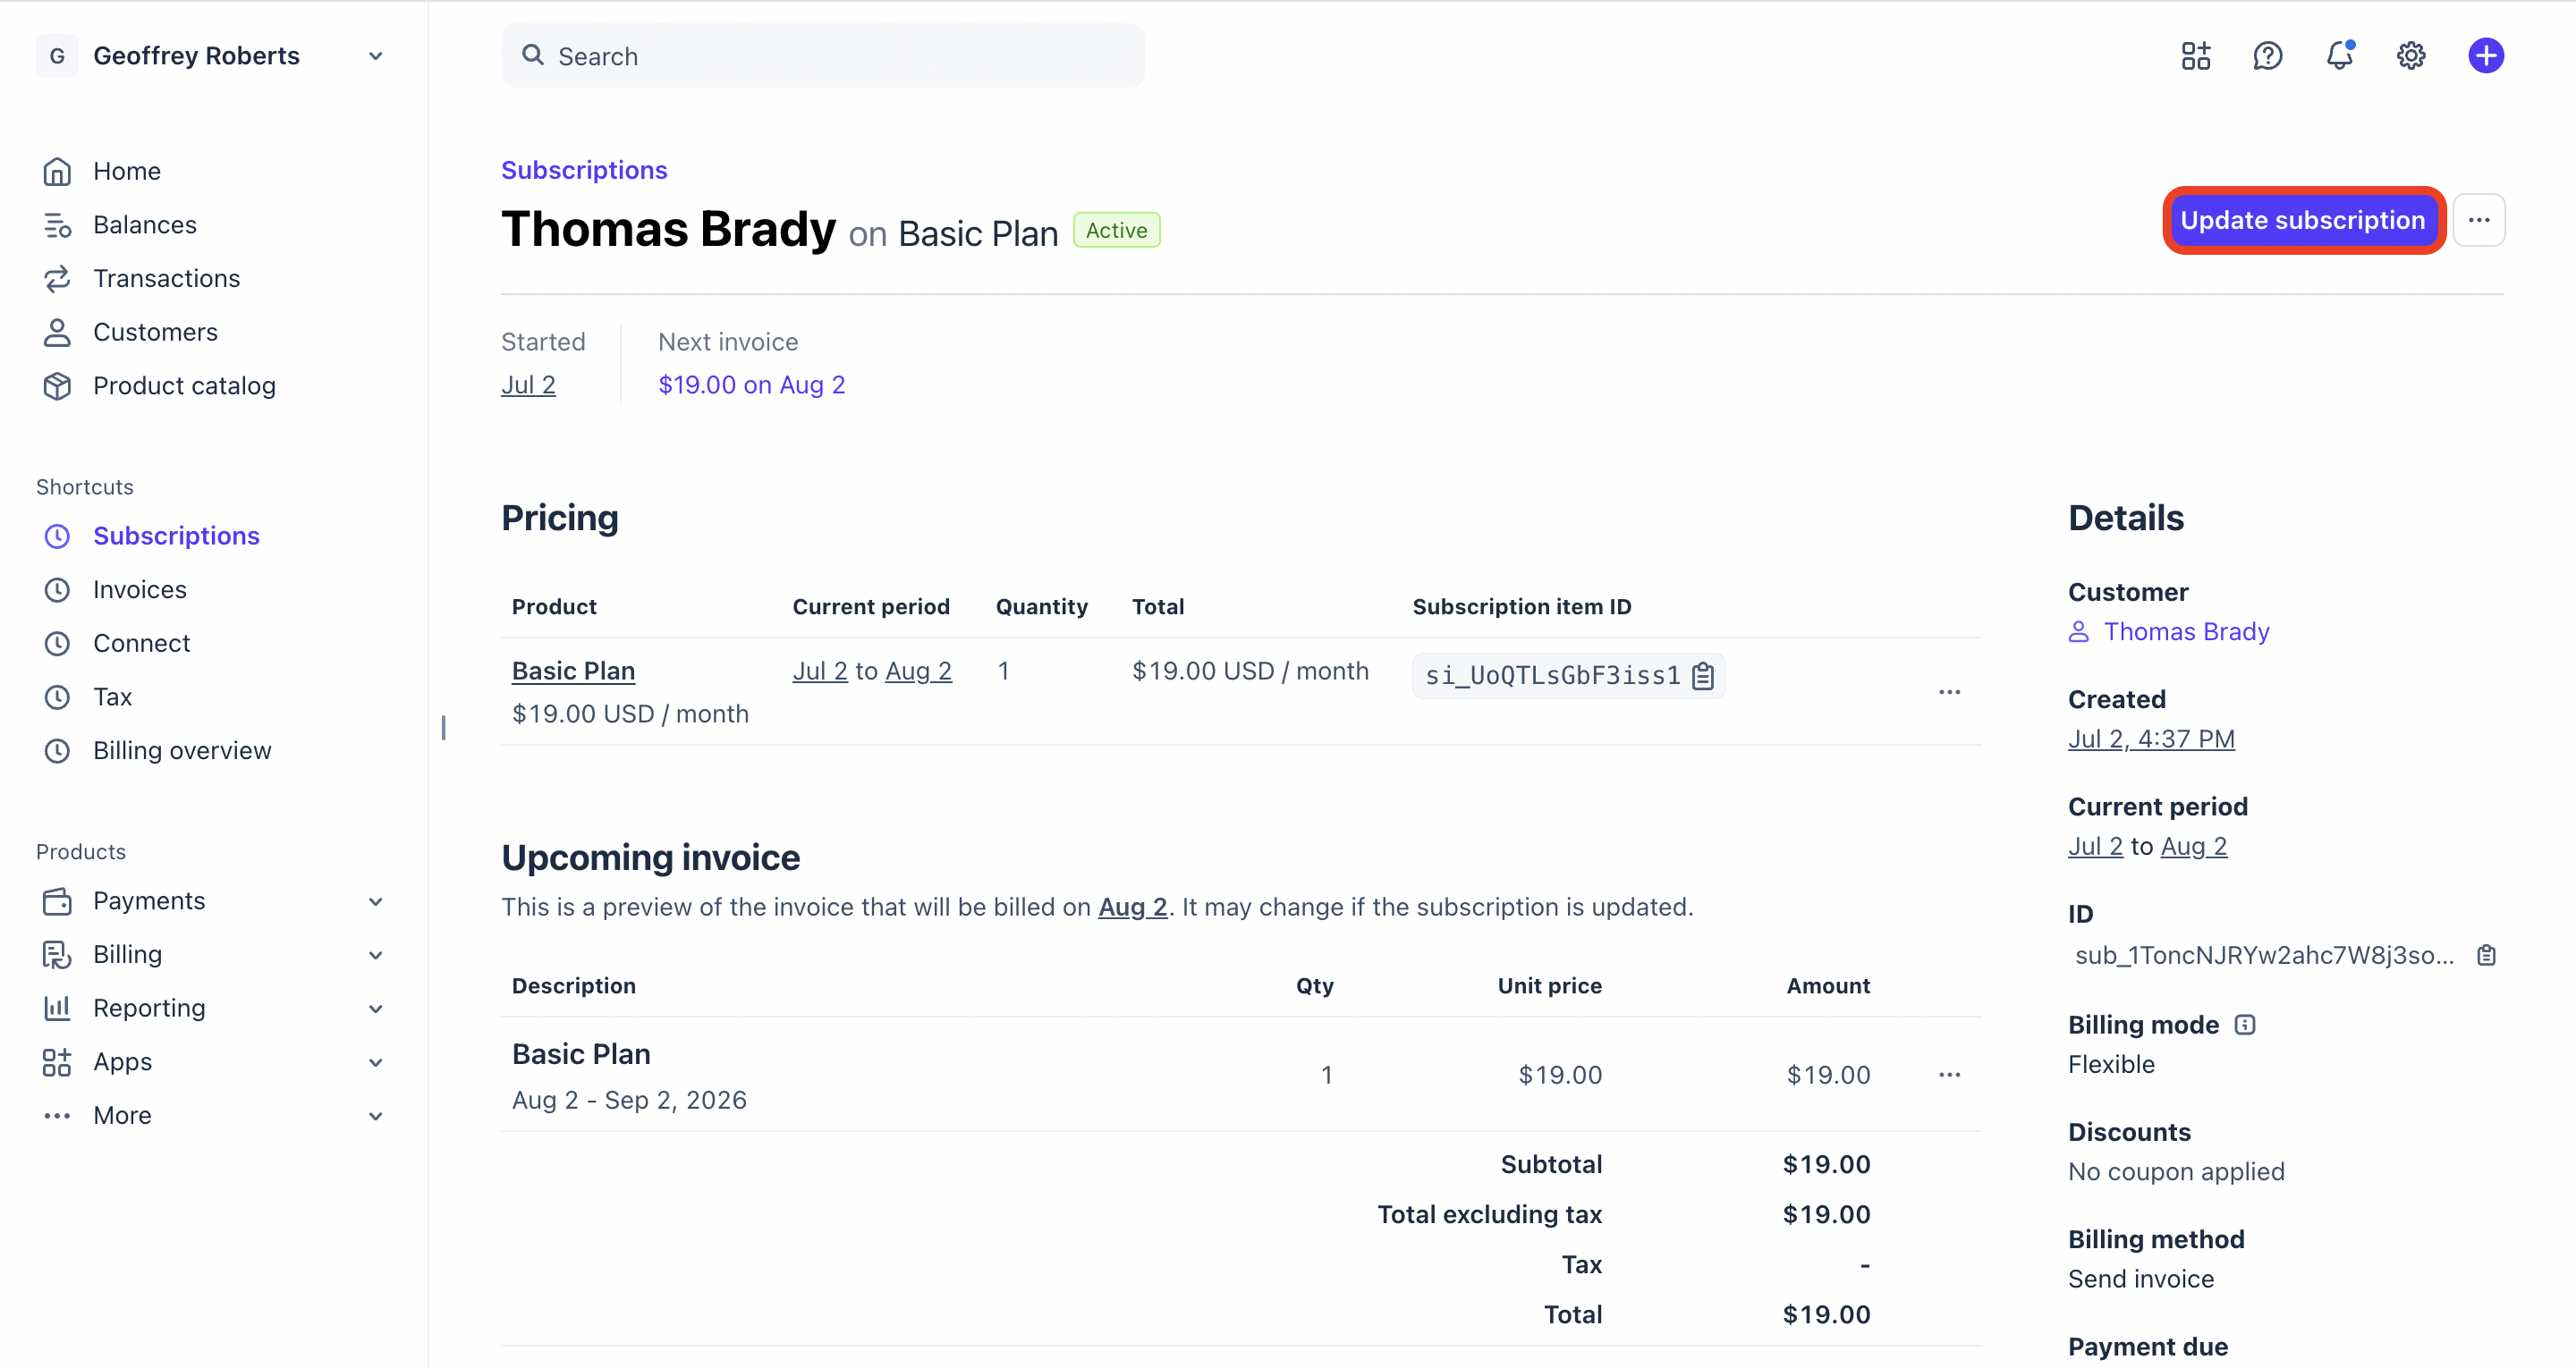
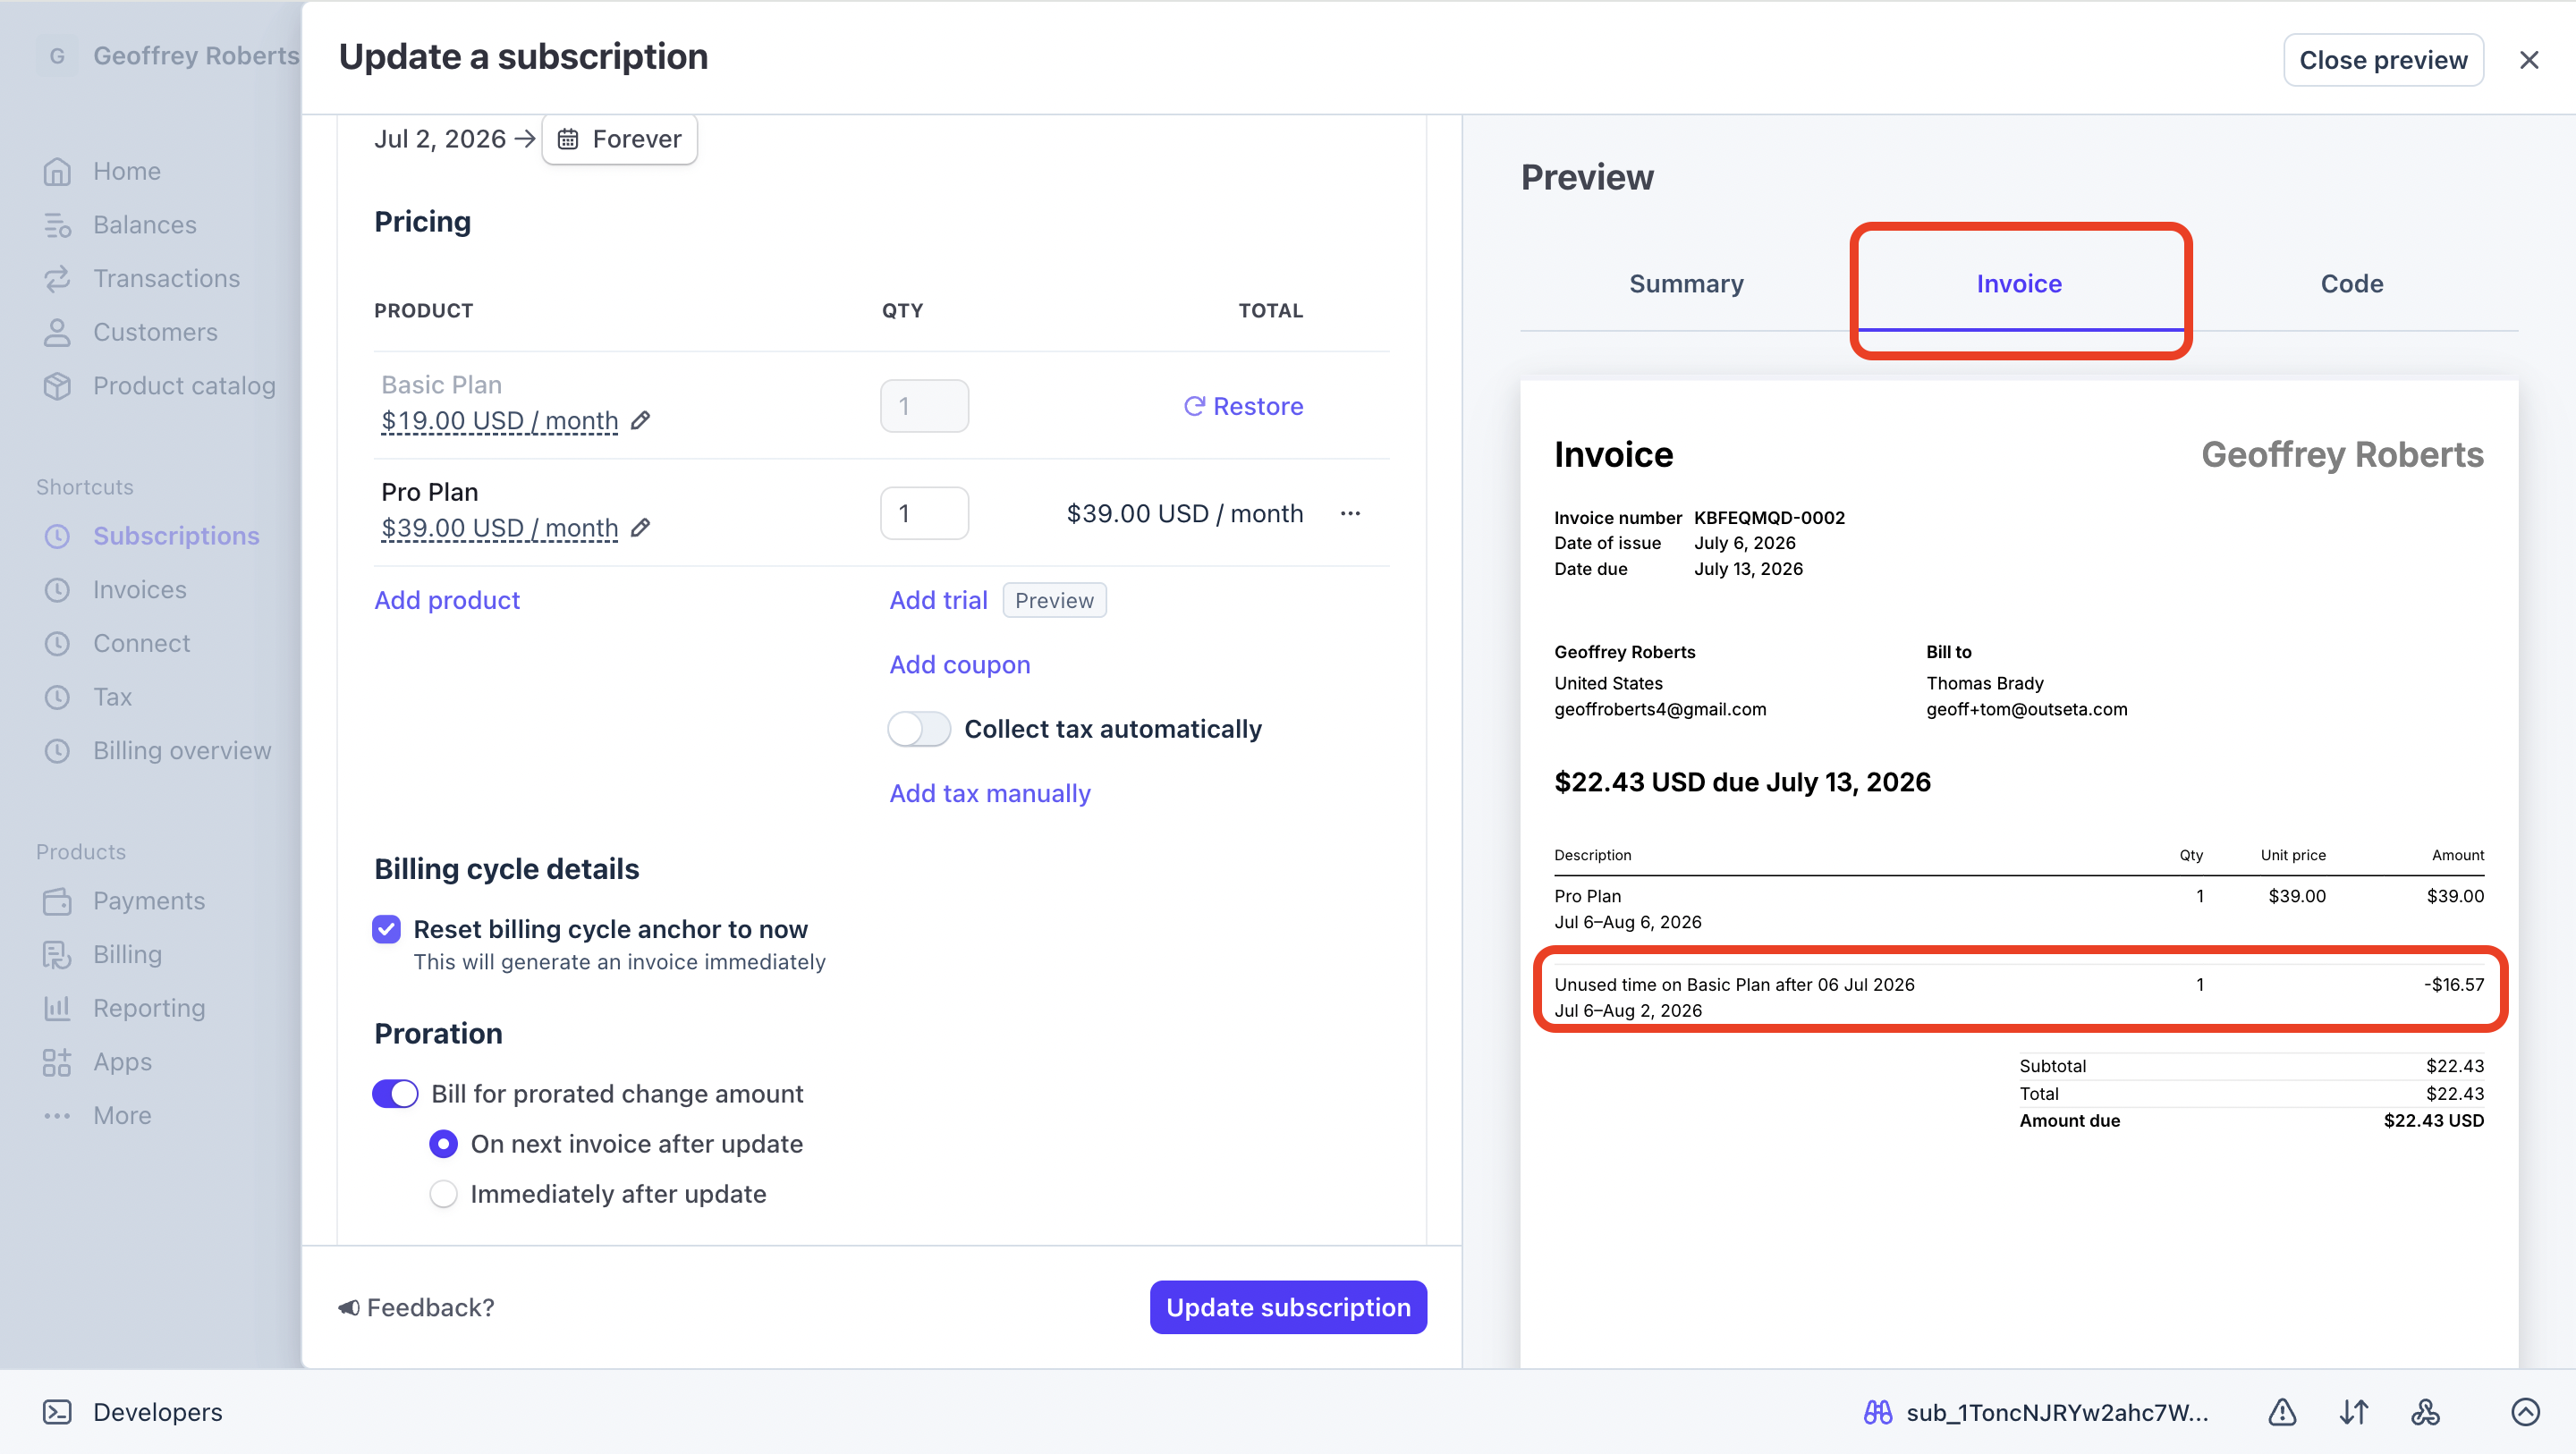
In this example I've first removed the "Basic Plan" from the subscription.
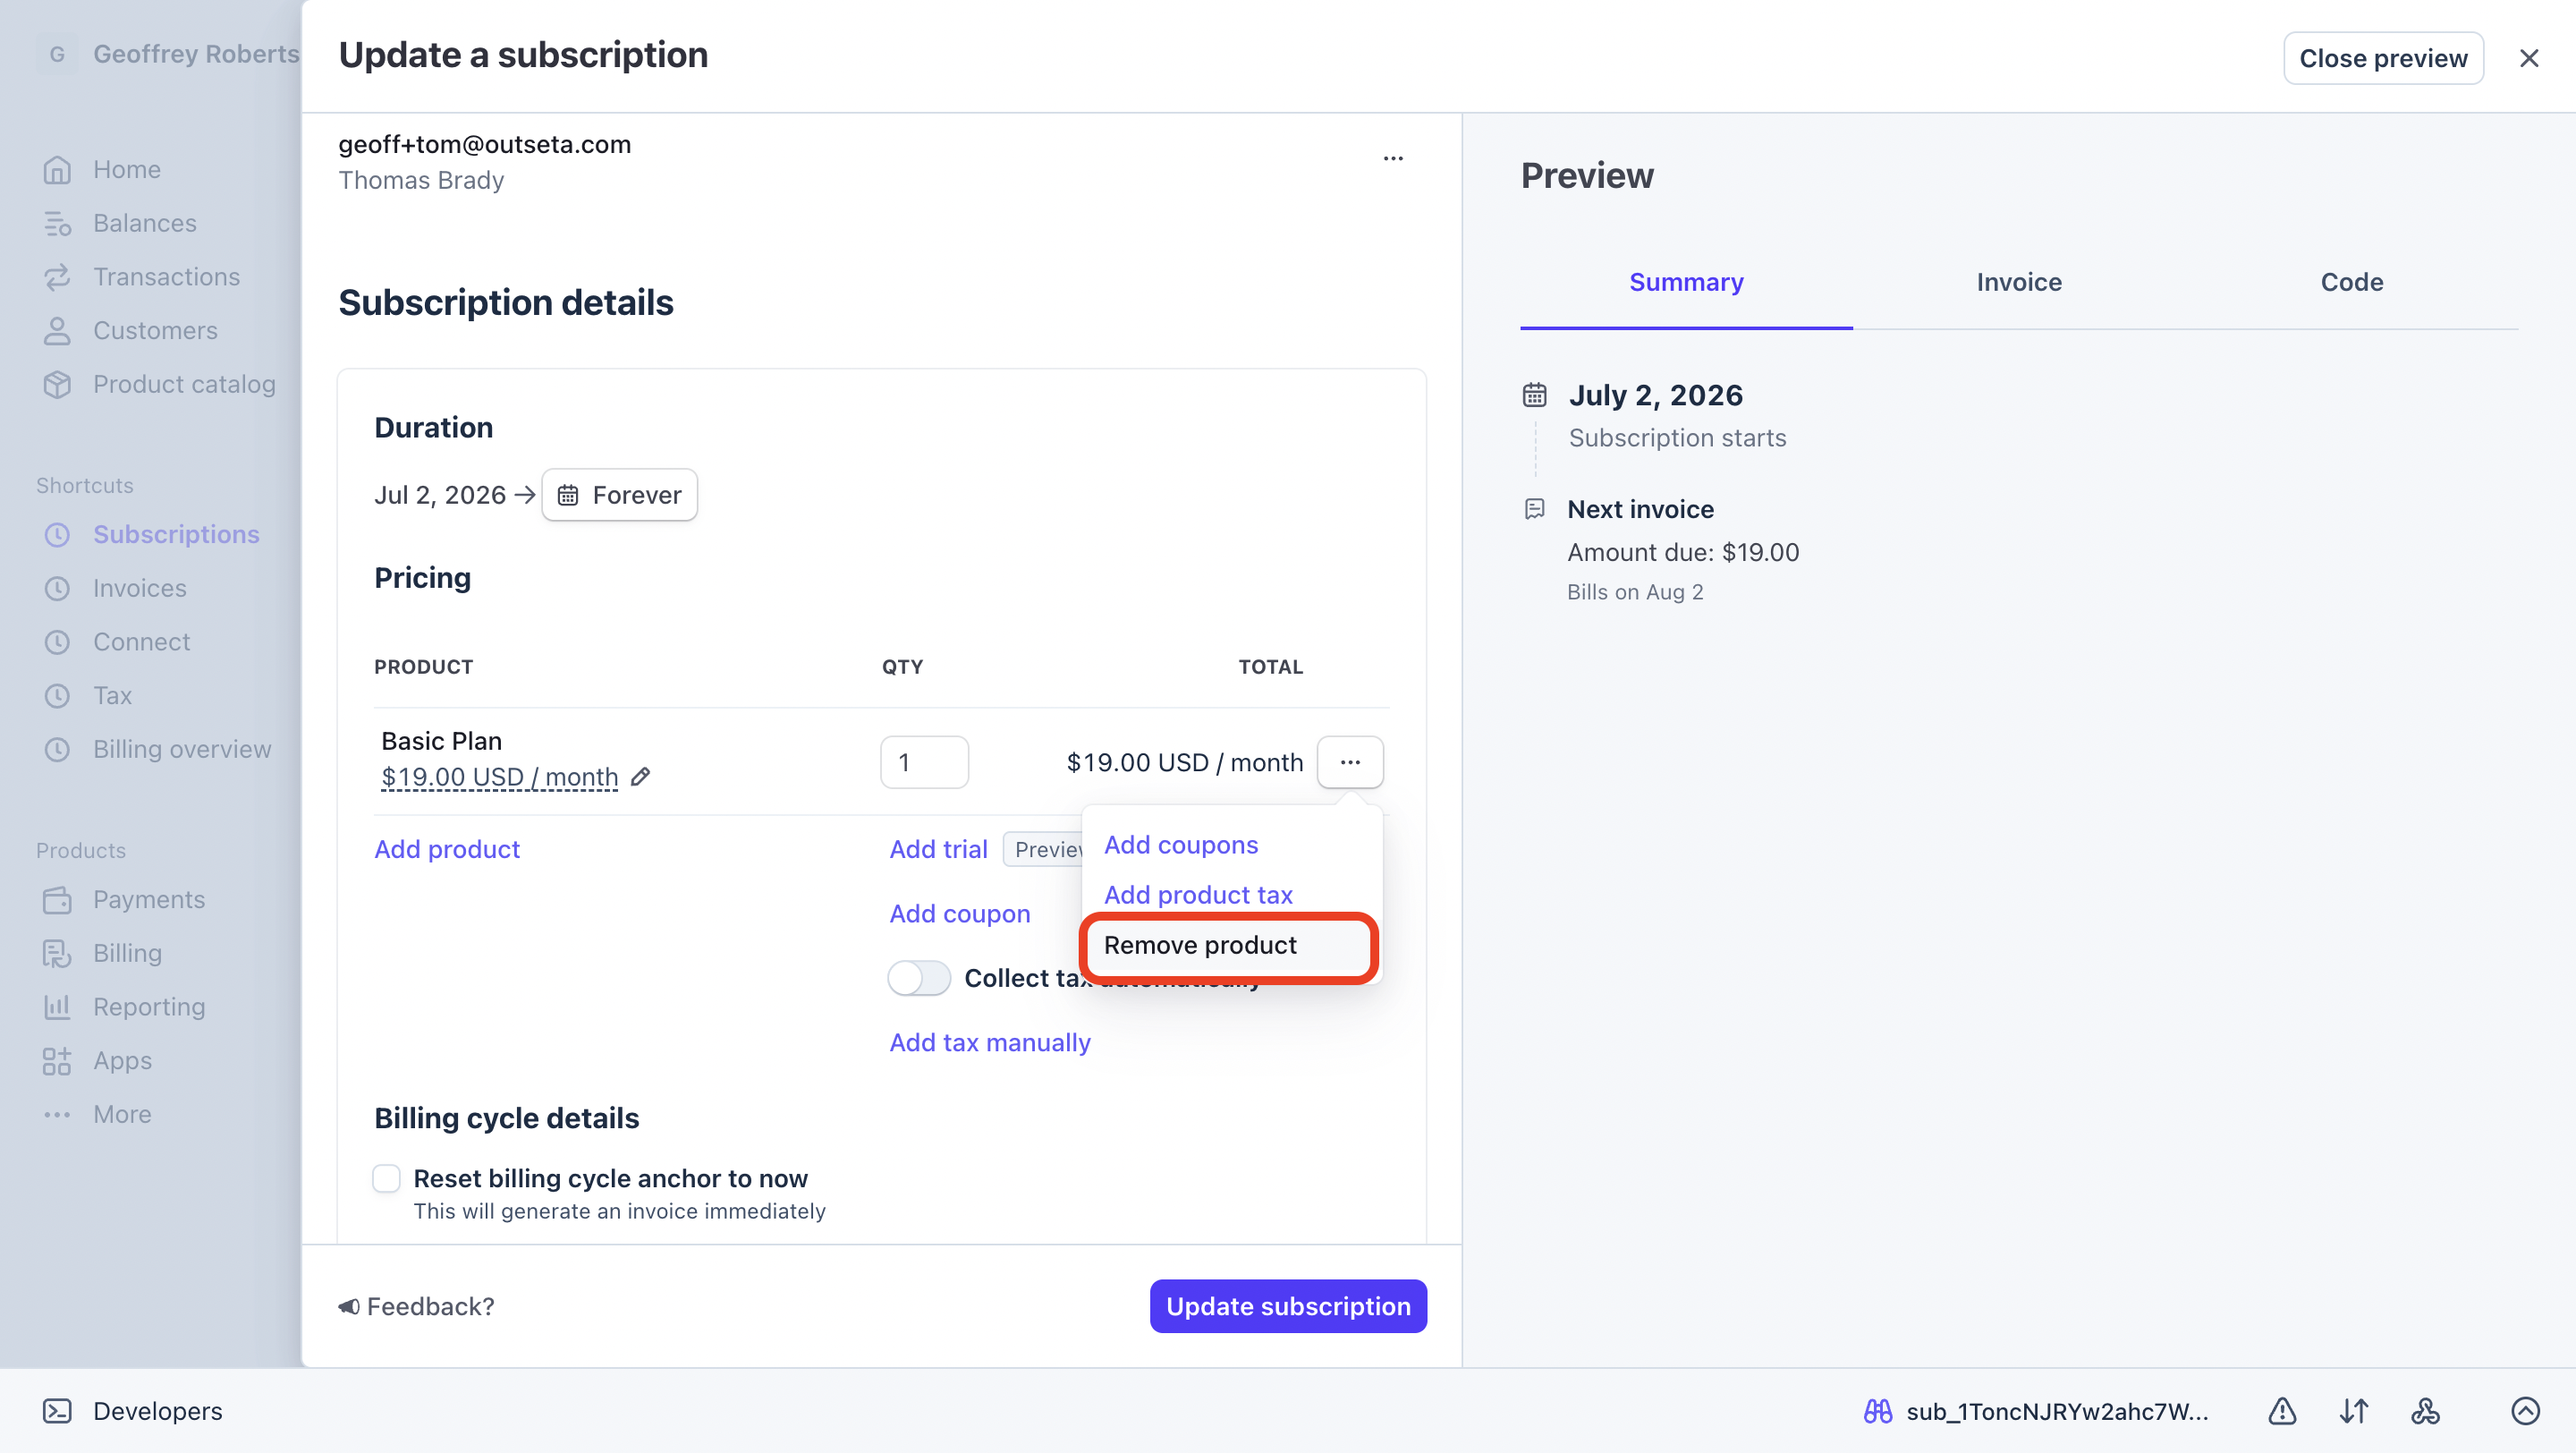
I then added the "Pro Plan"—I also chose the Reset billing anchor to now and Bill for prorated change amount options. A few notes on these settings.
- Reset billing cycle anchor to now—Starts a new subscription period immediately.
- Bill for prorated change amount—Applies proration to the subscription change based on the used time the customer had on their previous plan.
As a result of these changes, the user will have their plan changed to the "Pro Plan" immediately and will pay $22.42—which represents the $39/mo cost of the "Pro Plan," with a credit of $16.57 applied based on the unused time on the "Basic Plan."
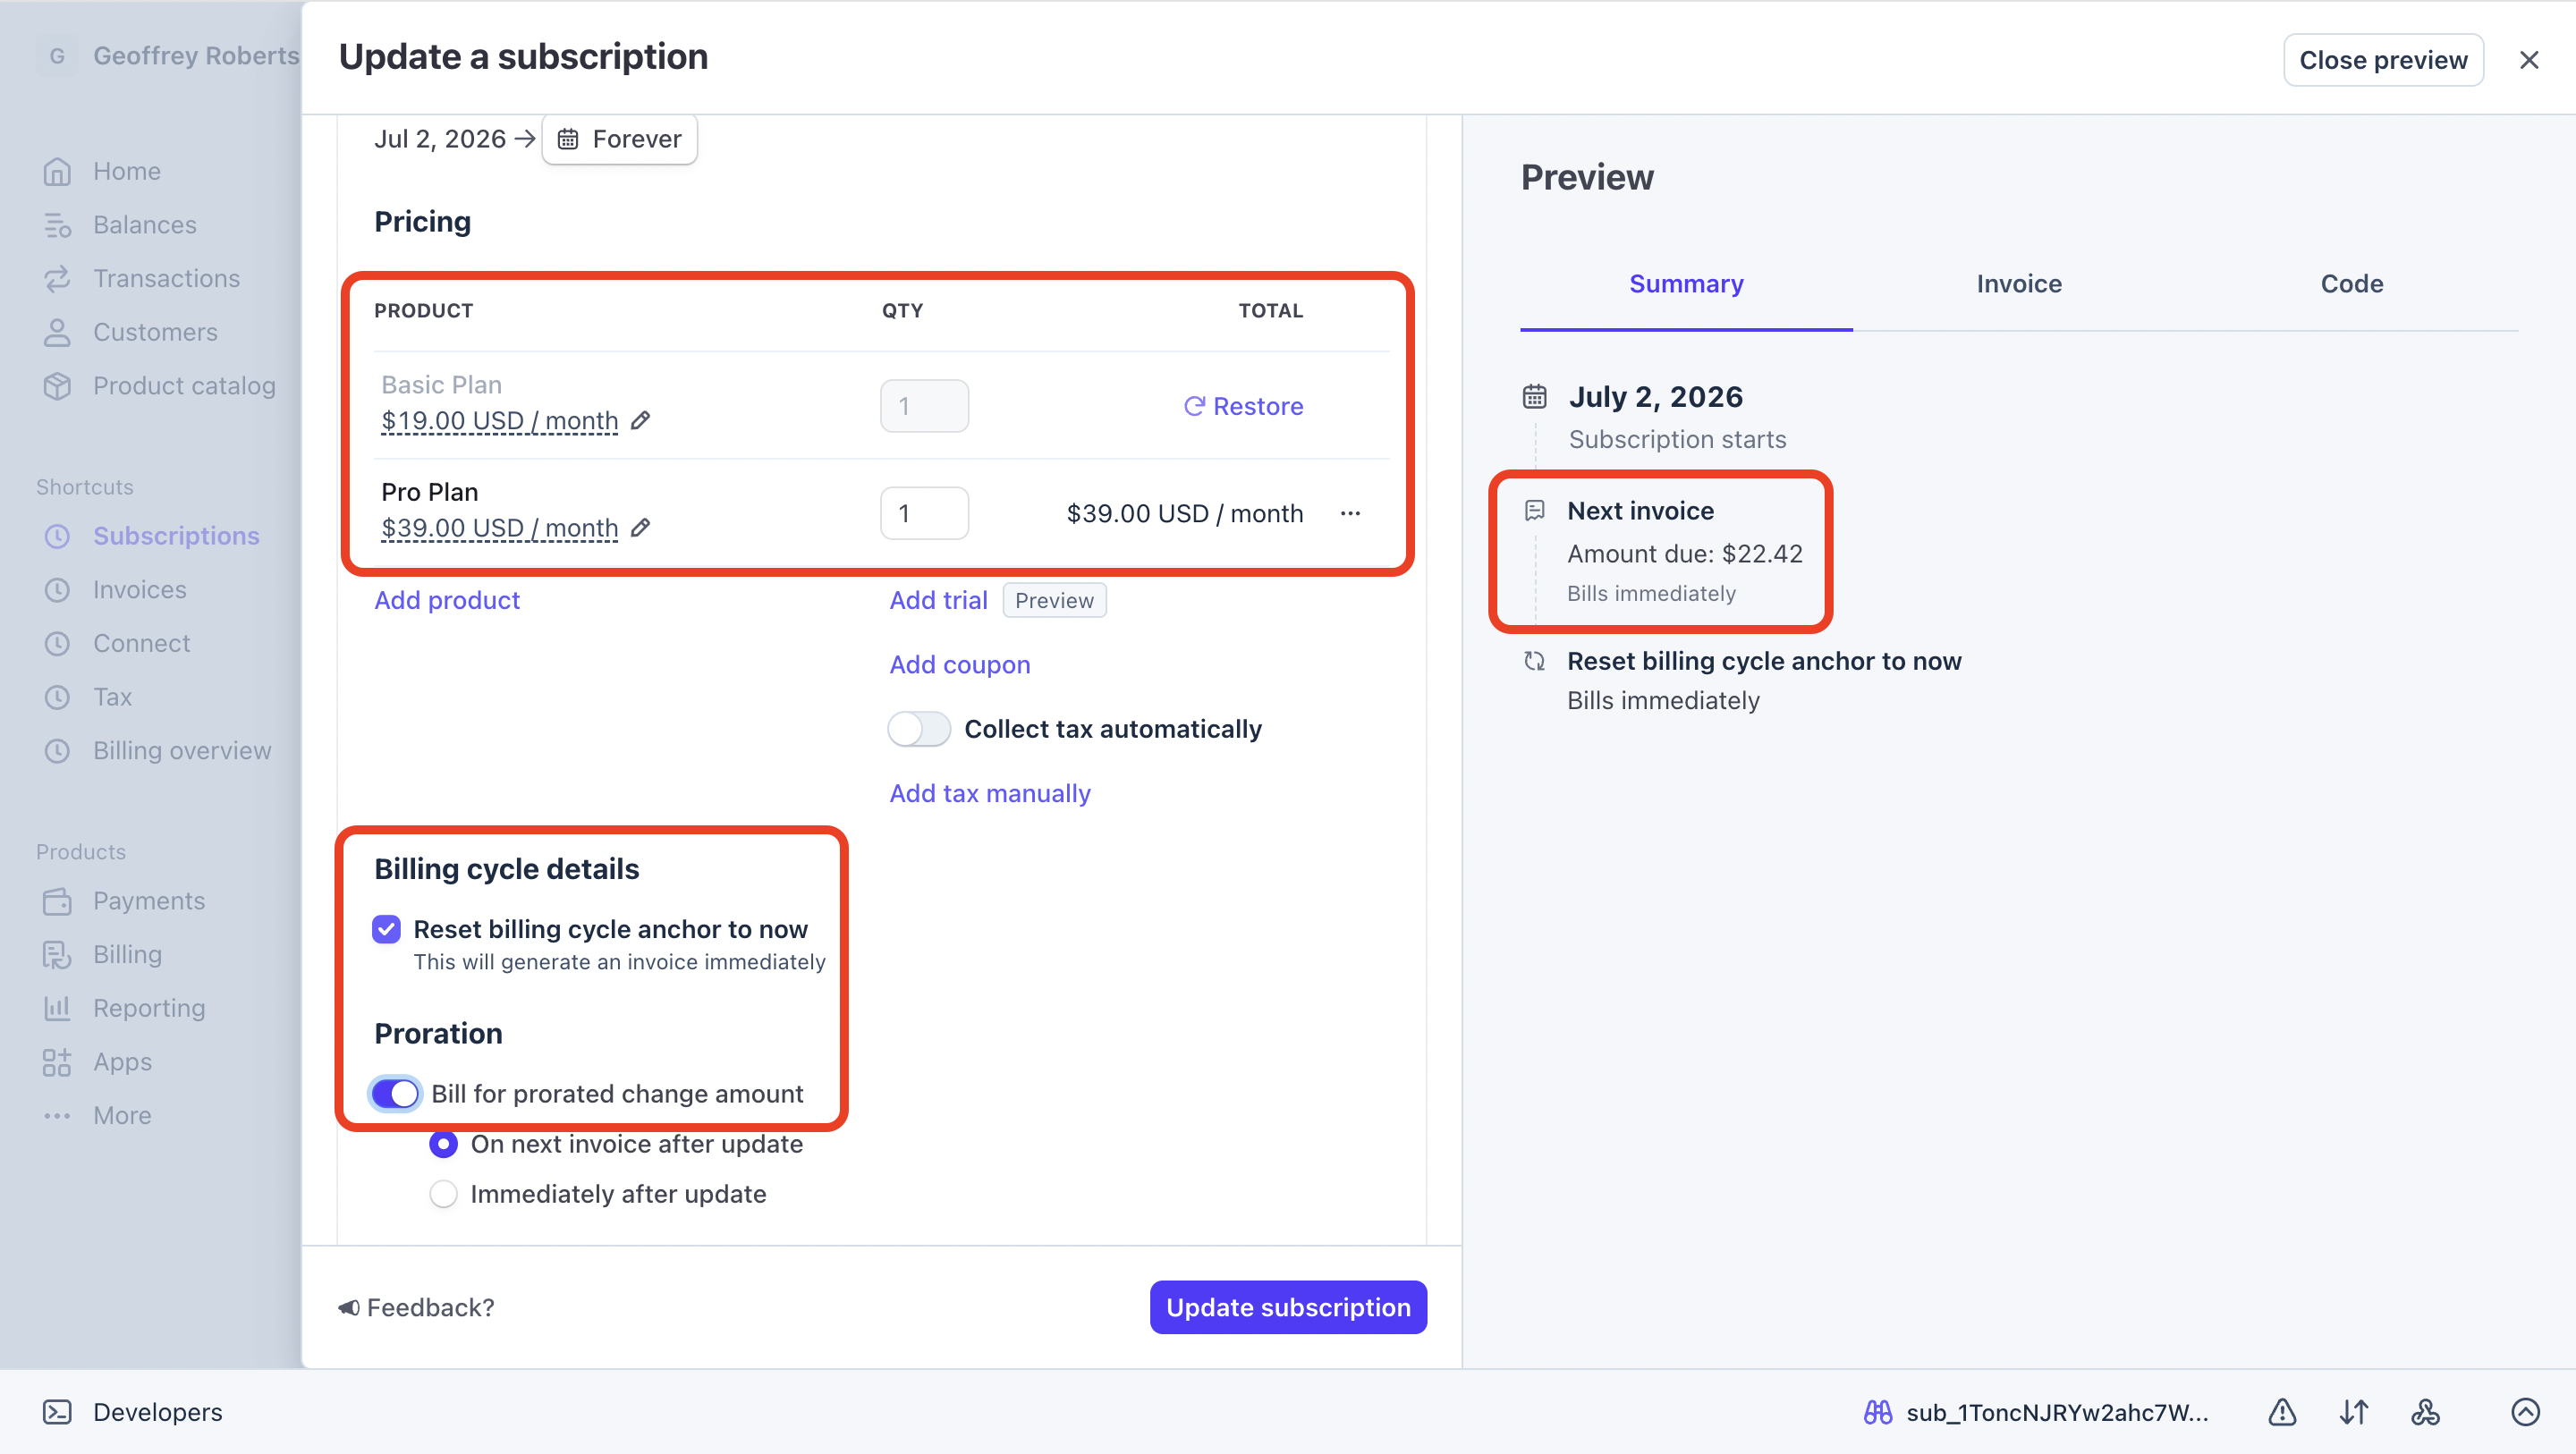
4. In the PREVIEW section of the page, you'll always see when the customer will be next invoiced and the amount due. You can rely on this to ensure that any subscription change is in line with your expectations prior to making the change. You can also click on INVOICE to see the actual invoice that the user will receive—this will also include a summary of any proration that was applied.
For any overview of the rest of the settings available on this page, refer to Stripe's documentation.
5. Once what you see in the PREVIEW section looks correct, click UPDATE SUBSCRIPTION.
Subscription changes as a customer (how a customer change's their own subscription)
Customers can make subscription changes themselves by logging into your site and interacting with the PRODUCTS section of Outseta's profile embed.
1. Click MANAGE SUBSCRIPTIONS. This will open Stripe's Customer Portal.
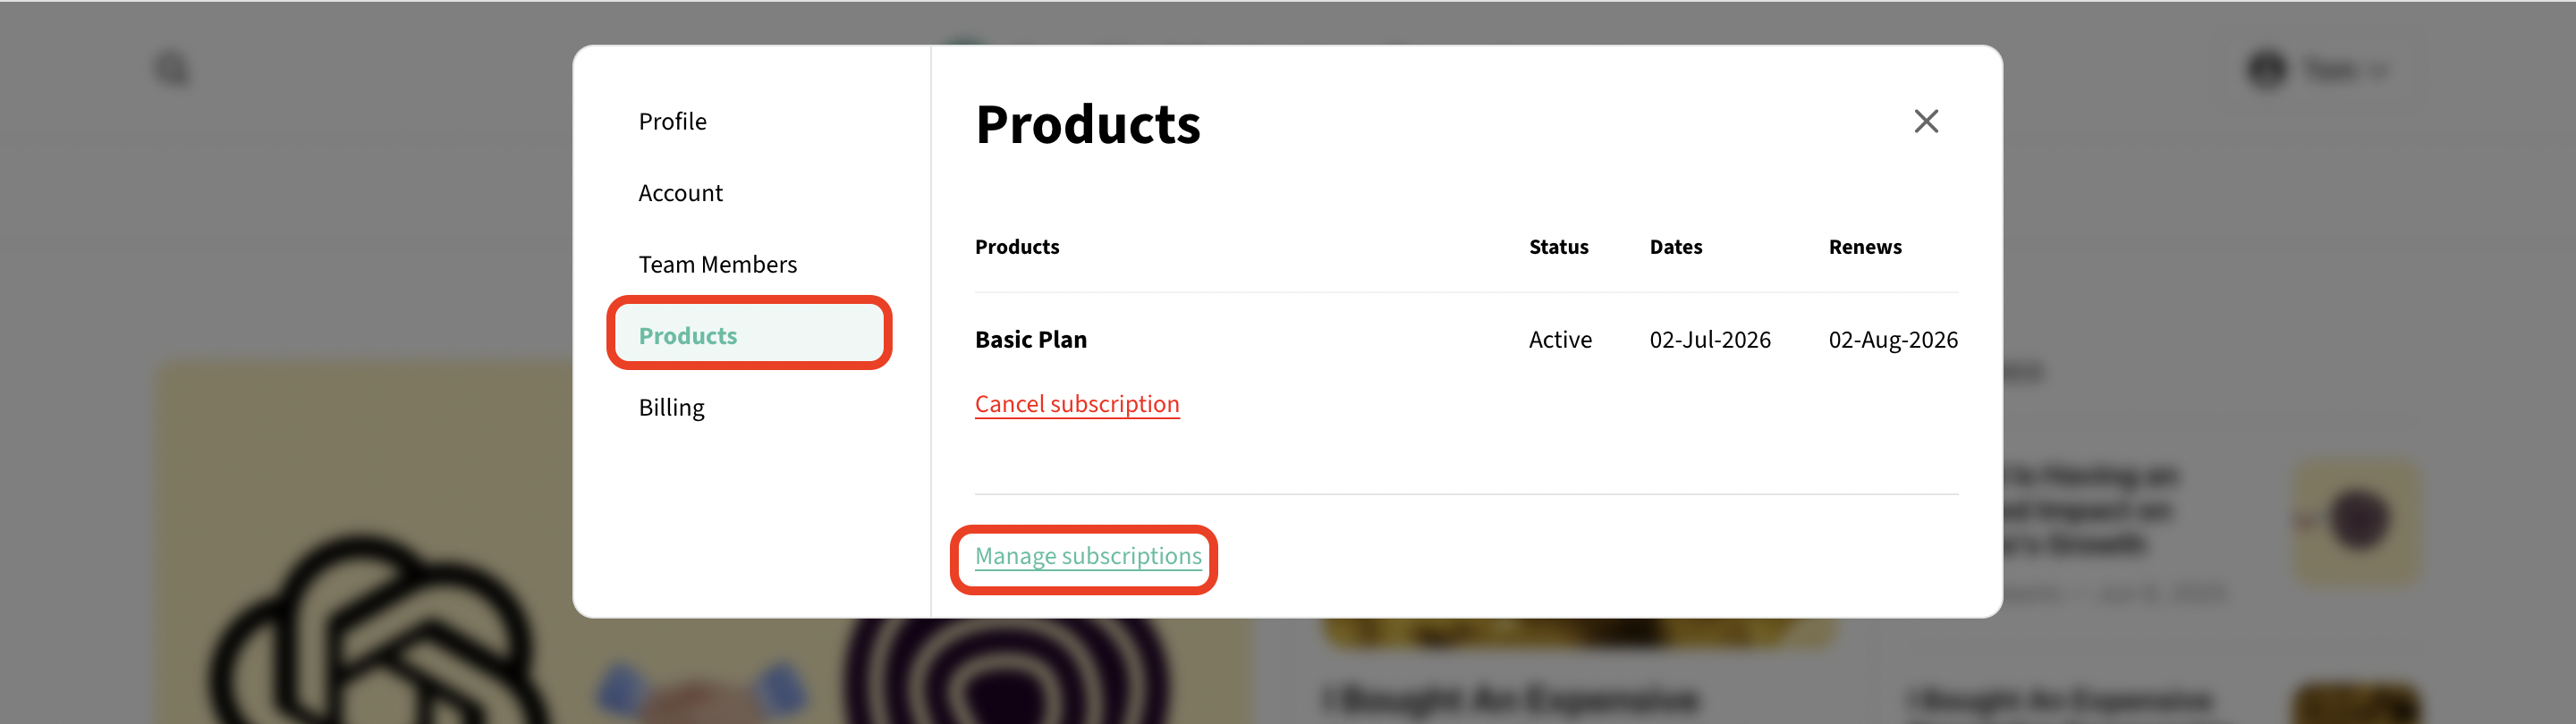
More information on Stripe's Customer Portal can be found here: Provide a customer portal to your customers
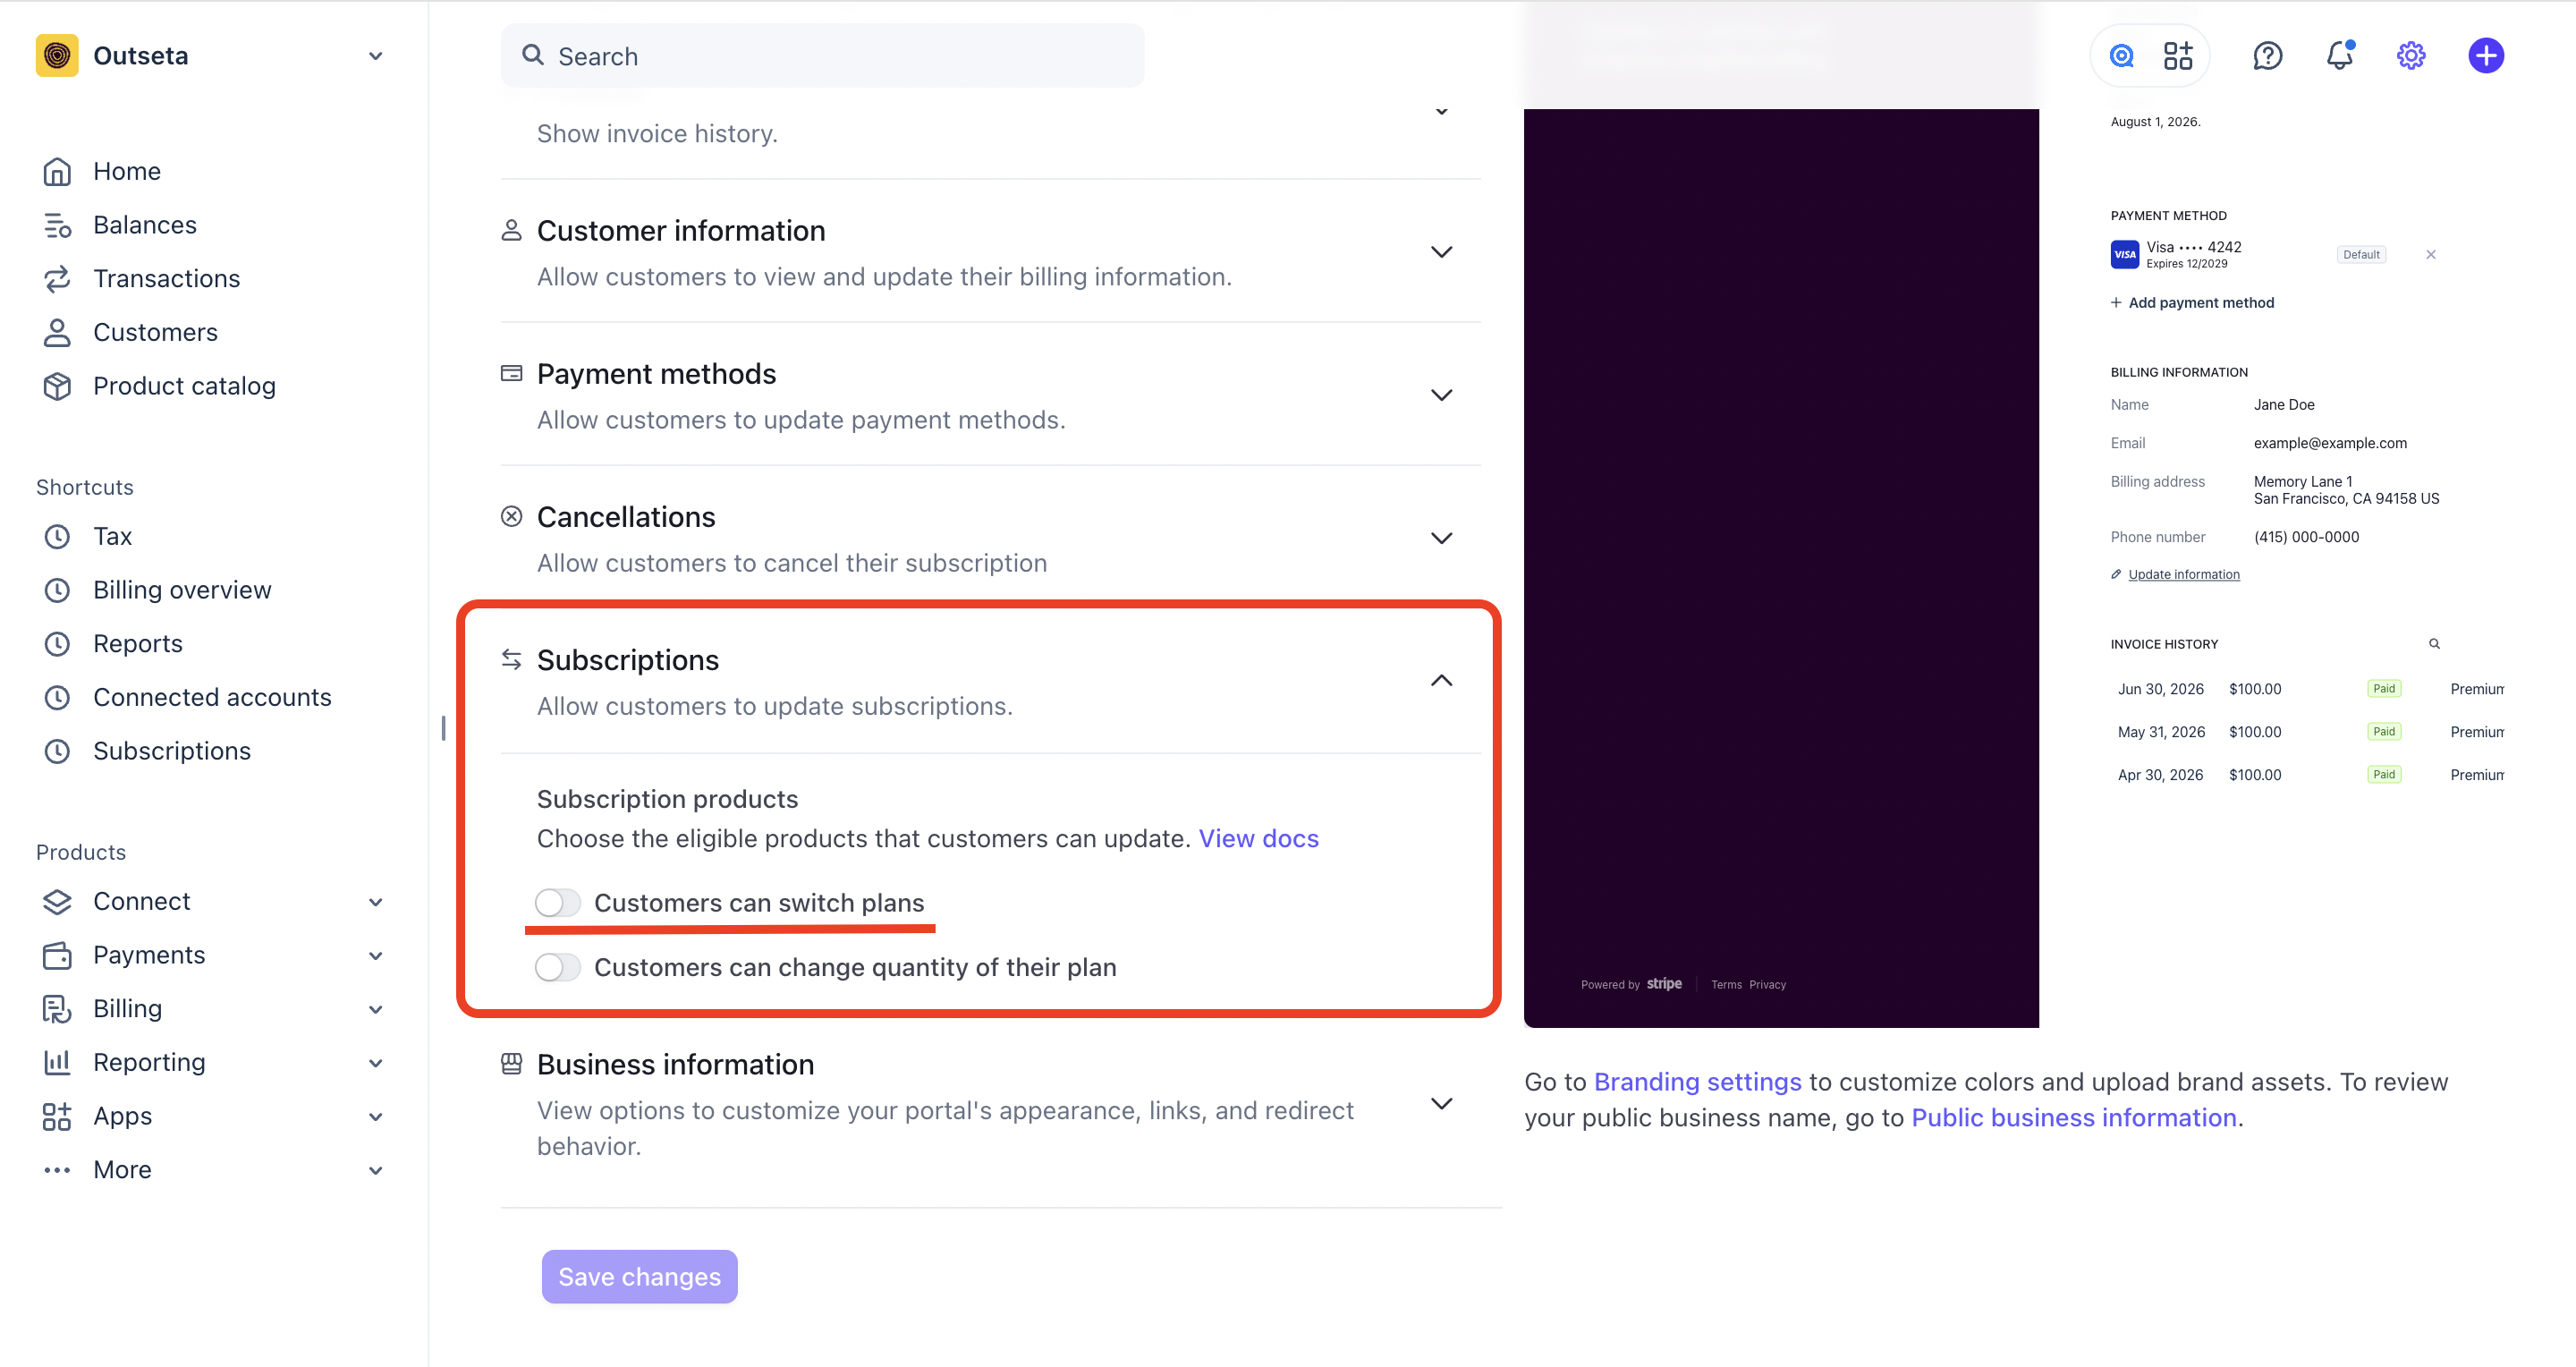
2. Within Stripe, navigate to SETTINGS > BILLING > CUSTOMER PORTAL. Note that on this page you need to enable the ability for customers to change their own subscription.
Upgrades
Upgrades will typically occur immediately and will be automatically prorated. Upgrading mid-cycle results in an immediate positive proration for the remaining time on the higher plan, alongside a negative proration (credit) for the unused time on the lower plan.
Downgrades
Upgrading mid-cycle results in an immediate positive proration for the remaining time on the higher plan, alongside a negative proration (credit) for the unused time on the lower plan.
- Immediate Downgrade (Prorated): The change takes effect immediately. Stripe calculates the unused time on the higher-tier plan, issues a prorated credit, and applies it against the cost of the new, lower-tier plan for the remainder of the billing cycle. You can manually choose to refund this negative proration balance or leave it as credit for future invoices.
- Scheduled Downgrade (At Period End): The customer retains their current features until the end of the current billing cycle. Once the cycle ends, the downgrade to the cheaper plan automatically takes effect. This approach avoids issuing partial credits and eliminates the complexity of mid-cycle prorations.
Proration logic
Stripe prorates subscription changes by calculating the time a customer spent on their old plan and the time they will spend on their new one. The system computes this down to the second, creating line items for unused time (a credit) and remaining time on the new plan (a charge).

Automated Upgrades/Downgrades
For workflows that require automation, bulk operations, or custom integrations, you can programmatically change subscription plans. This section covers two approaches: using Make (Integromat) for no-code automation and custom server-side code for maximum flexibility.
General Process
All automated subscription changes follow the same basic process:
Step 1: Find Current Subscription
First, retrieve the account's current subscription details using the Account ID (or email). This provides the subscription UID needed for the update and validates that the account has an active subscription.
Step 2: Change Subscription
Once you have the current subscription information, update it with the new plan details. This includes specifying the new plan UID, billing renewal term, and whether the change should take effect immediately.
Automated Upgrades/Downgrades with Make (Zapier Alternative)
Make provides a visual, no-code approach to automating subscription changes based on triggers from other applications in your workflow. This method is ideal for teams that want automation without custom development.
Prerequisites
- Outseta App configured in Make with your account credentials
- A trigger that provides the Account ID of the customer whose plan you want to change
- New Plan ID for the target subscription plan
This trigger could be a webhook, a manual trigger, or data from another service in your workflow.
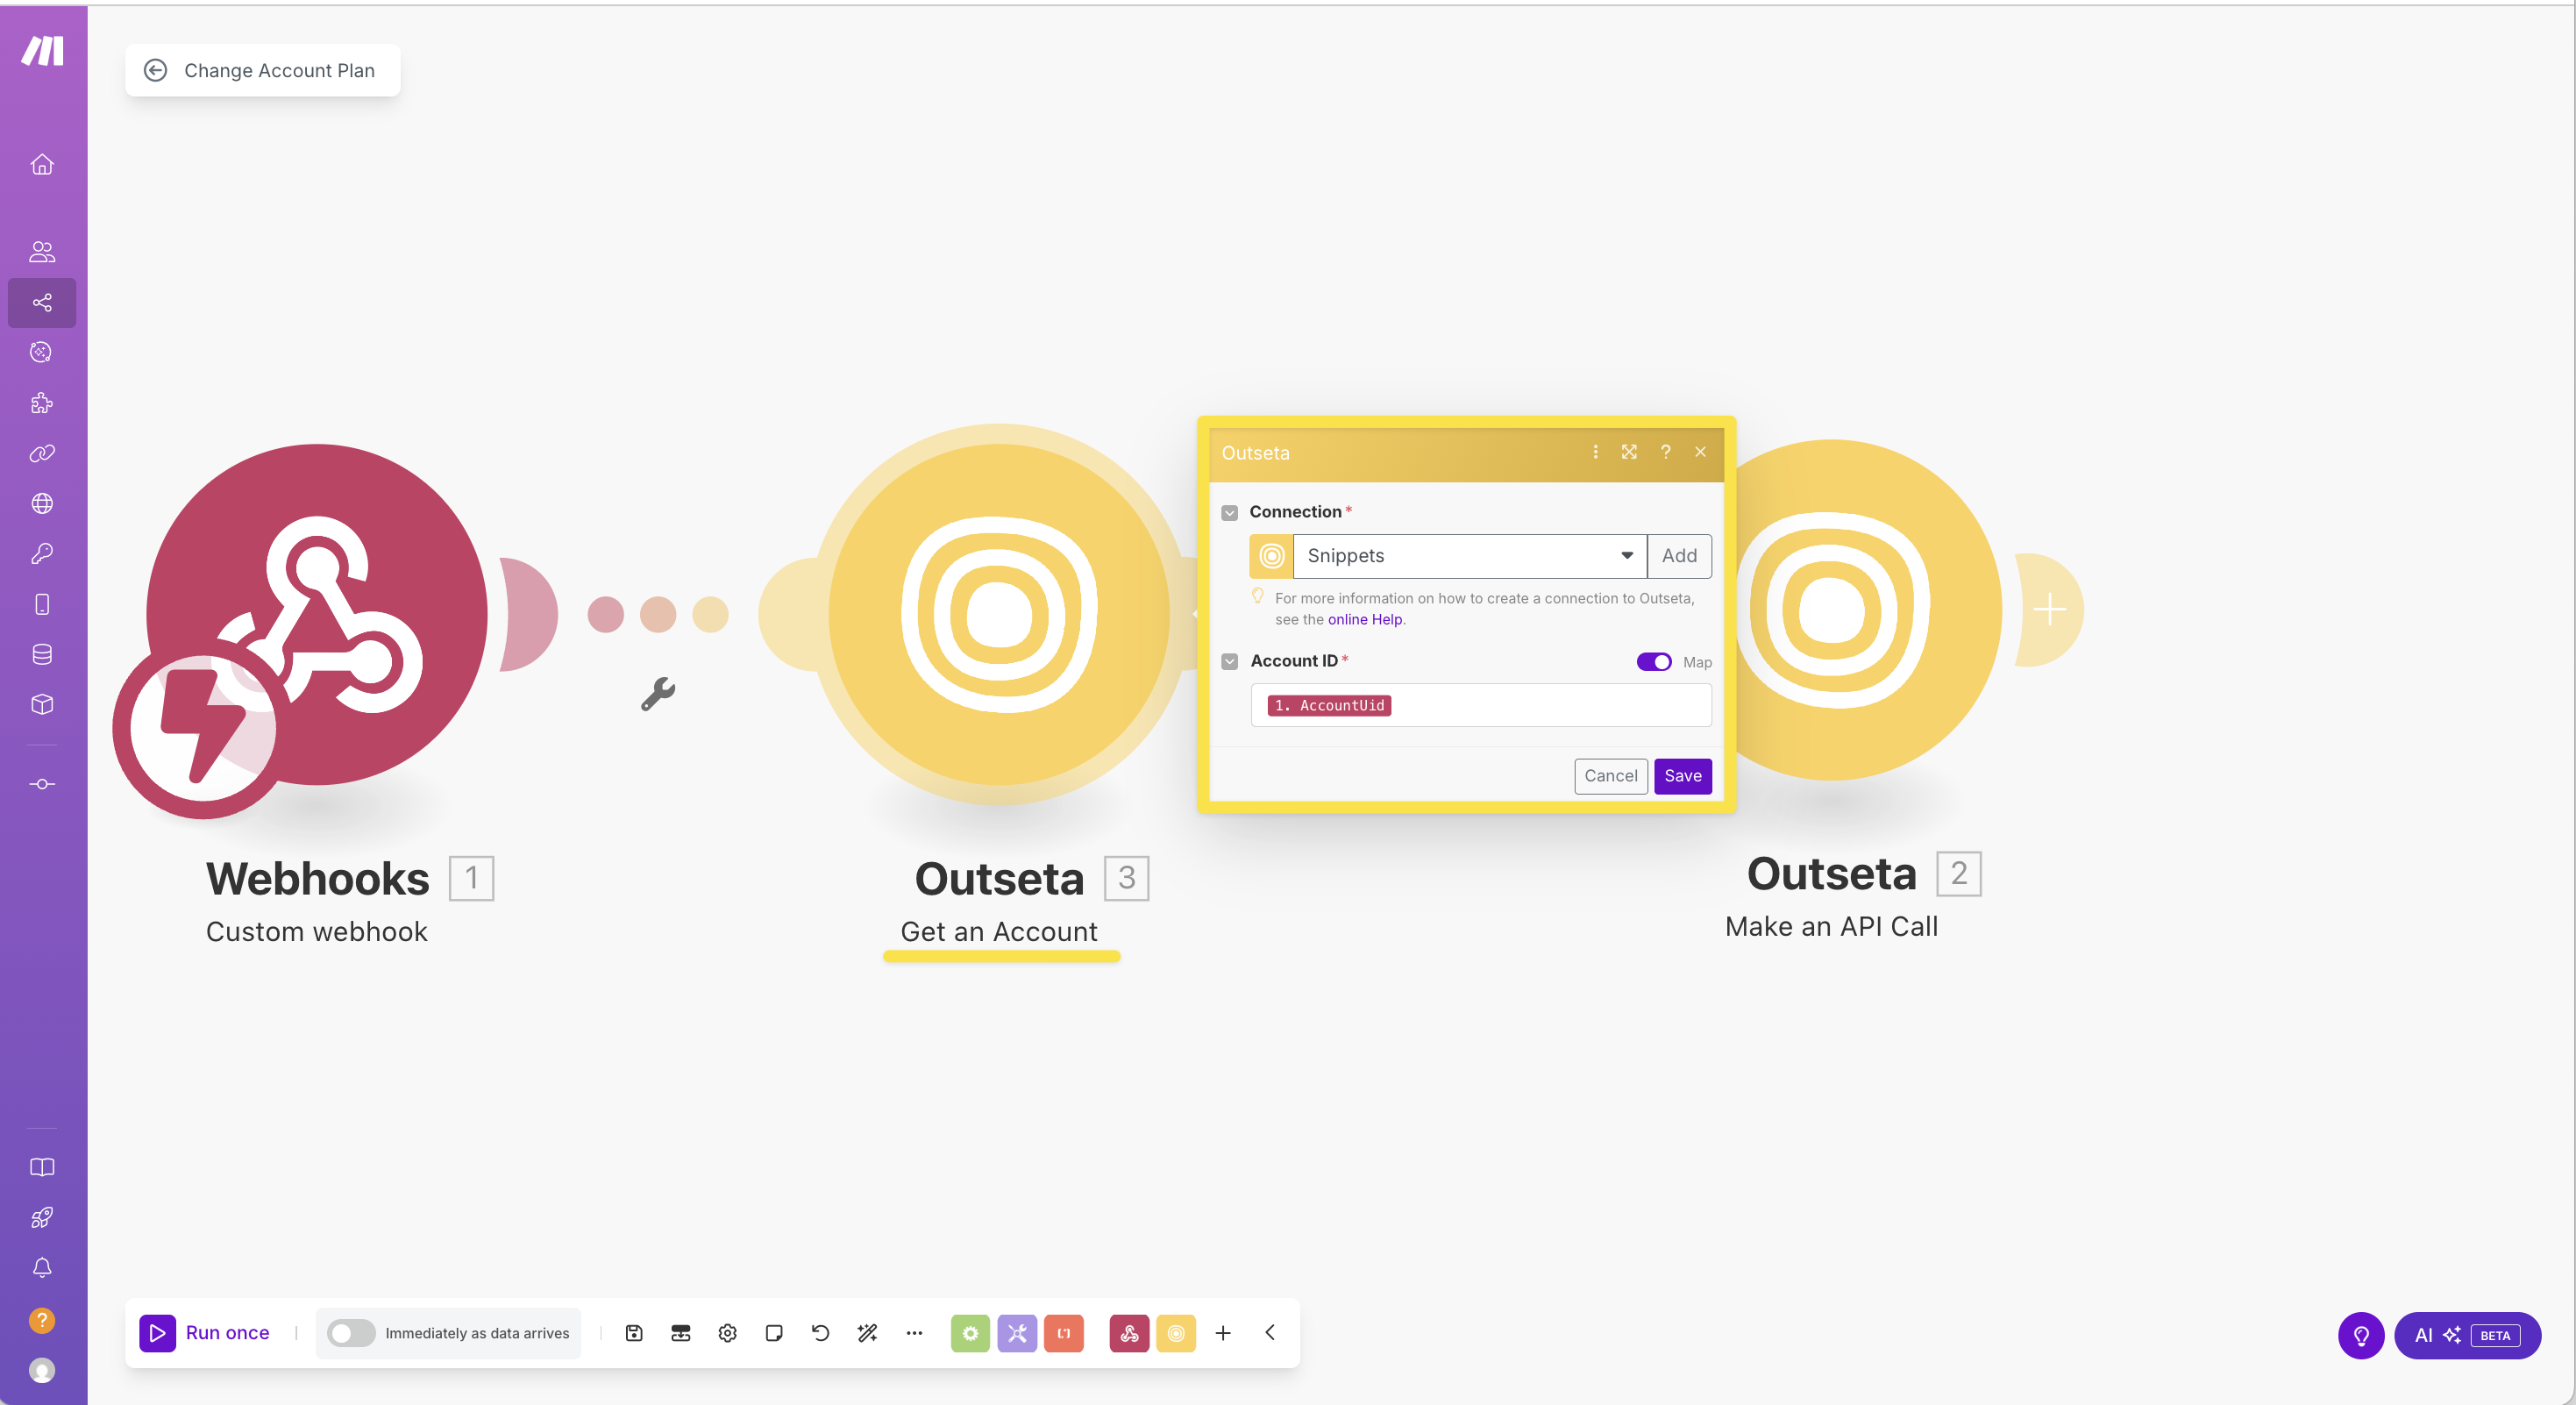
Step 1: Outseta > Get Account
- Add the "Get Account" Outseta module to your scenario
- Configure the connection with your Outseta credentials
- Set the Account ID (can be from trigger data or manually specified)
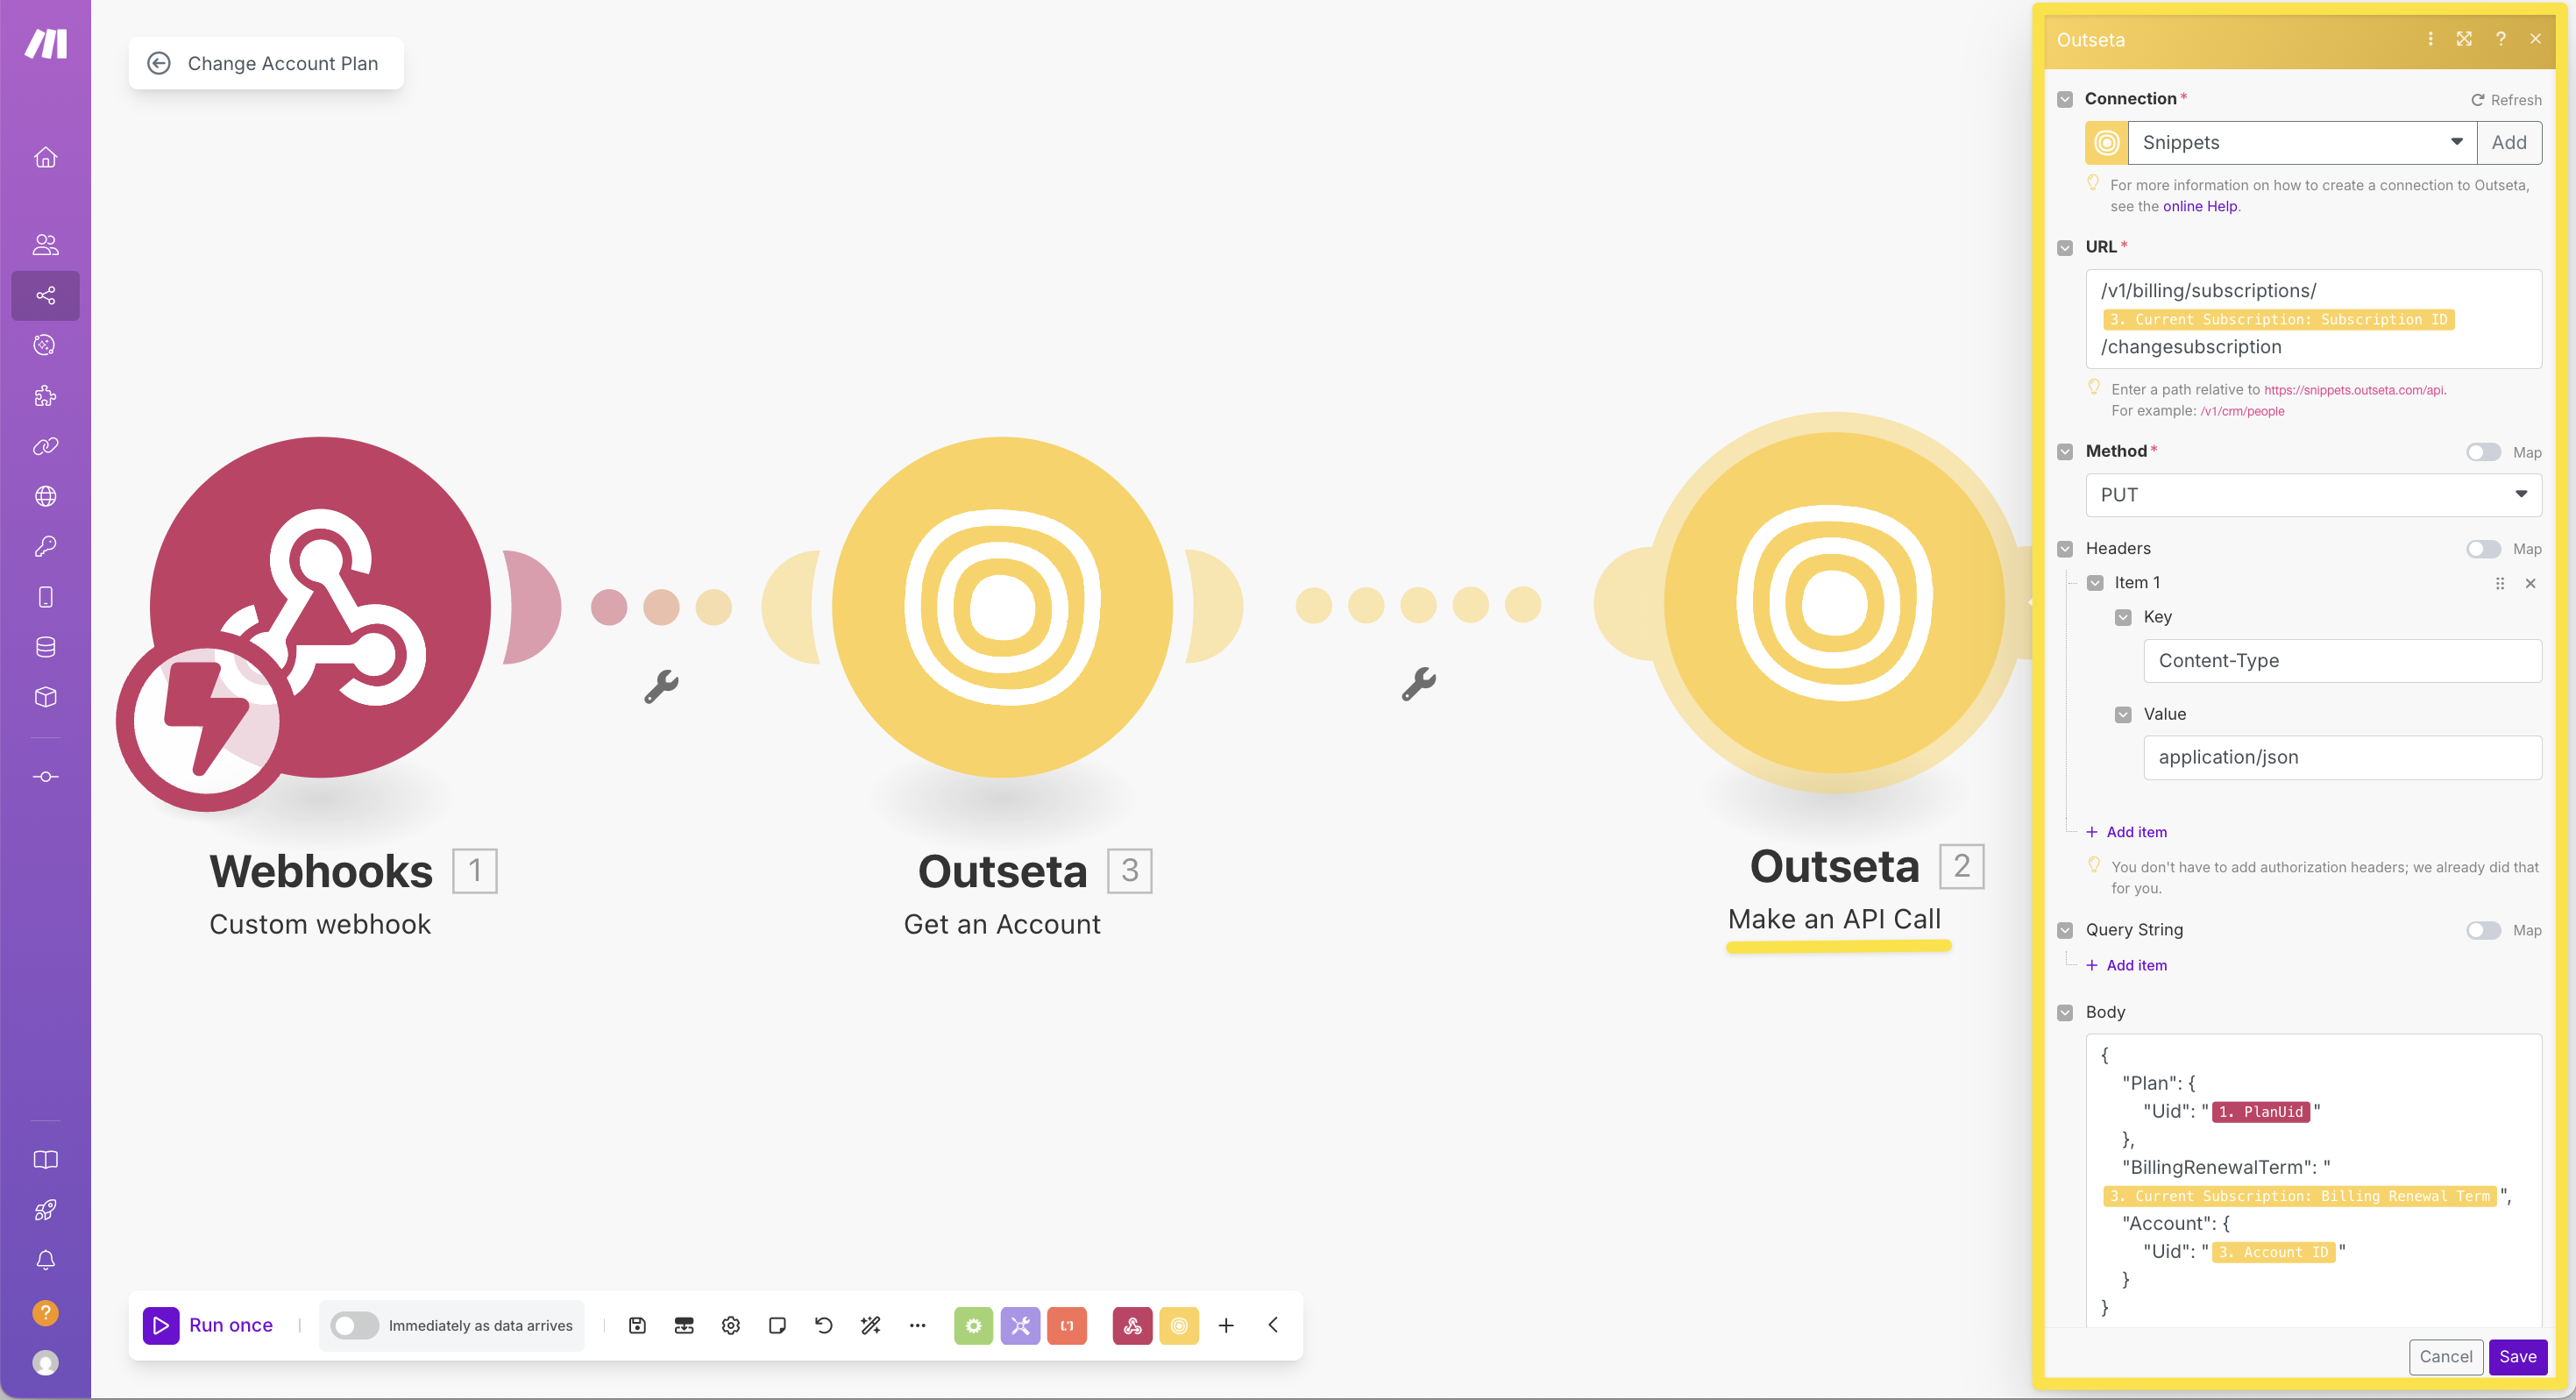
Step 2: Outseta > Make API Call
- Add the "Make an API Call" module from the Outseta App
- Set the URL to:
/billing/subscriptions/{{3.CurrentSubscription.Uid}}/changesubscription - Configure method: PUT to update existing subscriptions
- Configure headers:
Content-Type: application/json - You may also add
startImmidatlyas a query param to control timing - Set up the body with subscription update data:
{
  "Account": { "Uid": "{{3.Uid}}" },
  "Plan": { "Uid": "{{1.PlanUid}}" },
  "BillingRenewalTerm": "{{3.CurrentSubscription.BillingRenewalTerm}}"
}
Automated Upgrades/Downgrades with Custom Code
For automated workflows, bulk operations, or custom integrations, you can programmatically change subscription plans using Outseta's REST API. This method requires server-side implementation, offering greater flexibility and automation capabilities.
Prerequisites
Before using the API, you'll need:
- API Key and Secret from Settings > Integrations > API Keys
- Account Uid of the customer
- Plan Uid of the target plan
- Server-side environment (Node.js, Python, etc.)
Server-Side Implementation
Below is a complete server-side function to change subscription plans. For a complete working demo with preview functionality, see the Change Plan Demo.
/**
 * Changes the subscription plan for an account in Outseta
 * @param {Object}  options - The options object
 * @param {string}  options.accountUid - The unique identifier for the account
 * @param {string}  options.newPlanUid - The unique identifier for the new plan to change to
 * @param {boolean} options.startImmediately=false - Whether the changes should start immediately
 * @returns {Promise<Object>} - The API response
 */
export async function changePlan({
  accountUid,
  newPlanUid,
  startImmediately = false,
}) {
  // Step 1: Fetch the account with current subscription info
  const accountResponse = await fetch(
    `https://[your-subdomain].outseta.com/api/v1/crm/accounts/${accountUid}?fields=Uid,Name,CurrentSubscription.*`,
    {
      method: "GET",
      headers: {
        Authorization: `Outseta [your-api-key]:[your-secret-key]`,
        "Content-Type": "application/json",
      },
    }
  );

  const accountData = await accountResponse.json();
  if (!accountResponse.ok) {
    throw new Error(
      `/api/v1/crm/accounts/${accountUid}: [${accountResponse.status}] ${
        accountData.ErrorMessage || accountData.Message || ""
      }`
    );
  }

  console.debug(`✅ Account data fetched for: ${accountUid}`);

  // Step 2: Validate that the account has a current subscription
  if (!accountData.CurrentSubscription) {
    throw new Error(
      `Account ${accountUid} does not have an active subscription`
    );
  }

  const currentSubscription = accountData.CurrentSubscription;
  console.debug(`✅ Found current subscription: ${currentSubscription.Uid}`);

  // Step 3: Update the subscription with the new plan
  const subscriptionUpdatePayload = {
    Plan: {
      Uid: newPlanUid,
    },
    BillingRenewalTerm: currentSubscription.BillingRenewalTerm,
    Account: {
      Uid: accountUid,
    },
  };

  const subscriptionResponse = await fetch(
    `https://[your-subdomain].outseta.com/api/v1/billing/subscriptions/${currentSubscription.Uid}/changeSubscription?startImmediately=${startImmediately}`,
    {
      method: "PUT",
      headers: {
        Authorization: `Outseta [your-api-key]:[your-secret-key]`,
        "Content-Type": "application/json",
      },
      body: JSON.stringify(subscriptionUpdatePayload),
    }
  );

  const subscriptionData = await subscriptionResponse.json();
  const endpoint = `/api/v1/billing/subscriptions/${currentSubscription.Uid}/changeSubscription`;
  console.debug(`\n--- ${endpoint} response ---`);
  console.debug(JSON.stringify(subscriptionData, null, 2));
  console.debug("------------------------------\n");

  if (!subscriptionResponse.ok) {
    throw new Error(
      `${endpoint}: [${subscriptionResponse.status}] ${
        subscriptionData.ErrorMessage || subscriptionData.Message || ""
      }`
    );
  }

  return subscriptionData;
}
Usage Example
Here's how to use the function to change a customer's plan:
// Example usage
try {
  const result = await changePlan({
    accountUid: "customer-account-uid",
    newPlanUid: "new-plan-uid",
    startImmediately: false // Set to true for immediate downgrades
  });

  console.log("Plan changed successfully:", result);
} catch (error) {
  console.error("Failed to change plan:", error.message);
}